The Ultimate Guide to Finding and Conquering Every Shrine in Zelda: Tears of the Kingdom
Discover all 152 Shrines in Zelda: Tears of the Kingdom with ease using our comprehensive shrine maps Our guides will also help you complete each one with step-by-step instructions
Quick Links
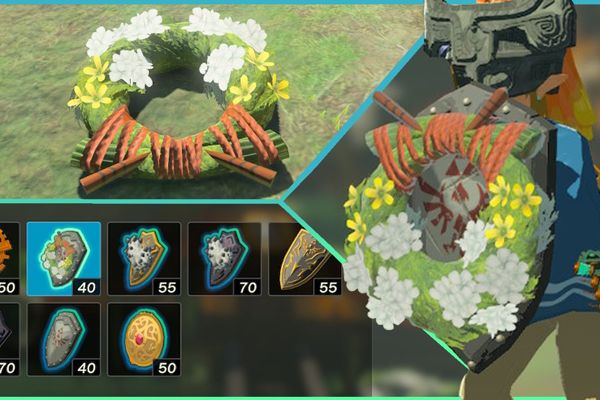
The Challenge of Finding and Conquering Every Shrine in The Legend of Zelda: Tears of the KingdomThe vast open world of The Legend of Zelda: Tears of the Kingdom offers players a plethora of activities to engage in, including collecting all 1,000 Korok Seeds and completing numerous side quests. However, one of the most daunting challenges lies in discovering and conquering all 152 Shrines of Light that are scattered throughout the Kingdom of Hyrule and the skies above it. Each successful conquest of these Shrines rewards players with a valuable Light of Blessing, making the journey well worth the effort.
As well as providing a fun experience, the shrines in The Legend of Zelda: Tears of the Kingdom serve a crucial purpose in enhancing Link's abilities. By exchanging the Lights of Blessing found within these shrines, players can increase Link's Heart Containers or Stamina Vessels. To have any chance of defeating Ganondorf, players will need to seek out as many shrines as possible, or risk being underpowered for the final battle.
Every Shrine in Hebra

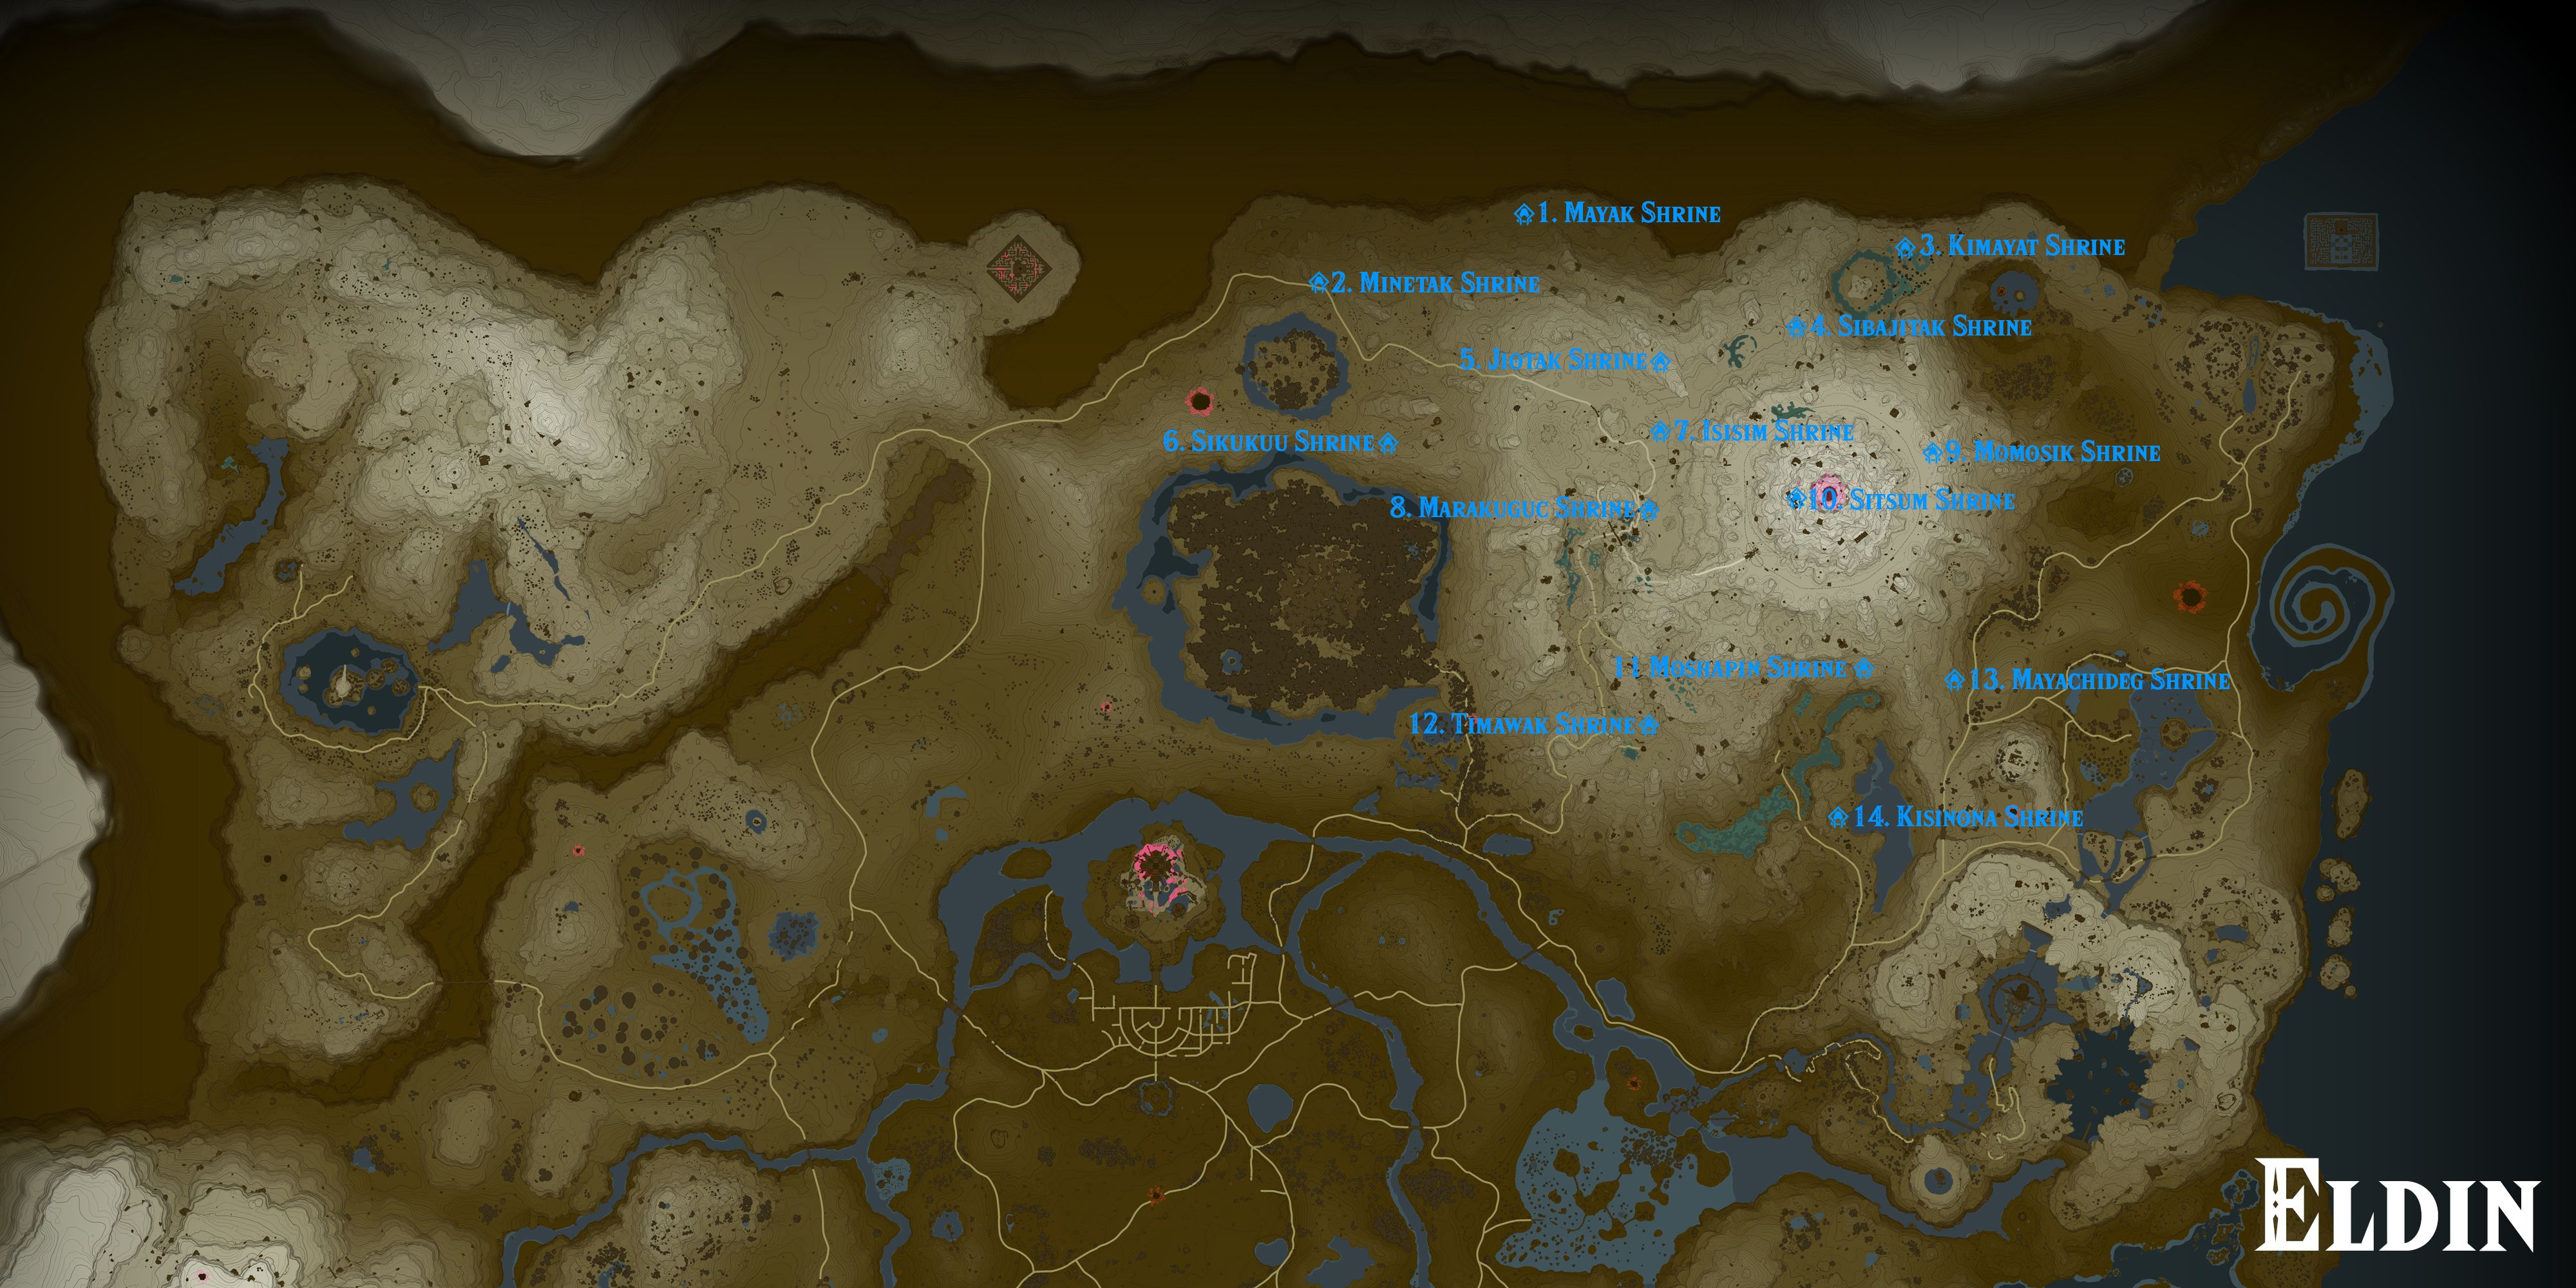
Every Shrine in Eldin
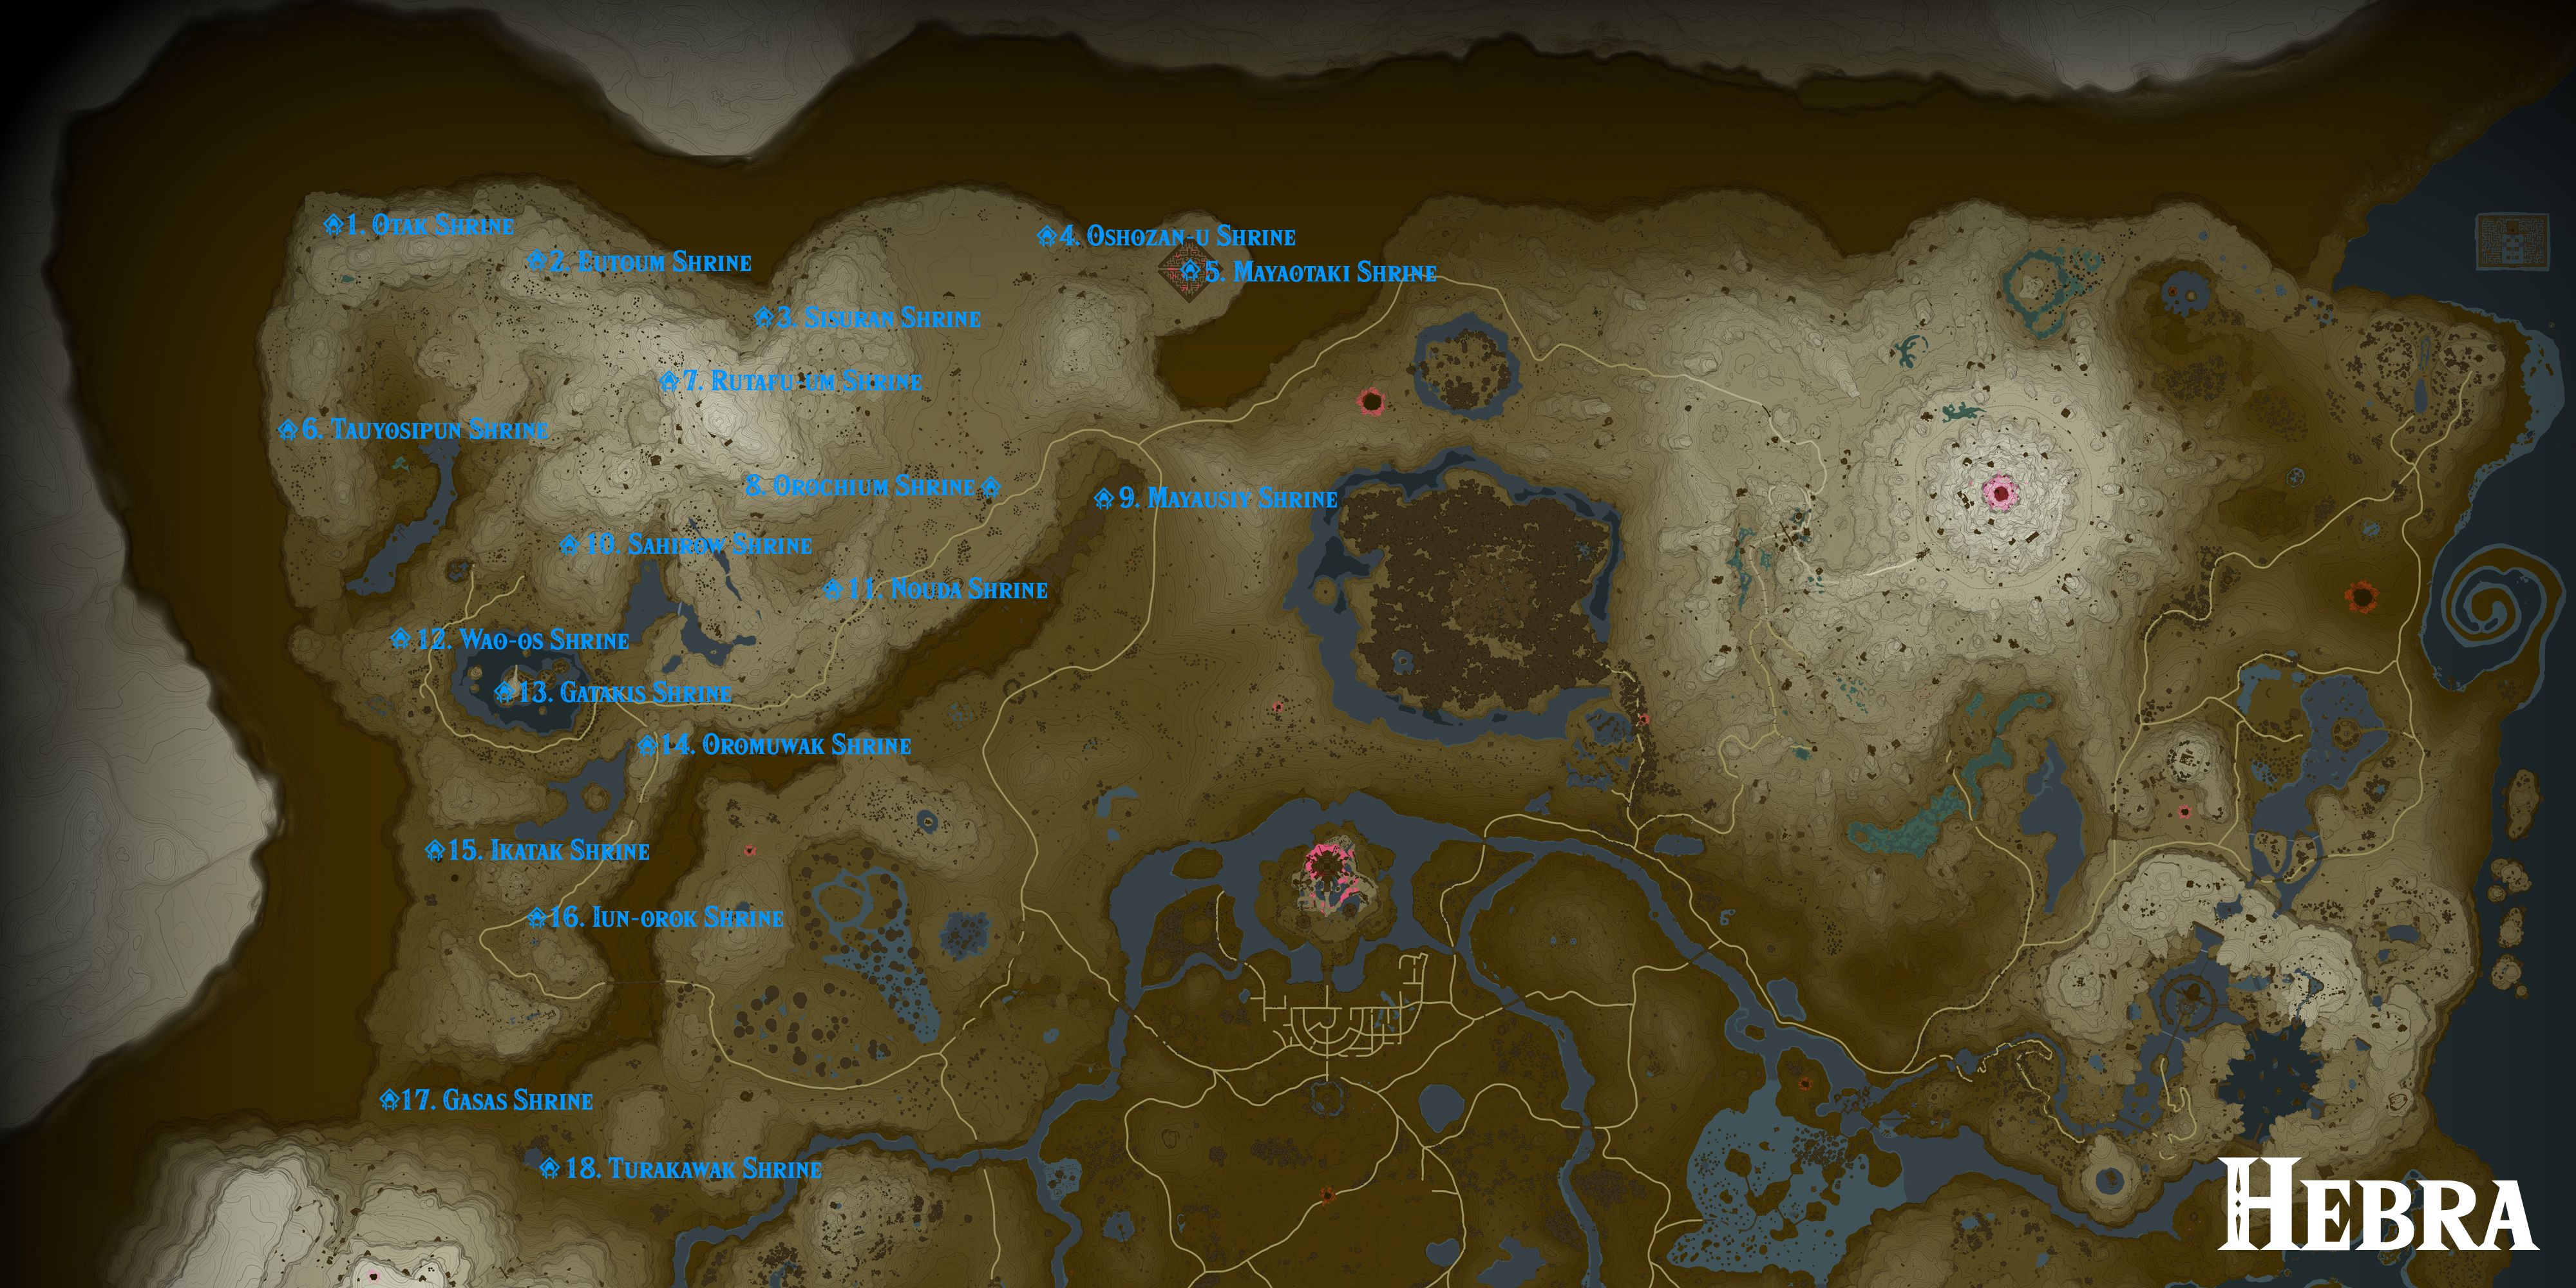
Located in the Hebra Mountains, the Otak Shrine offers a challenging Proving Grounds: Traps test for those seeking to prove their skills. Meanwhile, the Eutoum Shrine nearby presents the Proving Grounds: Infiltration challenge. In the North Hebra Mountains region, the Sisuran Shrine houses the Crystal as its main attraction, while the Oshozan-u Shrine requires players to use the Mallet Smash. Other shrines in the area include the Mayaotaki Shrine, which rewards players with Rauru's Blessing, the Tauyosipun Shrine, which challenges players to choose between moving Forward or Backward, and the Rutafu-um Shrine, located in the Northwest Hebra Cave Crystal. In the Tabantha Frontier, players can find the Mayausiy Shrine, Sahirow Shrine, Nouda Shrine, Wao-os Shrine, Gatakis Shrine, Oromuwak Shrine, Ikatak Shrine, Iun-orok Shrine, Gasas Shrine, and Turakawak Shrine, each with their own unique challenges and rewards.
Every Shrine in Akkala
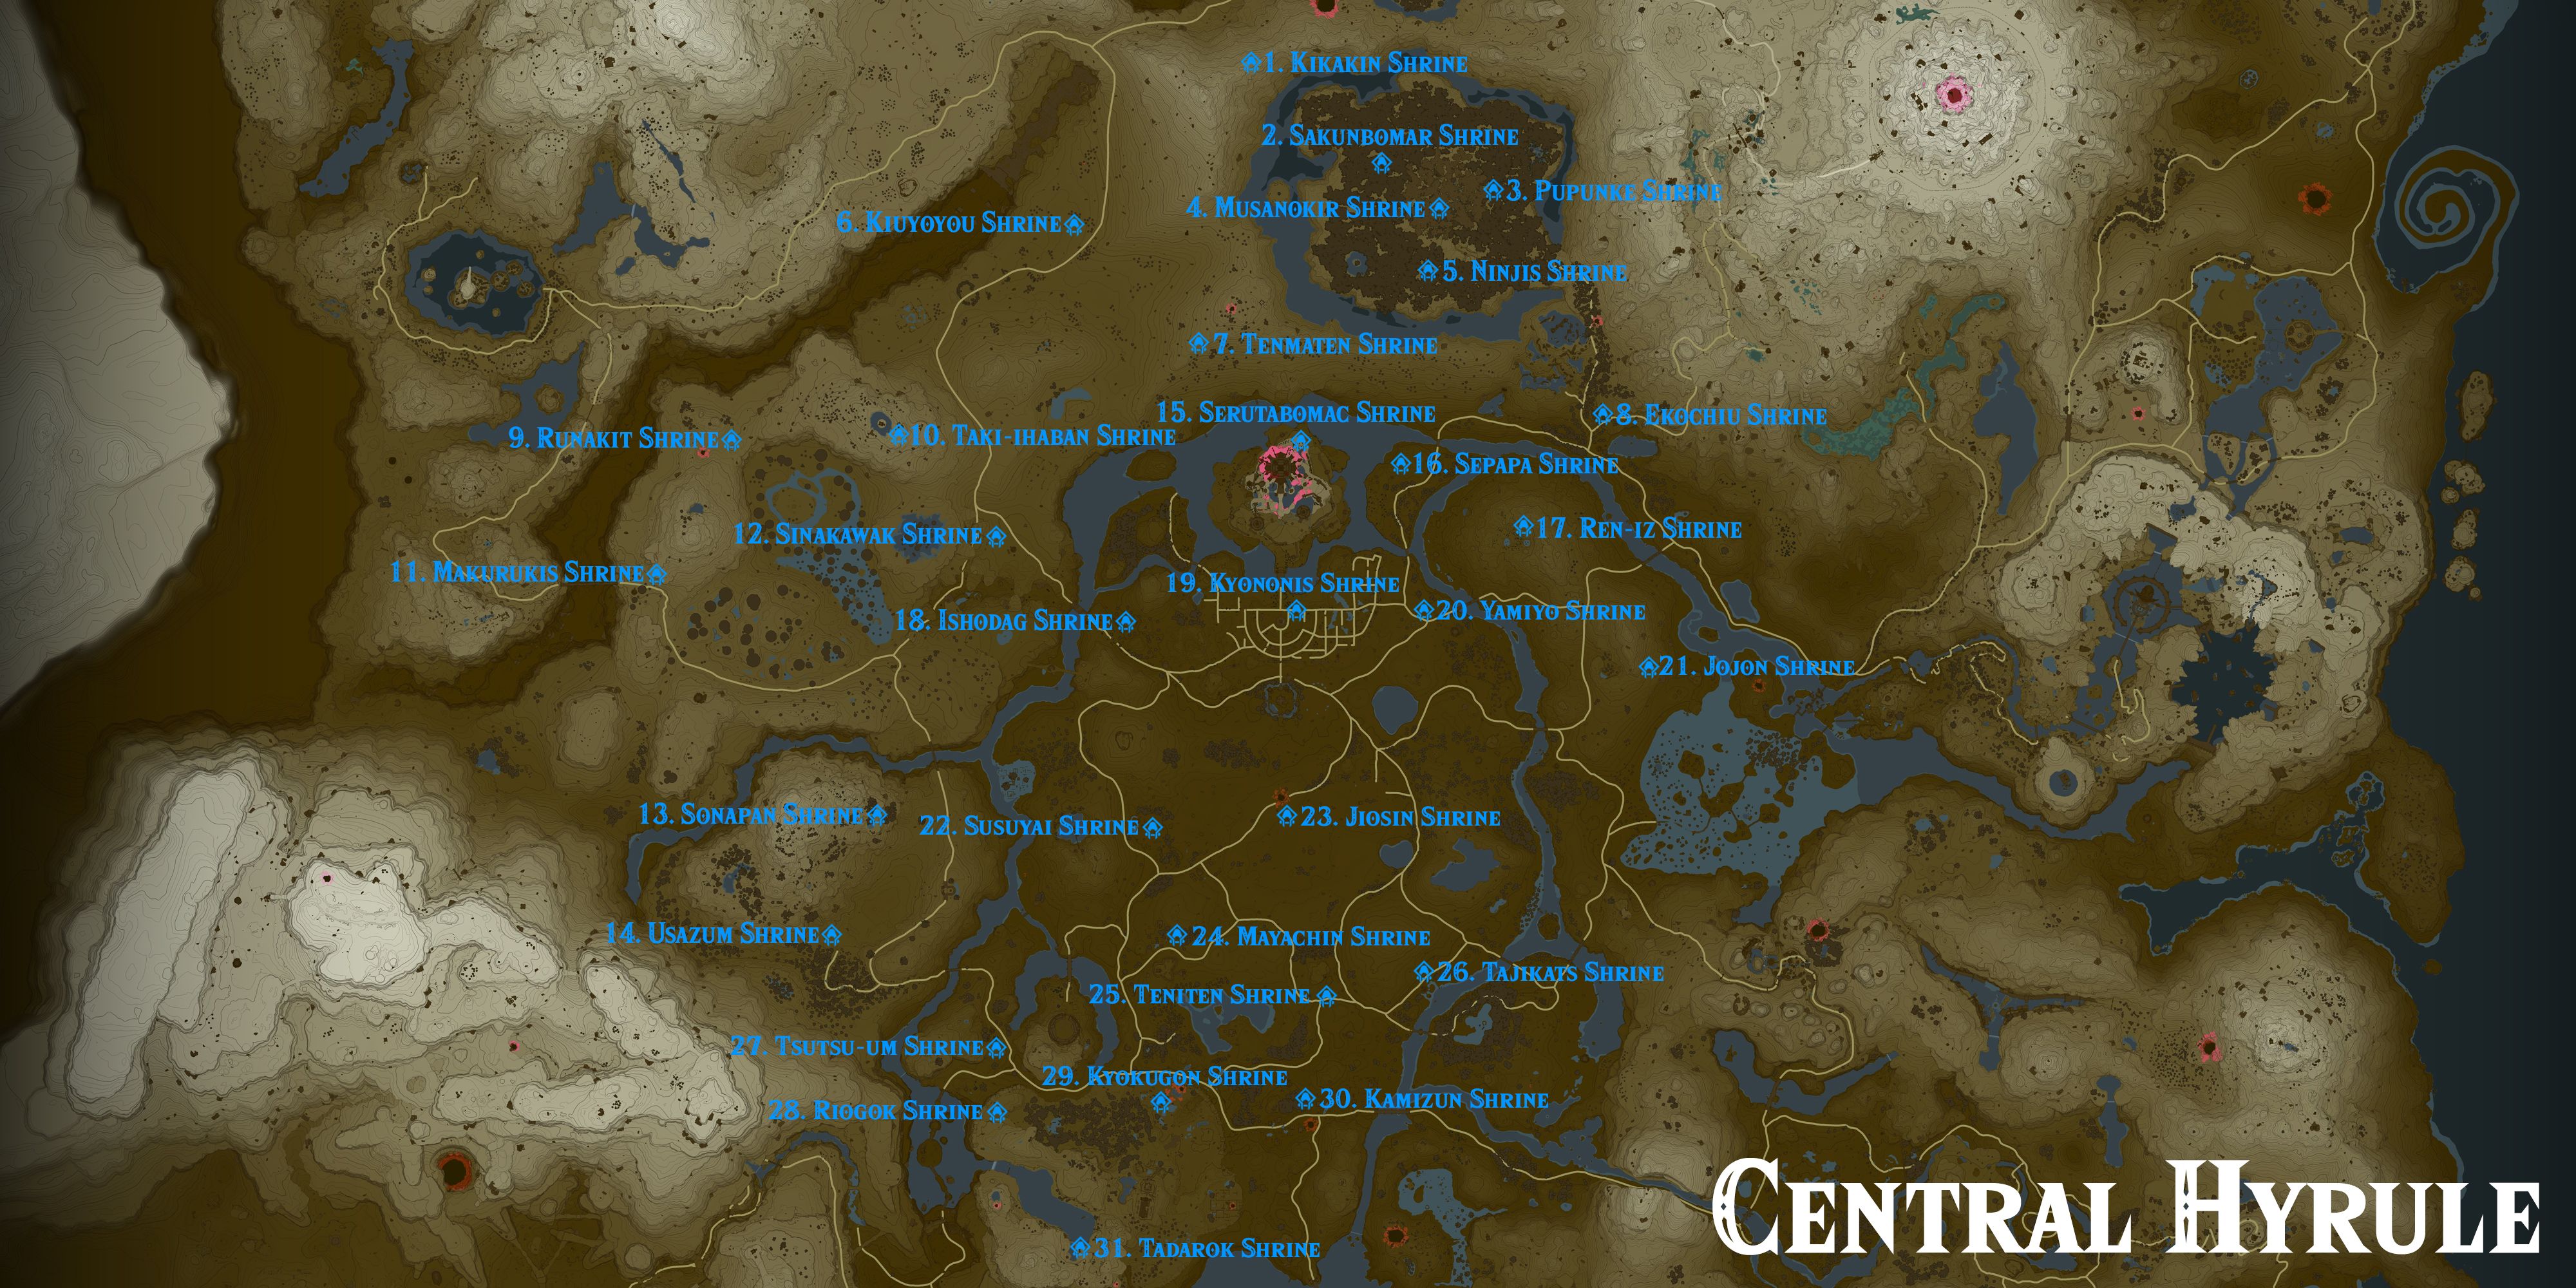
Every Shrine in Central Hyrule
In the Eldin Canyon, adventurers can find the challenging Mayak Shrine where they must use their timing skills to catch falling balls. For those seeking Rauru's Blessing, the Minetak Shrine and Jiotak Shrine both offer this reward. The Kimayat Shrine presents a test of strength with its Proving Grounds: Smash, while the Sibajitak Shrine challenges players to align mirrors correctly. The Sikukuu Shrine, located in the Eldin Mountains, requires players to navigate through spinning gears. Adventurers can also find the Isisim Shrine, where they must complete the Proving Grounds in reverse, and the Marakuguc Shrine, where they must use wheels to solve puzzles. The Momosik Shrine, located in the Death Caldera Cave Crystal, offers an additional challenge. For those seeking a controlling device, the Sitsum Shrine in Death Mountain is the place to go. The Moshapin Shrine can be found in the Lake Intenoch Cave Crystal, where players must solve puzzles to reach the shrine. The Timawak Shrine presents a unique challenge where players must navigate against the flow of a river. Lastly, the Mayachideg Shrine challenges players to hunt down targets within a time limit, and the Kisinona Shrine requires the use of wind power to solve puzzles.
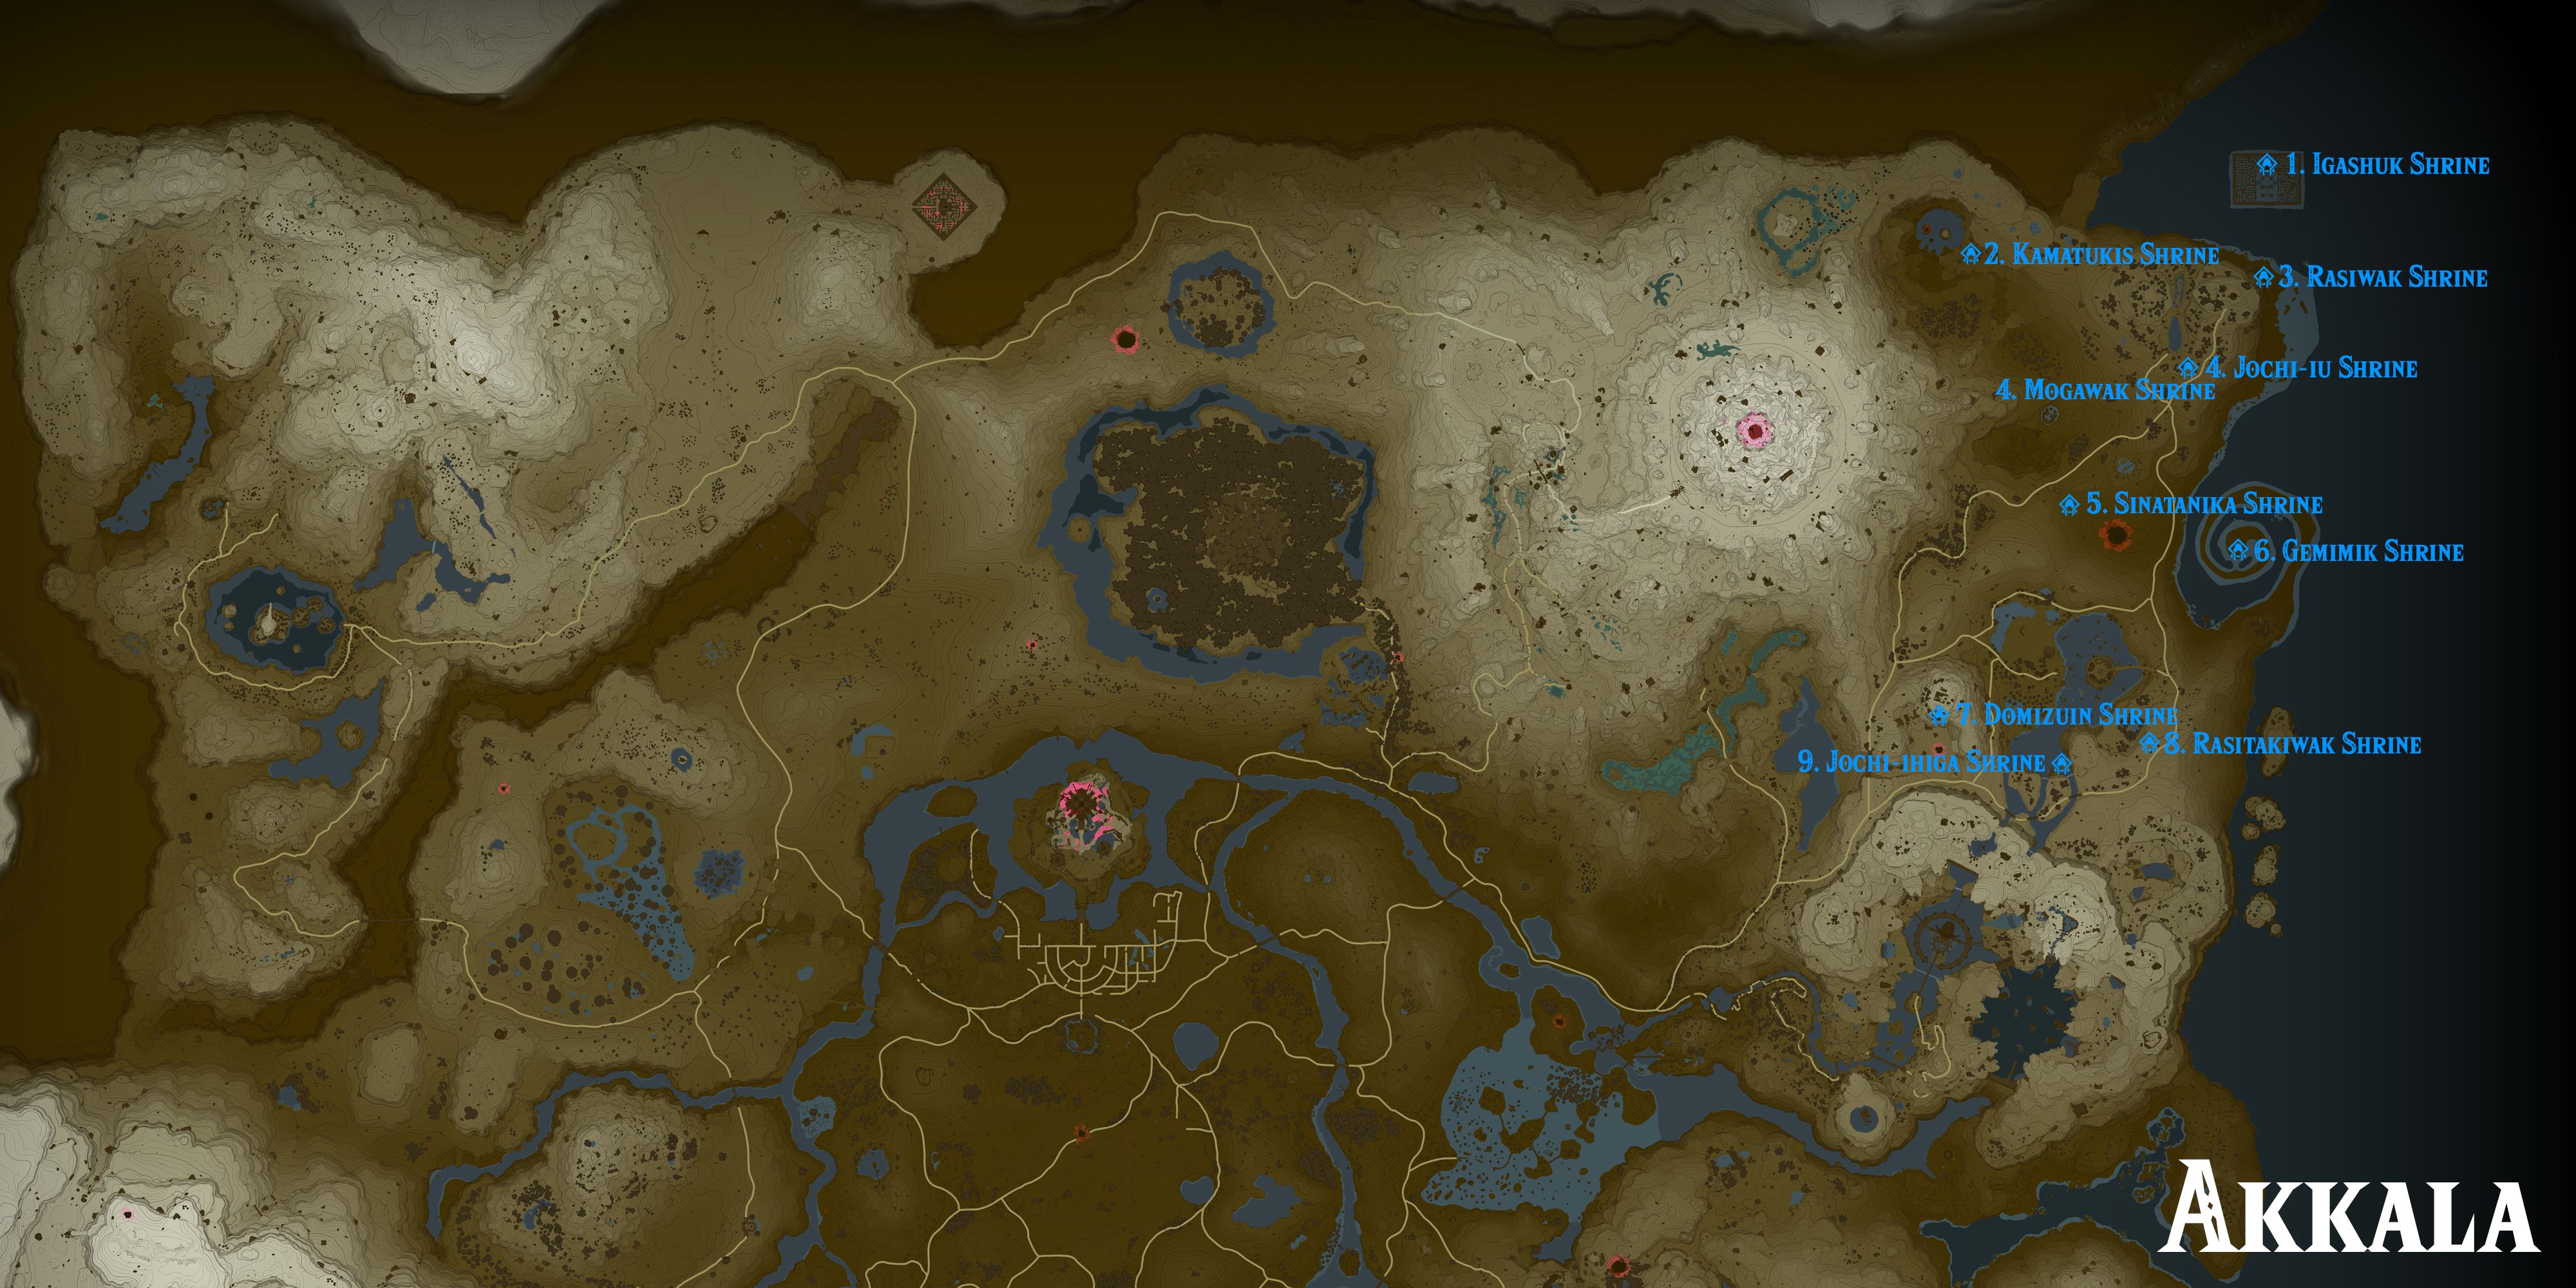
Explore the wonders of Akkala Sea and Deep Akkala by visiting the Igashuk Shrine (Rauru's Blessing), Kamatukis Shrine (A Precise Strike), Rasiwak Shrine (Flotational Brilliance), and Jochi-iu Shrine (Courage to Pluck). For combat training, head to the Sinatanika Shrine (Combat Training: Sneakstrike) in Akkala Highlands. Take on the challenges of the Gemimik Shrine (Turbine Power), Domizuin Shrine (A Prone Pathway), Rasitakiwak Shrine (Proving Grounds: Vehicles), and Jochi-ihiga Shrine (Rock for Sale) in Akkala Highlands to test your skills and gain valuable rewards. Don't miss out on these exciting opportunities for adventure and discovery.
Every Shrine in Lanayru
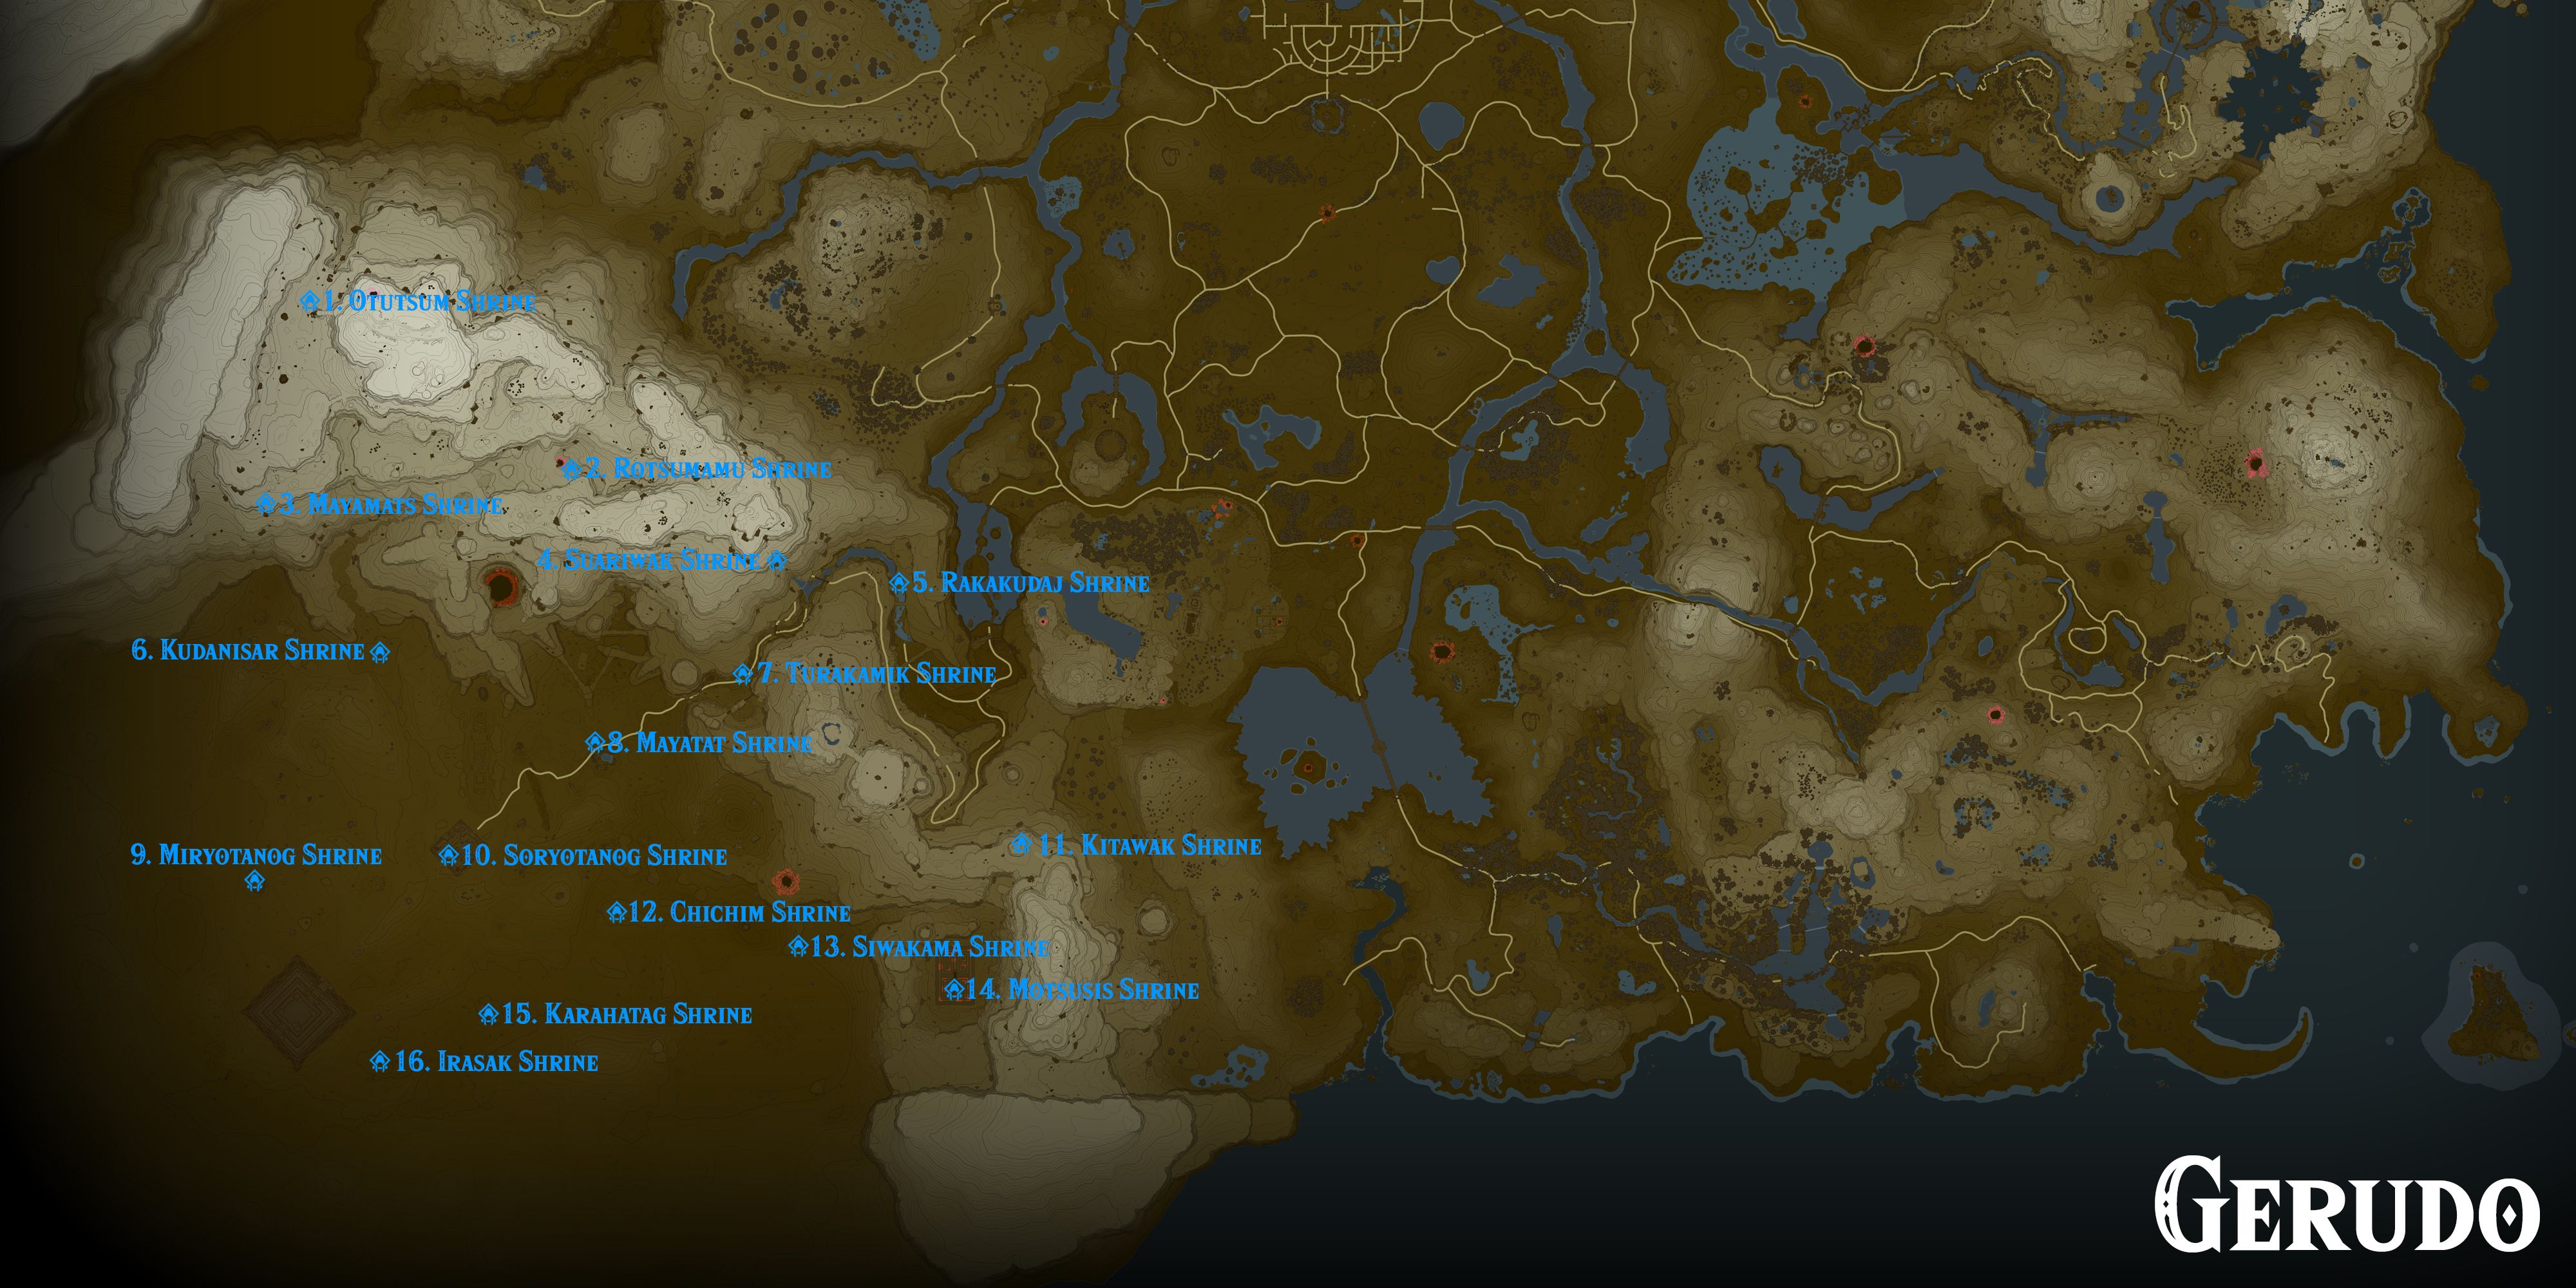
Every Shrine in Gerudo
Ekochiu Shrine (Rise and Fall) can be found in the Great Hyrule Forest, located at coordinates 1063, 1283, 0045. This shrine requires the use of motion controls to navigate a ball through a series of obstacles. The main challenge is to maintain control of the ball as it moves across moving platforms and through narrow pathways. While the shrine may seem daunting at first, with patience and practice, it can be completed successfully.
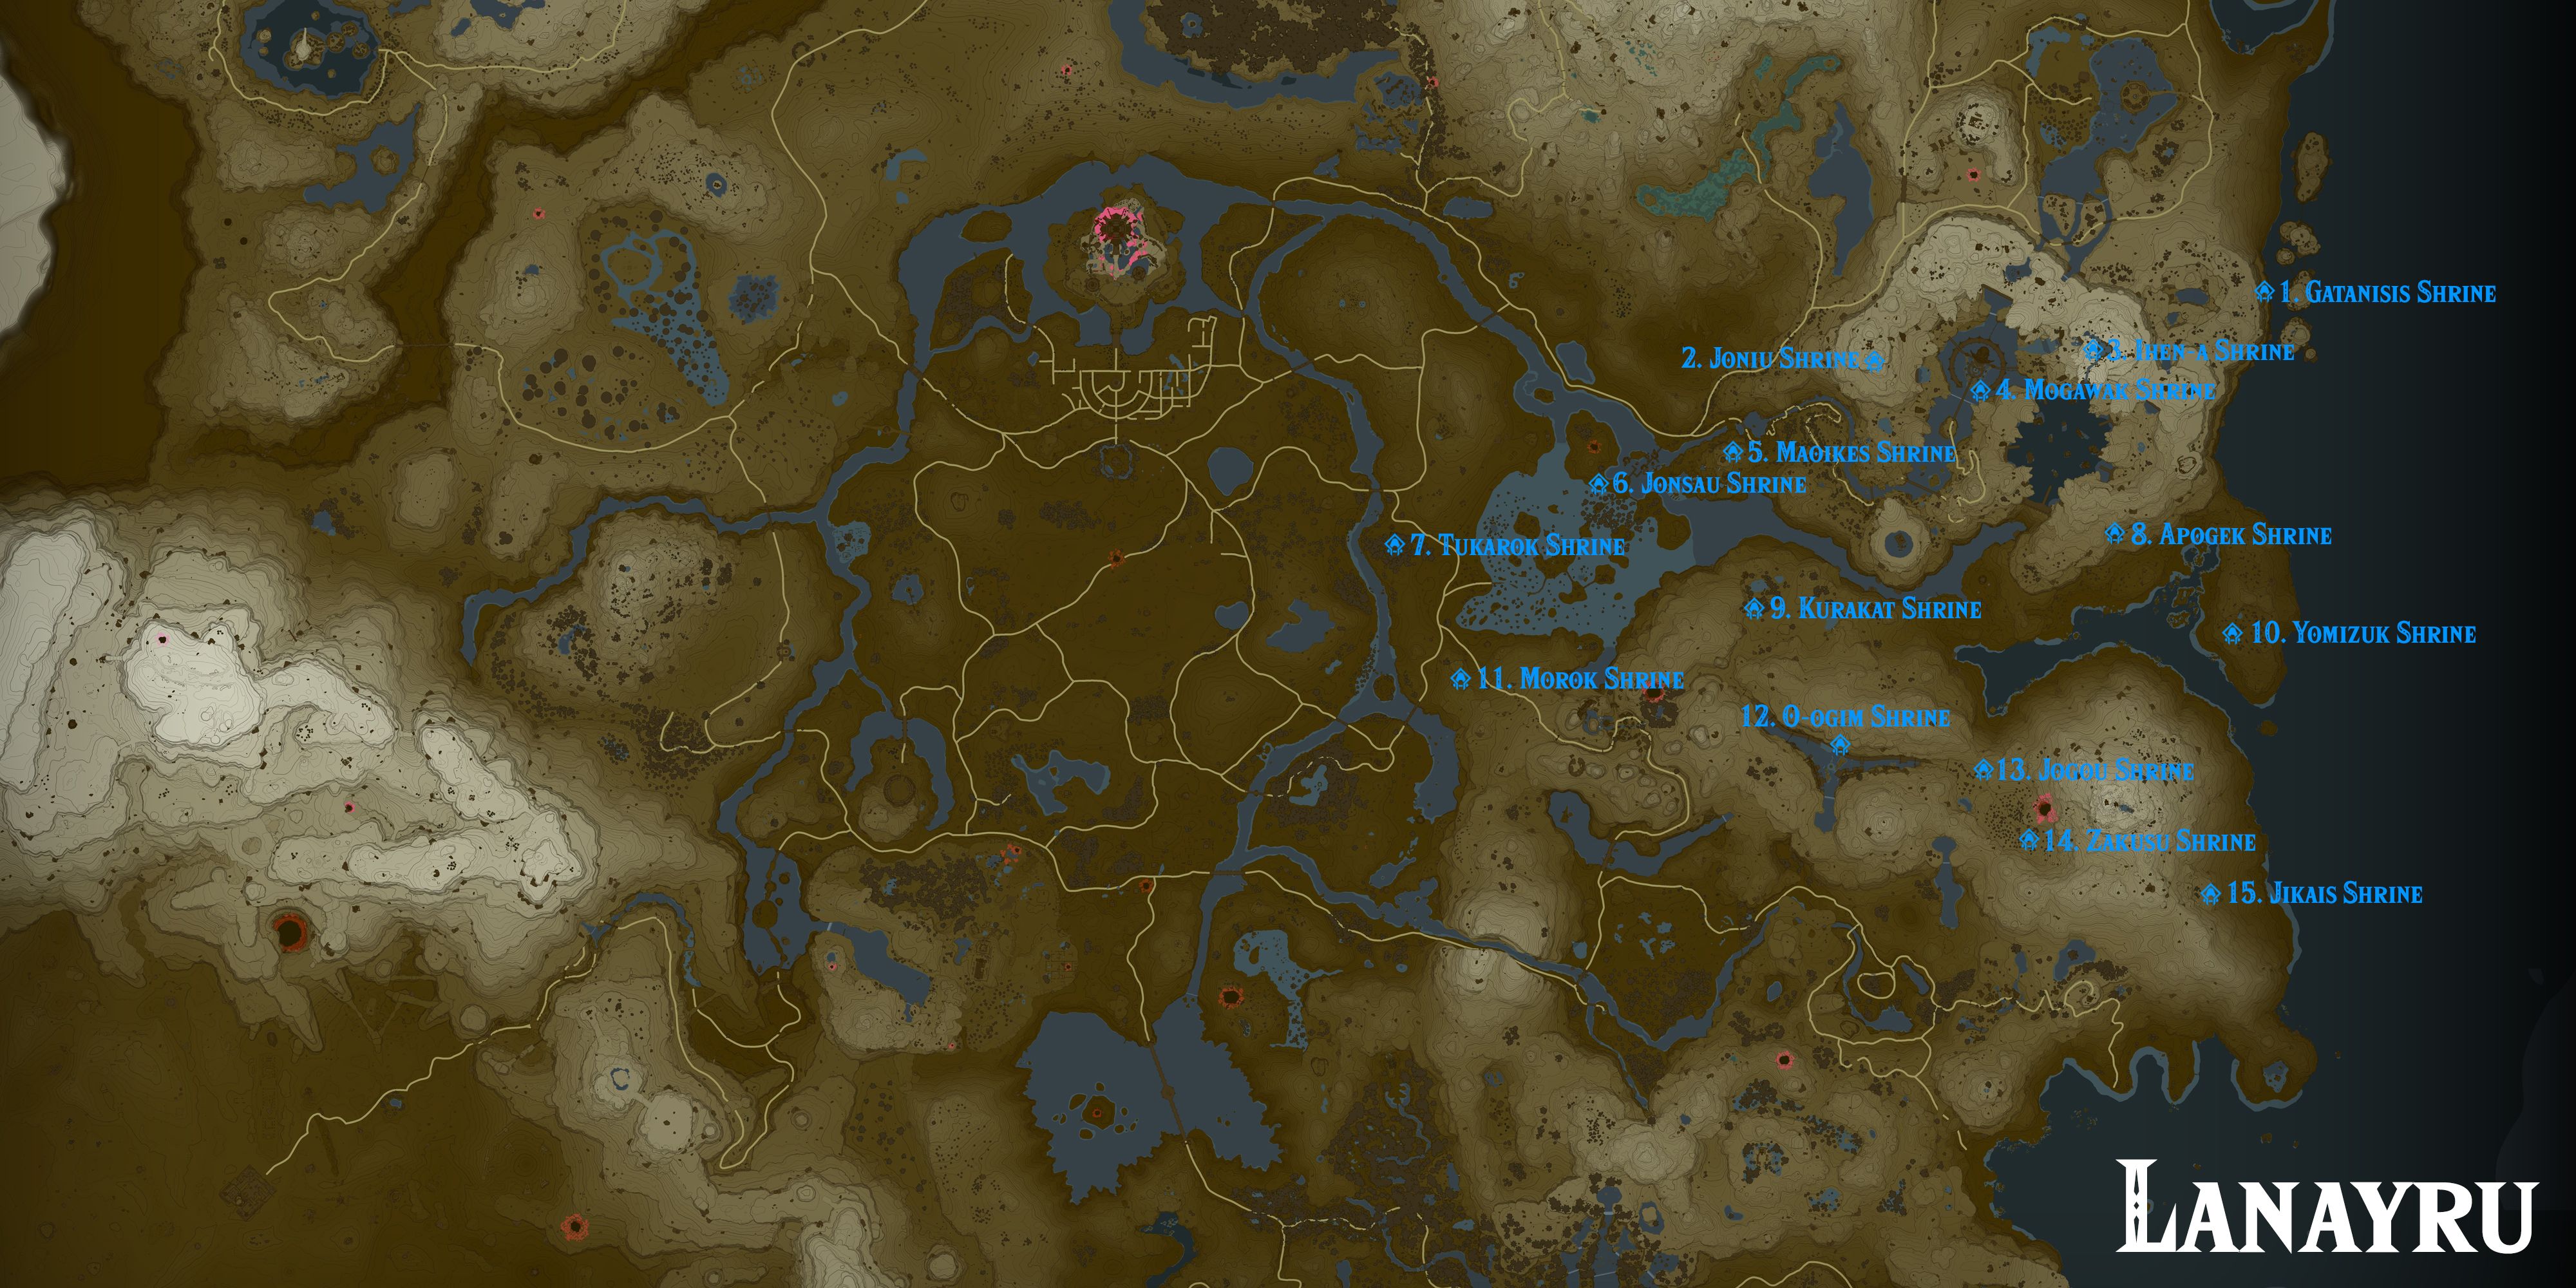
Looking for a challenge? Check out the Gatanisis Shrine in Lanayru Sea for a well-timed bounce. For a crystal-clear mission, head to the Joniu Shrine located in Lanayru Great Spring. If you're up for some midair action, the Ihen-a Shrine in Lanayru Great Spring is the place to be. The Mogawak Shrine in Lanayru Great Spring tests your ability to harness the power of water. In Lanayru Wetlands, the Maoikes Shrine awaits with Rauru's Blessing. The Jonsau Shrine challenges you with deep force while the Tukarok Shrine requires forward force. For a unique experience, try the Apogek Shrine in Lanayru Great Spring with wings on wind. The Kurakat Shrine in Lanayru Great Spring has a tricky task for you - dyeing to find it. The Yomizuk Shrine in Lanayru Great Spring also features Rauru's Blessing. In Lanayru Wetlands, the Morok Shrine offers a bouncy device to test your skills. The O-ogim Shrine in Lanayru Great Spring requires the Lanayru Road Crystal. For a mountaintop challenge, head to the Jogou Shrine in Mount Lanayru. Lastly, the Zakusu Shrine in Mount Lanayru is the proving grounds for ascension, while the Jikais Shrine tests your jailbreaking abilities.
Every Shrine in Faron
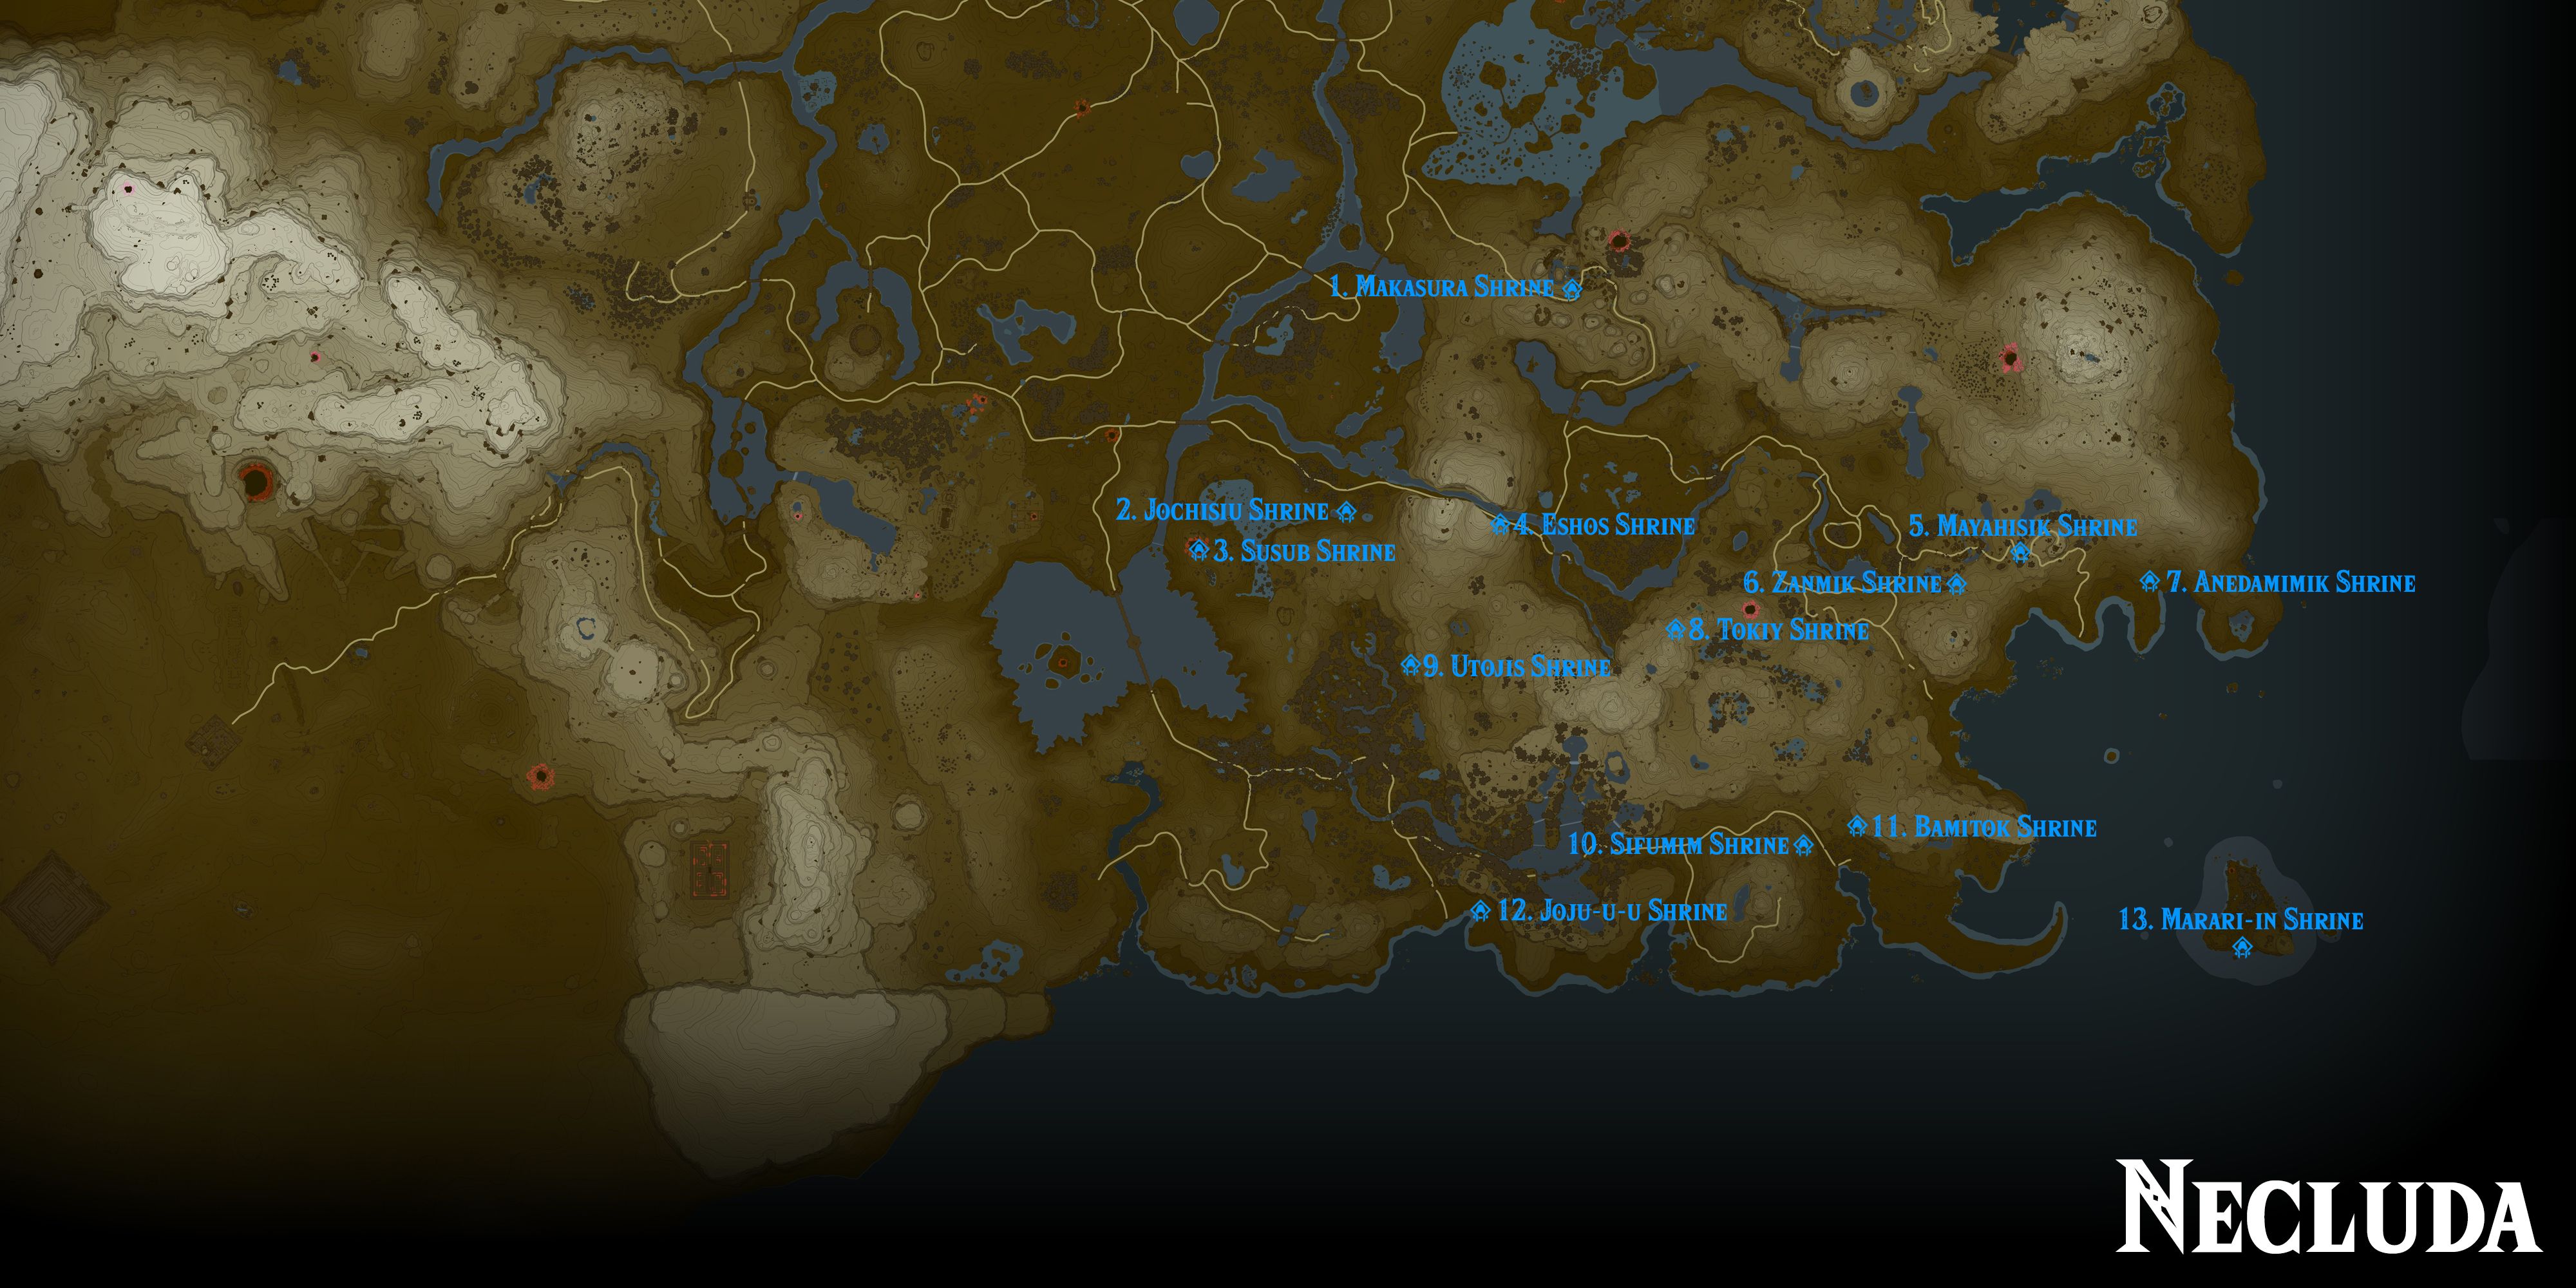
Every Shrine in Necluda
Located in the Gerudo Highlands, the Kitawak Shrine challenges adventurers to move upward and forward. With a series of puzzles and obstacles to overcome, this shrine is not for the faint of heart. But for those who persevere, the rewards are well worth the effort.

Discover four hidden shrines in the Faron Grasslands and Lake Hylia that will test your skills and reward you with powerful items. Among them, the Jiukoum Shrine was built for rails, the En-oma Shrine holds the Lake Hylia crystal, the Ishokin Shrine challenges you to ride a giant horse, and the Utsushok Shrine offers a choice between a long or wide path.
Every Sky Shrine in Tears of the Kingdom
{{h1_placeholder_9}}
Located in the Necluda Sea, the Marari-In Shrine is another of the Rauru's Blessing shrines. Its coordinates are (4631, -3711, 0018).
Located in the Lanayru Great Spring Sky, the Sihajog Shrine offers Rauru's Blessing to those who complete its trial. This shrine can be found at coordinates (4546, -0846, 1135) and requires the use of various runes to navigate its puzzles.
The Legend of Zelda: Tears of the Kingdom is available for the Nintendo Switch.