
Unlock Maximum Performance: Mastering Disabling Integrated Graphics on Windows 11
Boost performance and eliminate lag in games and graphics-heavy apps on Windows 11 Discover how to disable integrated graphics effortlessly using the Device Manager or BIOS settings Ensure your monitor is connected to the right port and easily determine which graphics card is currently in use
Key Takeaways
Plug your monitor into the correct port to prevent graphics-related issues on your computer. Check the GPU port on the back of the case.
To optimize RAM resources, prevent heating problems, and prolong your laptop's battery life, it is recommended to disable the integrated graphics. Access the Device Manager or BIOS menu to disable the integrated graphics functionality. Once done, restart your computer and verify the utilization of the dedicated GPU by checking the Task Manager or DirectX Diagnostic Tool.
Is Your Monitor Plugged Into the Correct Port?
Experiencing frequent crashes with graphics-intensive applications on your computer? This frustrating issue often occurs due to the app utilizing the integrated graphics card instead of the dedicated one. To effectively address this problem, it is essential to disable the integrated graphics card. Keep reading to discover the steps required for disabling it.
Ensure that you've connected your monitor to the appropriate port before disabling your onboard graphics. It's common to mistakenly plug your monitor into the motherboard's iGPU port instead of the dedicated GPU port, especially if it's your first time building a computer.
If you're uncertain about distinguishing between the iGPU and GPU ports, you'll typically find the GPU port labeled with the name of your GPU, such as GeForce RTX 3050, on the rear of your computer case. In contrast, the iGPU port, labeled with the motherboard manufacturer's name, is usually located on the back of the motherboard.
If you're still unsure, check your computer's documentation or contact the manufacturer's customer support for help.
Why Should You Disable Integrated Graphics on Windows
Disabling integrated graphics is crucial to avoid any graphical glitches in applications. Integrated graphics cannot handle the demands of graphics-intensive software such as games or video editing tools, resulting in stuttering or crashing. This occurs because integrated graphics lack the necessary resources to support smooth operation.
Moreover, by disabling integrated graphics, you can allocate more RAM resources. Integrated graphics rely on your computer's RAM for VRAM, albeit not the ideal solution. However, in this scenario, desktop RAM serves as a suitable substitute.
Integrated graphics can cause heating problems and lower the battery life of your laptop due to their use of system resources. To overcome these issues, it is advisable to disable the integrated graphics. Now, let's delve into the steps on how to disable them.
Disable Your Integrated Graphics Using the Device Manager
The quickest way to disable your integrated graphics is by using the Device Manager. To do that, press Windows + X to open the "Power User Menu" and choose "Device Manager."
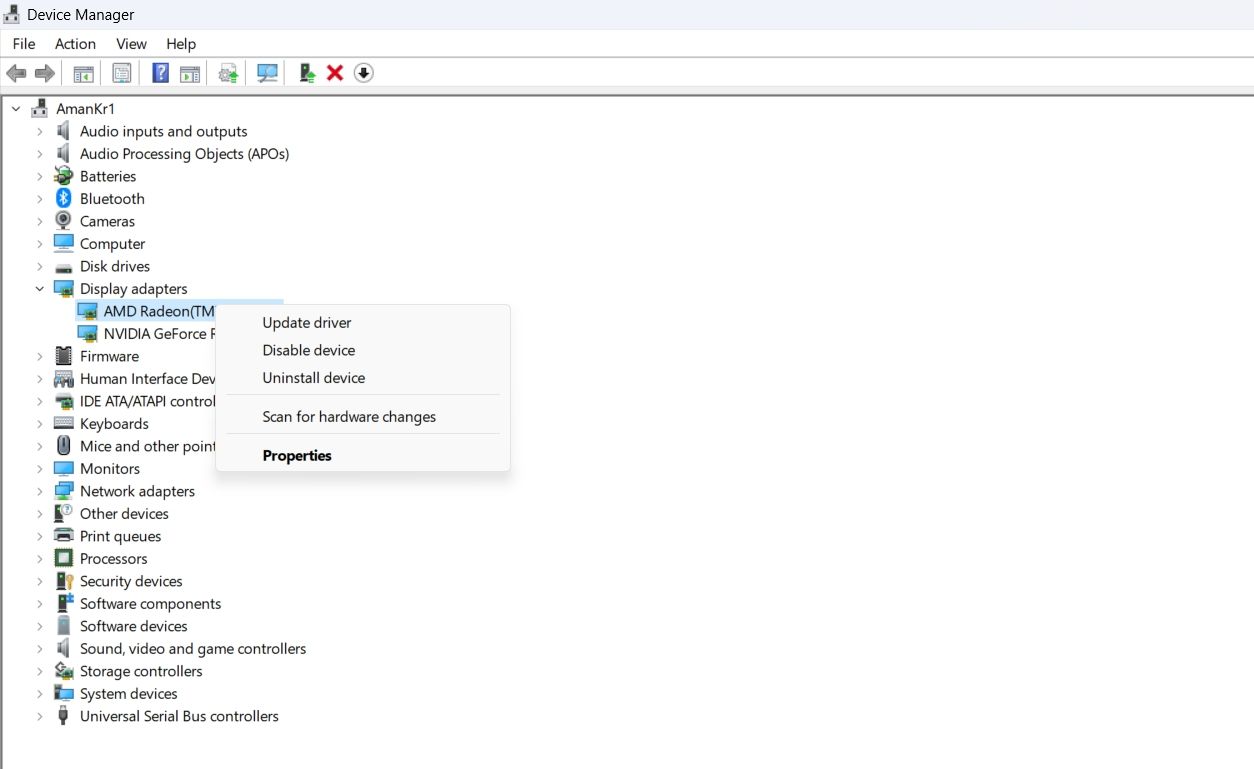
To access the drop-down menu in the Device Manager, simply double-click on "Display adapters." Next, right-click on your integrated graphics and select "Disable device." Confirm your action by clicking "Yes" in the confirmation box that appears.
You might need to restart your computer to see the changes.
Disable Your Integrated Graphics Using BIOS
To prevent Windows from automatically reverting to integrated graphics after a Windows upgrade, you have the option to disable your integrated graphics from the BIOS menu. However, it is important to note that not all BIOS menus offer this feature, in which case you may need to rely on the Device Manager method.
Please exercise caution when using this method as it is only suitable for those with a dedicated GPU. Disabling onboard memory without a dedicated GPU will result in a blank screen, requiring a BIOS reset to resolve the issue.
The steps to disable integrated graphics may vary depending on the manufacturer of your motherboard. However, the general procedure is to restart your computer and repeatedly press the BIOS key (usually Delete, F2, or Esc) as soon as you see the manufacturer's logo to access the BIOS menu. Once in the BIOS menu, navigate to the "Advanced" settings window and disable the internal graphics option.
How to Check Which Graphics Card Is Being Used
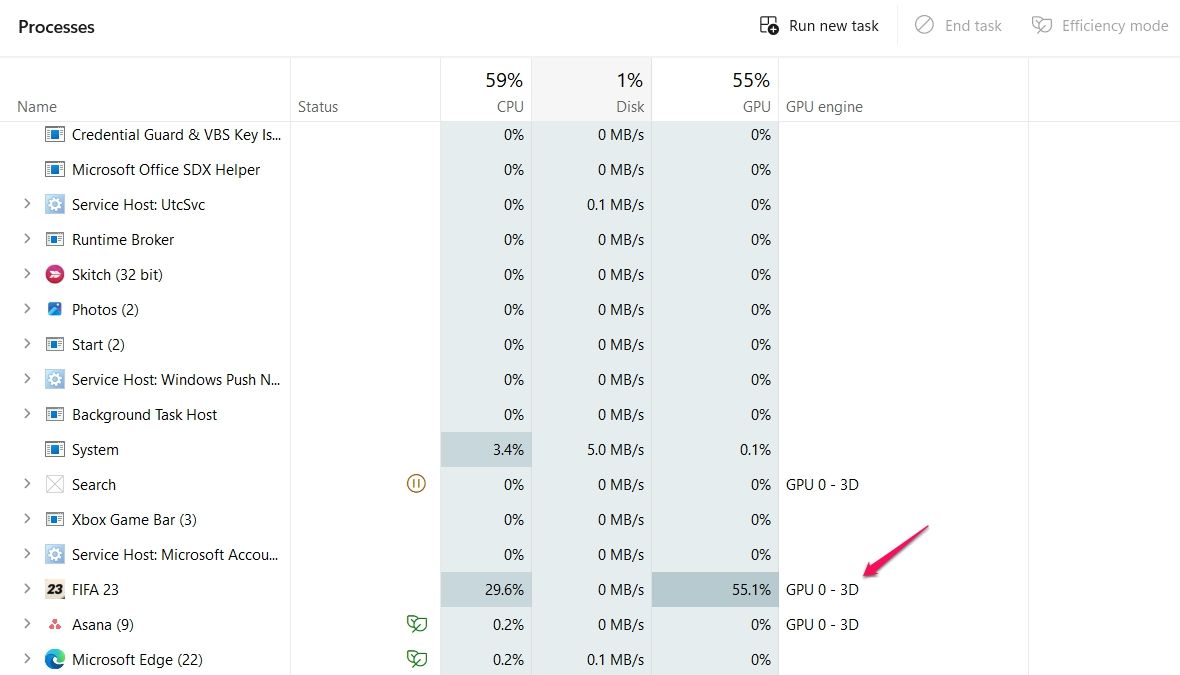
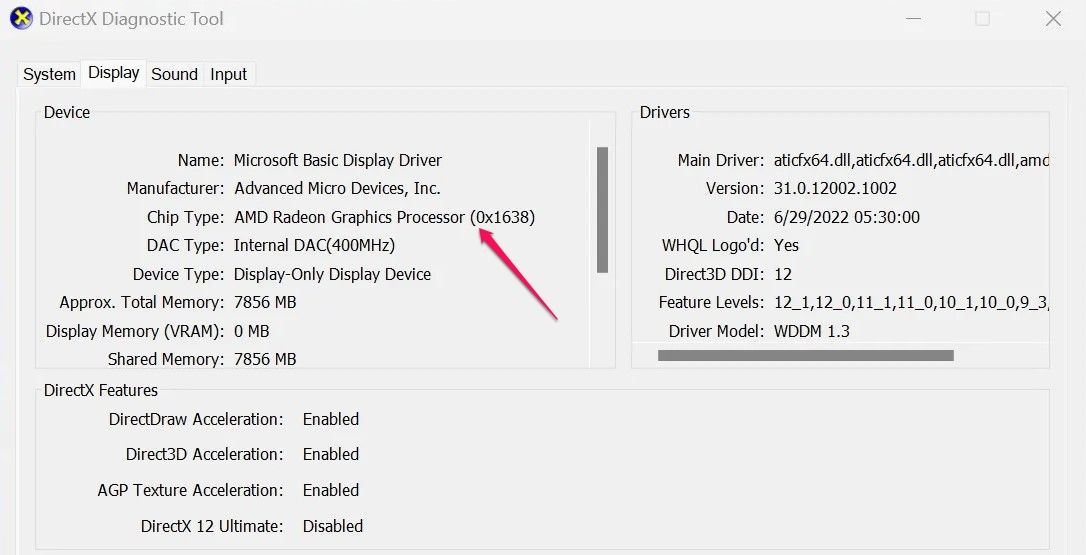
After disabling the iGPU, you can verify if your computer is utilizing the dedicated GPU by using either the Task Manager or the DirectX Diagnostic Tool.
To check with the Task Manager, simultaneously press the Ctrl+Shift+Esc keys to open the "Task Manager." Then, navigate to the "Processes" tab located in the left sidebar. In the GPU Engine column, you will find the GPU name assigned to each application. Once the iGPU is disabled, all applications dependent on a GPU should be utilizing your dedicated GPU.
To verify the graphics card your computer is utilizing, access the DirectX Diagnostic Tool by navigating to the "Start" menu, typing "dxdiag," and pressing Enter. Proceed by selecting the "Display" tab. Within the Device section, you will find the identified name of your graphics card.
This is the method to deactivate your integrated graphics card and confirm that your computer is utilizing the dedicated one. As a result, you can effortlessly enjoy games and applications that require high-quality graphics without experiencing any disruptions.


