The Ultimate Guide to Editing the Hosts File on Windows 10 and Windows 11
Learn how to effectively edit the hosts file on Windows 10 or Windows 11 to block access to specific websites and enhance your online security
Key Takeaways
The hosts file is the first place Windows checks for IP addresses when connecting to websites and can be manually edited to block access to specific websites.
The hosts file can be found at "C:\Windows\system32\drivers\etc" on both Windows 10 and 11. To edit the file, administrative permissions are required.
In order to block a website using the hosts file, simply redirect the URL to either 0.0.0.0 or 192.168.0.1.
The hosts file is the initial location that Windows refers to when attempting to connect to a website. You have the ability to manually modify this file in order to restrict access to certain websites. Discover the contents and location of the hosts file, as well as techniques for editing it.
What Does the hosts File Do?
When you enter a standard web address, such as google.com, into your browser, your computer doesn't automatically know how to establish a connection. It requires the correct IP address associated with the web address in order to establish a connection.
The hosts file is the initial location your computer will look for an IP address for a website, but by default, it doesn't contain any. If your computer cannot find an IP address in the hosts file, it will check the DNS cache or connect to a DNS server. When a web address and its IP are added to the hosts file, it will provide that information to your computer whenever you attempt to connect to that web address.
If the hosts file tells your computer to find a web address at an IP address that won't connect — like 0.0.0.0 — it blocks access to the website.
The Windows hosts File Location
The
How to Edit the Windows hosts File
can be found in the same directory for both Windows 10 and 11, specifically at "C:\Windows\system32\drivers\etc". However, editing the hosts file requires administrative permissions, so you cannot simply open it in a regular Notepad window.To edit the hosts file, use any text editor. Notepad is readily available on both Windows 10 and 11. It is recommended to avoid word processors such as Wordpad, as their disparities with Notepad can occasionally lead to issues.
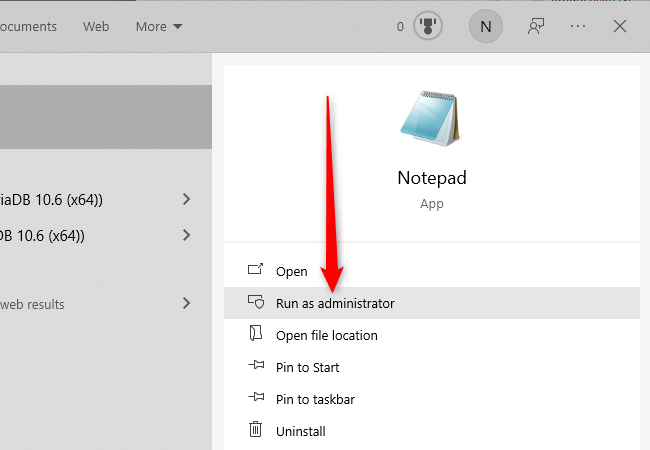
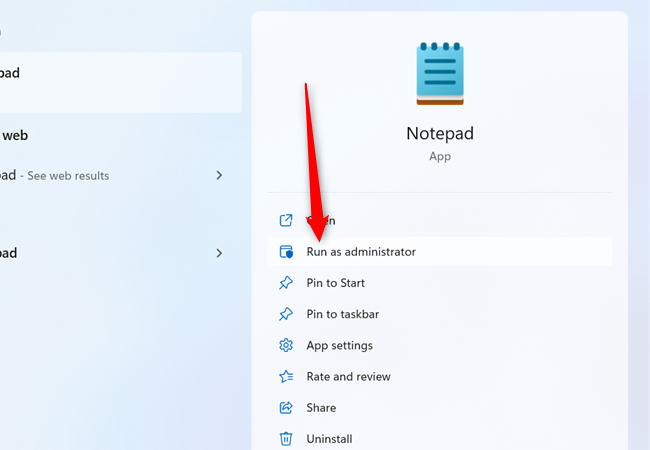
To edit the hosts file, open Notepad as an administrator. On Windows 10, click the start button, search for "notepad" in the search bar, and then click "Run as administrator" on the right.
To run Notepad on Windows 11, follow the same procedure as in Windows 10. However, you will not see the "Run as administrator" option immediately. Simply click on the start button and enter "Notepad" in the search bar. Then, on the right-hand side, click the tiny arrow pointing downwards to unveil additional options.
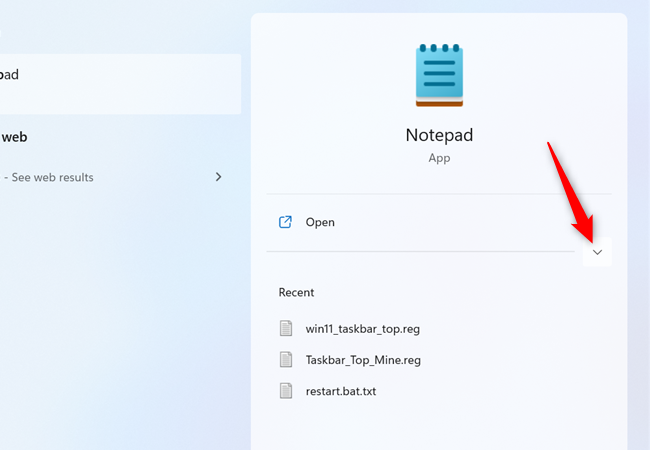
Then click "Run as administrator."
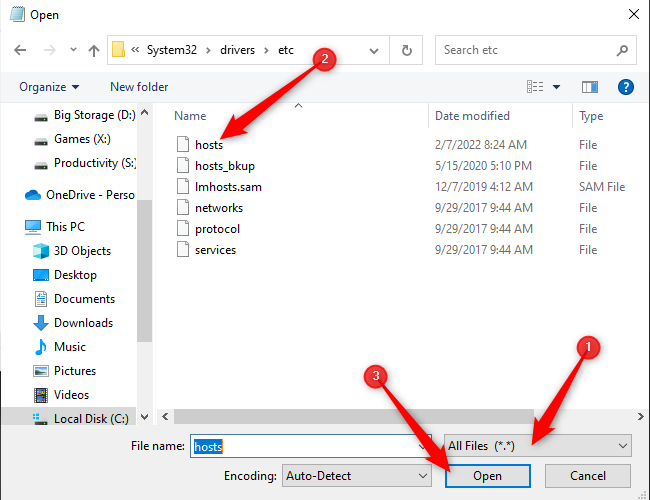
Once Notepad is open, click on File > Open, and navigate to "C:\Windows\System32\drivers\etc"
Notepad is set to look for ".txt" files by default, so you'll need to set it to look for "All Files" in the drop down menu instead. Then, click the hosts file and hit open.
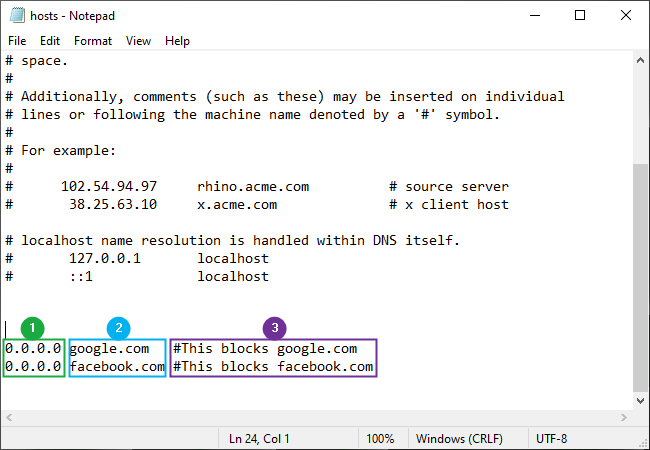
The IP Address directs your PC to the website location.
The Web Address - This is the website address you want to block.
The Comment - Where you describe what the line does. The comment must have a hashtag preceding it.
It isn't necessary to include the comment for the hosts file to work, but commenting files when you edit them is an excellent habit.
After adding the lines, click on "File" and then select "Save" to save your changes. There should be no pop-up appearing after clicking save. If a pop-up does appear, it means that Notepad does not have administrative access. In this case, you need to close Notepad and run it as an administrator. Once you have successfully saved, go ahead and exit Notepad.
Two commonly used addresses in the hosts file to block traffic are 127.0.0.1 and 0.0.0.0. While there are significant differences between these two addresses, in most cases either one will work. However, it is advisable to use 0.0.0.0 to avoid potential problems that may arise if a program on your PC is running and you use 127.0.0.1.
If You Can Still Connect to Blocked Addresses
Recent versions of Google Chrome, Mozilla Firefox, and Microsoft Edge all now have native support for DNS over HTTPS (DoH) as the default setting. With DNS over HTTPS, your queries are encrypted, offering enhanced privacy. Through this encryption, third parties are unable to decipher the requests you have made to a DNS server or gain knowledge of the server's responses.
Enabling DNS over HTTPS in a browser causes it to bypass the regular DNS client in Windows 10 and 11, disregarding the hosts file and utilizing a secure DNS server specified by the browser. Consequently, any attempts to block addresses using the hosts file will be ineffective. To utilize the hosts file for blocking web browser traffic, it is necessary to disable DNS over HTTPS in the browser.
Thankfully, it is possible to enable DNS over HTTPS on Windows 11, enabling the utilization of the hosts file for blocking addresses while retaining the benefits of DNS over HTTPS.