Say Goodbye to Operation Errors: 4 Quick Fixes for Windows
Get rid of the frustrating 'Operation Did Not Complete' virus error on Windows with these 4 easy solutions From redownloading files to repairing file explorer, we've got you covered Say goodbye to the error message and hello to seamless computing
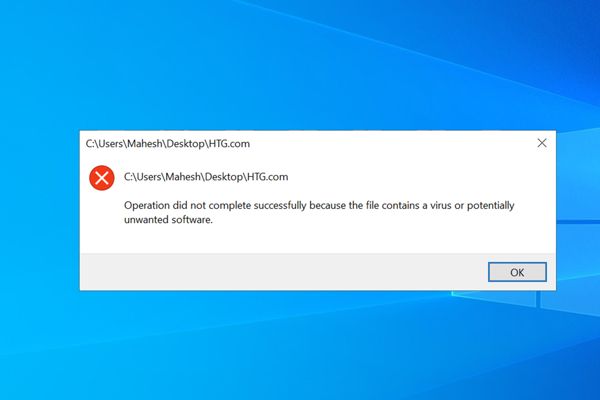
Windows may display an "operation did not complete" virus error when attempting to open a file that your antivirus software identifies as a potential threat. This error message indicates that the file may be infected with a virus, triggering your antivirus to block your access. It's possible for your antivirus to produce a false-positive and block your access even if the file is safe to use. Unfortunately, there's no foolproof way to know if an alert is a false positive, so it's best to err on the side of caution and assume that the file is infected. To fix this error, one simple solution is to temporarily disable your real-time antivirus protection. You can do this by going to Windows Security > Virus & Threat Protection > Manage Settings and turning off "Real-Time Protection."
How to Resolve the Operation Did Not Complete Virus Error
To resolve issues with launching a file, it is important to determine whether the file is actually infected with a virus or if your antivirus is displaying a false-positive result. Follow the appropriate methods below to fix the problem successfully.
- Redownload Your File From Another Source
If you encounter the error message above when attempting to launch a file that was downloaded from the internet, try downloading the file from a different source to see if the error persists.

If you suspect that the file you have downloaded is infected, it is possible that the web host from where you downloaded the file is compromised. In such cases, it is advisable to search for the same file on other websites, especially if it is a popular file or app.
If the file was sent to you via email, it is best to request the sender to resend the file using a different email account. However, it is important to be cautious with email attachments as email addresses can be spoofed, and the sender may not be who they claim to be. Therefore, even if you trust the sender, it is important to exercise caution before downloading any attachments.
If you trust the source of your file and believe that your antivirus software has mistakenly flagged it as a potential threat, you may choose to disable your antivirus protection in order to access the file. However, it is important to note that this should only be done if you are confident in the safety of the file and understand the risks involved. Disabling your antivirus protection when dealing with a potentially harmful file could lead to serious consequences, including infecting your computer and causing a range of issues.
To turn off your antivirus protection, simply open your antivirus application and locate the on/off toggle. The process for disabling the antivirus protection may vary depending on the specific application you are using, but it should generally be a straightforward task.
If you are using Microsoft Defender Antivirus, you can turn off real-time protection by opening the Windows Security app and selecting "Virus & Threat Protection."
.

To access the "Virus & Threat Protection Settings," simply click on the option that says "Manage Settings."

To disable your antivirus protection, you can turn off the toggle for "Real-Time Protection."
:

To temporarily disable your antivirus protection, turn off the toggle for real-time protection. You will then see a prompt for “User Account Control.” Simply select “Yes” to continue.
Once you have successfully launched your file without any error messages, remember to re-enable real-time protection immediately.
- Solution 3. Add Your File to Your Antivirus’ Exclusion List
To ensure that your files remain safe, it's important to verify that they are not harmful before adding them to your computer. Once you've done that, you can add the file to your antivirus' whitelist to prevent any future blocks on access to the file. This method allows you to keep your antivirus enabled while still having access to the file.
To add a file to your Microsoft Defender Antivirus whitelist, open the Windows Security app and select "Virus & Threat Protection." From there, go to the "Virus & Threat Protection Settings" section and click on "Manage Settings."

.
To whitelist your file, you'll need to temporarily disable your antivirus protection. To do this, turn off the "Real-Time Protection" option. You'll then be prompted with a "User Account Control" message, where you should select "Yes."
Once you've disabled your antivirus, navigate to the "Exclusions" section on the page. Click the "Add or Remove Exclusions" button.
You'll then be prompted again with a "User Account Control" message, where you should once again select "Yes."
Navigate to the "Add an Exclusion" option and select "File."

Locate the specific file you wish to exclude by using the "Open" window. Once found, double-click the file to add it to your antivirus software's whitelist.

- Solution 4. Repair File Explorer
If you're still encountering a virus error stating that the operation did not complete, it's possible that there are issues with your File Explorer utility. To resolve this, you can use Windows' SFC (System File Checker) utility to locate and repair any corrupted files associated with your file manager.
To use the SFC utility, simply open an elevated Command Prompt window. You can do this by clicking on the "Start" menu, searching for "Command Prompt," and then selecting "Run as Administrator."
.
Select “Yes” on the “User Account Control” prompt.
Next, open Command Prompt and type in the following command:
sfc /SCANFILE=C:\Windows\explorer.exe
This command will check if the executable file for File Explorer is corrupt.
After the above process is completed, execute the following command:
sfc /SCANFILE=C:\Windows\SysWow64\explorer.exe
This command will locate and resolve any problems with your File Explorer tool. Once it has been repaired, you can launch your file without experiencing any further difficulties.
And that’s how you get around the Windows error that prevents you from opening your files. We hope the guide helps you out.