
The Ultimate Guide to Adding Programs to Startup in Windows 10 and Windows 11: Boost Your Efficiency like Never Before!
Learn how to efficiently add programs to your Windows 10 or Windows 11 startup without slowing down your PC Discover the best methods, including changing app settings, creating shortcuts, and using Task Scheduler for advanced control
Key Takeaways
Easily add any app, file, or folder to start with Windows by adding it to the Windows "Startup" folder. It works in all versions of Windows.
such as when the computer starts up or when a user logs in. To do this, open Task Scheduler by searching for it in the Start menu or typing "task scheduler" in the search bar. Then, create a new task and specify the program you want to open, along with any desired conditions or triggers.
Check the App's Settings to Change Startup Options
: Adding an App, File, or Folder to the Windows "Startup" FolderMany apps offer a built-in option in their settings to control whether they will launch automatically when your PC starts up. Unfortunately, the location of this option differs greatly among apps, so we can't provide a specific guide. However, if the option exists, it usually provides the quickest way to manage an app's startup behavior. During setup, you are frequently given the opportunity to set an app's startup behavior.
Having multiple programs starting on boot can significantly slow down the startup process. However, you have the option to disable specific startup programs if you wish to exclude them from the boot sequence.
Step One: Open the Windows Startup Folder
You can access the "Startup" system folder in File Explorer if you enable the display of hidden files. It is technically stored in "%APPDATA%\Microsoft\Windows\Start Menu\Programs\Startup", but there's a simpler method to reach it without opening File Explorer and navigating through folders.
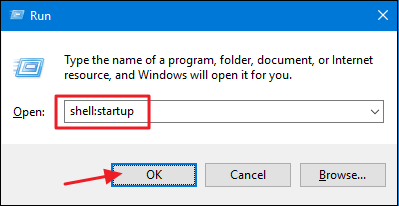
You can easily access Windows' hidden and special folders by using the "shell" command. To open the "Startup" folder quickly, simply press Windows+R to open the "Run" dialog box, type "shell:startup," and press Enter.
This will open a File Explorer window right to the "Startup" folder.
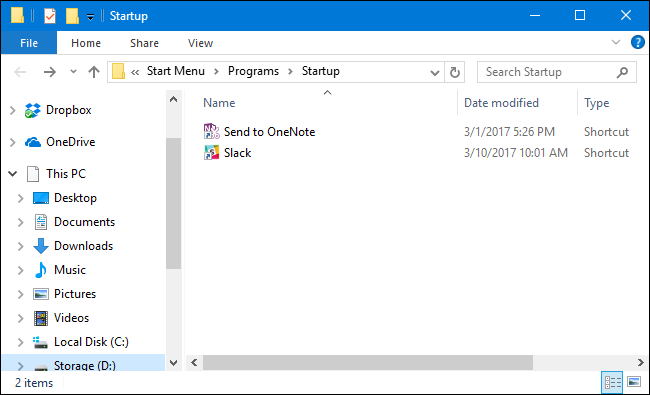
Go ahead and leave that window open, because we're going to be working with it in the next section.
Step Two: Create a Shortcut in the "Startup" Folder to Add a Program to Startup
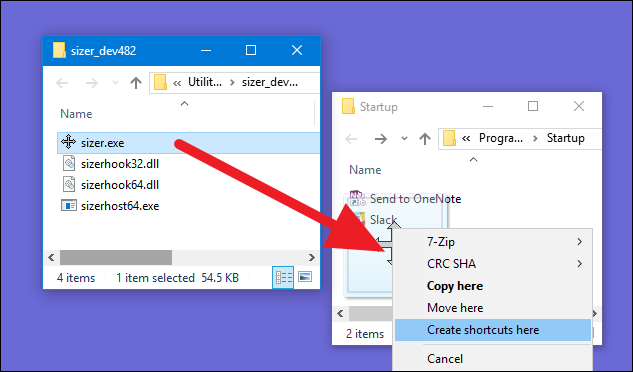
Creating a shortcut to an app, file, or folder on Windows is easy. Just follow these steps to add it to the "Startup" folder. For this example, we'll use a useful app called Sizer, but you can apply this method to any item you want to create a shortcut for.
First, locate the item to which you want to create a shortcut. Open a second File Explorer window and find the executable, file, or folder you want to start at boot. There are various ways to create shortcuts in Windows, but we prefer the quick right-drag method. Simply hold down your right mouse button and drag the item you want to create a shortcut for to the "Startup" folder. When you release the button, a popup menu with several options will appear. Click on "Create shortcut here."
That's all you have to do. You'll now see a shortcut to your item in the "Startup" folder.
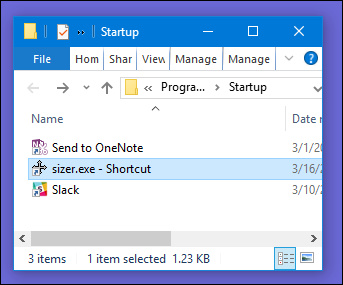
The next time you start Windows, your app, file, or folder will launch right along with it. This method even works for launching Windows Store Apps at startup.
How to Make Startup Programs Load Faster
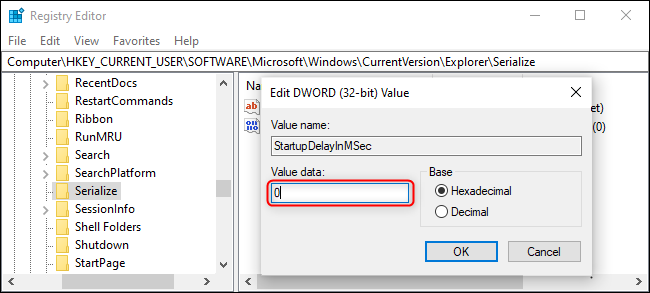
To remove the startup program delay on Windows 10 or 11, navigate to the following key in Registry Editor:
Navigate to HKEY_CURRENT_USER\SOFTWARE\Microsoft\Windows\CurrentVersion\Explorer\.
Create a new key called Serialize.
Under Serialize key, create a new 32-bit DWORD named "StartupDelayInMSec" and set its value to 0.
Or you could just head over to our article on removing the Windows 10 startup delay and grab the registry hack files that automate it for you. Up to you!
Alternative Method for Power Users: Use Task Scheduler for More Control
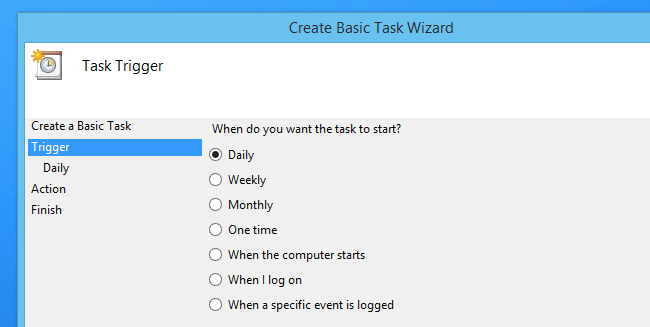
Instead of just using the shell:startup trick, we recommend utilizing Task Scheduler to execute processes during system startup, when logging in, during idle periods, or even when locking or unlocking the screen. This powerful tool is ideal for advanced users who wish to automate their computer, enabling tasks such as creating System Restore Points upon startup or automatically waking up at a specific time.
To initiate a program at Startup using Task Scheduler, simply access Task Scheduler via the search box in the Start menu. Proceed to the "Action" tab and select "Create Basic Task," then follow the prompts. It is advisable to utilize the "Log on" option when attempting to execute a typical program.
Task Scheduler is a pretty useful tool if you want to fine-tune startup behaviors, and using it really that difficult.


