
The Ultimate Guide to Effortlessly Cleaning Your Roomba
Maintain optimal functionality of your Roomba with these cleaning tips for its bin, filters, brushes, sensors, and more Keep your Roomba clean and productive for efficient vacuuming
Cleaning tips for your filter, brushes, sensors and more
Taking Care of YourFrom its bin to its sensors — and everything in between — all your Roomba’s components require some TLC to keep it vacuuming as it should. Fortunately, once you know how to clean your robot, the process is pretty easy, so your Roomba can be back at work in no time.
How to clean a Roomba bin
Cleaning Your Roomba's Dustbin It only makes sense that your Roomba’s dustbin is the area most likely to get dirty since it collects all the dust, hair, and debris from your floors. It’s one of the easiest parts to clean, though, so it shouldn’t take you more than a few minutes.
Step 1: Remove the bin
To remove the dustbin from most Roombas (including the 600, e, i, and j series), simply press the bin-release button located at the rear side of the robot. It is labeled with a bin icon. In the case of the s series, the dustbin is located on top of the robot. Lift the metallic lid and pull up the handle to remove it.Step 2: Empty the bin in the trash
Once you have the dustbin in hand, carry it to your trash can for debris disposal. The 600 series bin is equipped with a swinging door, while the e, i, j, and s series have a bin-door-release button marked with a bin icon. Remember to shake the bin over the trash can to ensure all the debris is removed.Step 3: Remove the filter
The filter of your Roomba is situated in the dustbin. In the case of e, i, and j series, the filter can be found on the side of the bin, whereas in the 600 series, it is positioned inside the bin. For the s series, you can locate the filter below a door at the top of the bin. Remember that while most dustbins can be washed, the filters should not be washed. Hence, carefully remove the filter and set it aside.Step 4: Rinse the bin in warm water
Even after you have emptied the bin, there may still be some dust and debris present. For e, i, j, and s series Roombas, the bins can be washed, so use warm water to rinse the bin and eliminate any remaining dirt. It is essential to rinse the bin by hand as it is not suitable for dishwashers. However, the 600 series does not possess a washable bin, so you can skip this step.Step 5: Dry the bin thoroughly
It is important to ensure that the dustbin of your Roomba is completely dry before reinserting it into the robot. Take a clean towel and meticulously dry both the inside and outside of the bin.Step 5: Reinstall the filter and bin
After the bin has been dried, carefully place the filter back into its designated spot within the bin. Then, slide or position the bin back into its slot, making certain that it is firmly and securely seated in the robot.How to clean Roomba wheels
 To ensure optimal performance and longevity of your Roomba, it is crucial to keep its wheels clean. As your Roomba moves across your floors, its wheels can accumulate dirt, hair, and debris, which can hinder their spinning ability and accelerate wear and tear. In particular, your Roomba has a front caster wheel and two side wheels that require regular cleaning.
 Step 1: Detach the front caster wheel from the robot
The front caster wheel is situated at the forefront of your Roomba. For cleaning, carefully flip your robot over and firmly grasp the wheel to detach it along with its housing from the robot. If you observe any dirt or debris inside the cavity of the caster wheel, simply wipe it away using a clean and dry cloth.Step 2: Remove the caster wheel from the housing
Apply strong pressure to release the caster wheel from its housing. Cleanse the housing thoroughly to eliminate any dirt or debris.Step 3: Wipe the caster wheel to remove dirt
You might encounter some hair or dust accumulated on the top of the wheel, which can be easily lifted off by your fingers. However, it is important to dedicate a moment to delicately wipe the caster wheel using a clean, dry microfiber or cotton cloth. This will effectively eliminate any leftover residue.Step 4: Reinstall the caster wheel in its housing
To securely reattach the caster wheel, make sure to push it back into its housing, ensuring that both sides of its axle snap into place. You’ll know it's properly secured when you hear a clicking sound.Step 5: Return the caster wheel to the robot
After securing the caster wheel in its housing, carefully slide it back into the cavity. To confirm proper installation, check that the wheel spins freely without any restrictions.Step 6: Push the side wheels up and down
Gently moving the side wheels in an up and down motion can effectively dislodge any debris that may be trapped around or inside the wheel well. To prevent any mess, it is advisable to perform this action over a towel, which will catch any dirt or dust that might fall out. It is important to manually rotate the wheels afterwards to ensure that they are spinning smoothly once again.Step 7: Blow compressed air into the side wheel wells
Despite the previous step, there may still be debris stuck inside the wheel wells. To tackle this problem, you can utilize a can of compressed air, which proves to be the most convenient option. By gently blowing the air into the wheel wells, any remaining dirt that is lodged inside can be freed effortlessly.Step 8: Wipe down the side wheels
Cleaning the wheels of your robot vacuum is important as they can accumulate dirt, dust, hair, and other debris in their grooves. To effectively clean them, take a microfiber or cotton cloth and gently wipe down the wheels. Make sure to spin the wheels as you clean to ensure you reach all their sides.How to clean a Roomba filter
When it comes to Roomba filters, they are not washable and cannot be cleaned with water. Therefore, it is necessary to replace them every two months to maintain their proper functionality. However, to keep your robot vacuum in optimal working condition, it is recommended to clean the filter at least once a week.Remember to refer to the  for more detailed instructions on cleaning and maintaining your Roomba.
Step 1: Remove the dustbin
In order to clean the filter of a Roomba, it is necessary to remove the dustbin first. The dustbin is positioned differently depending on the series of Roomba. In the 600, e, i, and j series, the dustbin is located in the front and can be pulled out by pressing the bin-release button. On the other hand, the s series requires opening the lid at the top of the robot to access the bin, which can then be lifted using the handle.Step 2: Pull the filter out of the dustbin
The placement of the filter varies among different Roomba series. In the e, i, and j series, the filter is situated on the side of the bin. For the 600 series, however, the filter is housed inside the bin. When removing the filter, it is important to handle it with care by gripping the sides to prevent any damage. In the s series, the filter is concealed behind a door, necessitating its opening before the filter can be taken out.Step 3: Tap the filter against a trash can
Take the filter to your trash can and gently tap it against the side to dislodge any accumulated debris. This action will effectively remove any particles resting on its surface. If the filter still appears unclean, employ a small, flat brush to eliminate any remaining dirt from its creases.Step 3: Reinstall the filter and bin
Subsequently, reinsert the debris-free filter into your Roomba's dustbin. Then, carefully place the bin back in its designated spot within the robot, ensuring it is firmly secured in place.How to clean Roomba brushes
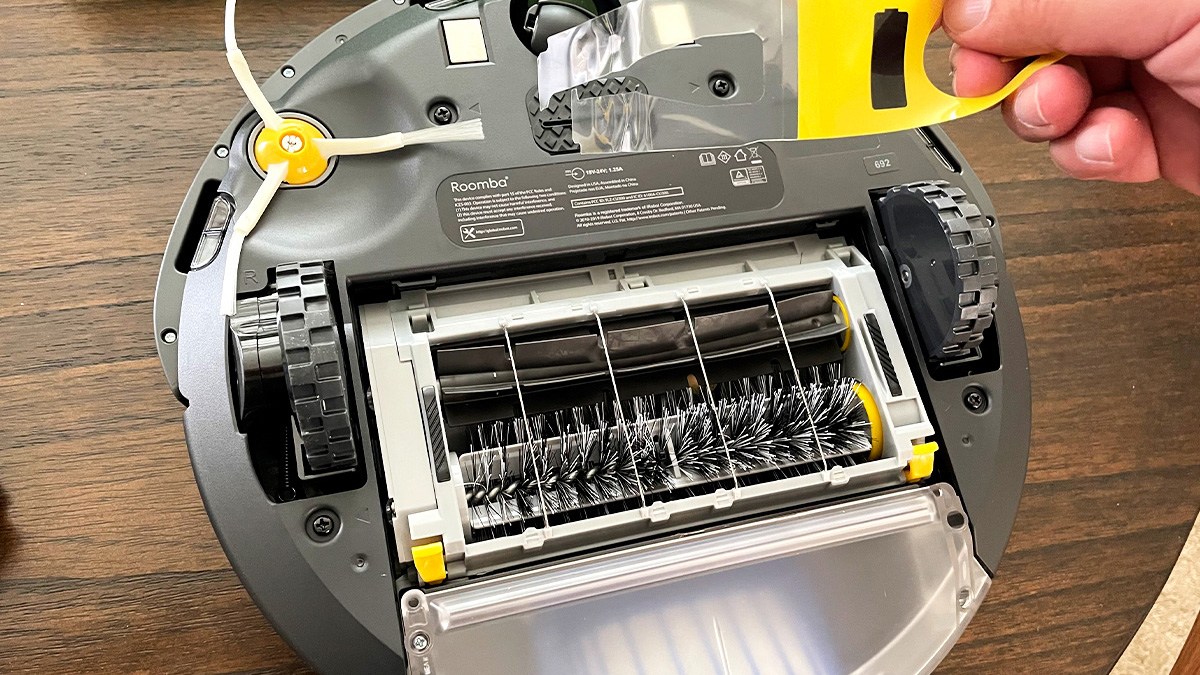
 One of the essential components of a Roomba is its set of brushes, which efficiently collect dirt and eliminate it from your floors. Throughout the cleaning process, the bristles may become entangled with hair, dust, and other debris. While the primary brushes located at the bottom of the robot are typically the most prone to becoming dirty, the side brush can also require cleaning.
Step 1: Turn your robot over on a flat surface
The primary brushes of your Roomba are situated on the underside of the robot, easily identifiable as they are fully exposed at the center. To ensure stability and prevent any unwanted movement, it is important to place your Roomba on a flat and steady surface.Step 2: Press the brush-release tab
Removing the brushes from the bottom of your Roomba is a breeze with the convenient brush-release tab. Simply press the tab and watch as the brushes effortlessly pop out for easy retrieval.Step 3: Remove the brushes and any debris in their compartment
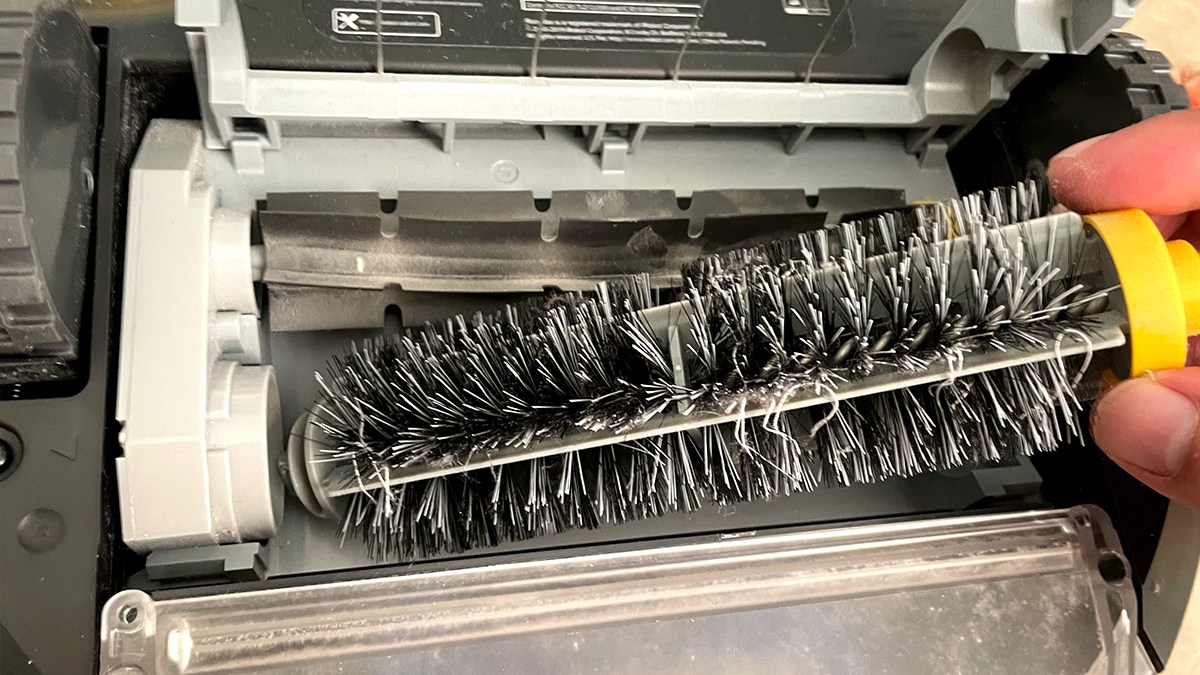
Once you've pressed the brush-release tab, lifting the two brushes out of their compartment becomes a simple task. Take a moment to inspect the underside of the robot and check if there is any dirt or debris accumulated in the brushes' cavity. If there is, a gentle wipe with a microfiber or cotton cloth will leave it clean and ready for use.Step 4: Clean around the bearings at the ends of the brushes
When the brushes are taken out of the robot, you will notice caps or bearings at the ends that assist in securing them inside the robot. Gently remove the caps and inspect for any debris underneath. Eliminate the dirt and reattach the caps to the ends of the brushes.Step 5: Remove any hair and debris from the brushes
Roombas are equipped with two types of primary brushes. The e, i, j, and s series have rubber brushes that lack bristles, specifically designed to prevent hair from becoming entangled around them. Any hair or debris present on these brushes can usually be easily removed by hand. Conversely, the 600 series Roombas utilize bristle brushes that tend to attract and coil hair. In such cases, manual removal may not be sufficient, necessitating the use of scissors to cut and extract the hair.Step 6: Reinstall the brushes
Ensure that the brushes are completely devoid of any hair or debris before carefully reinserting them into the robot. It is crucial to ensure their secure placement, as failure to do so could impede the Roomba's vacuuming capabilities.Step 7: Unscrew and remove the side brush
To detach the side brush of a Roomba, you will require a small or coin screwdriver, as it is affixed in position with a diminutive screw. Once the screw has been loosened, you can effortlessly remove the brush from the robot.Step 8: Remove any debris from the side brush and its post
Remove any hair and debris from the brush and its base, and then inspect the post and the well it sits in. Use a clean microfiber or cotton cloth to wipe them down and eliminate any dirt present.Step 9: Reinstall the side brush
Once the brush is clean, reattach it to the robot. Make sure to tighten the screw securely to ensure it stays in place.How to clean Roomba sensors
 Your Roomba is equipped with sensors on its bottom to help it navigate and prevent it from falling down stairs. In the event that these sensors become dirty, it can result in an error message that causes the robot to stop vacuuming.
Step 1: Turn your robot over
The number of sensors on your Roomba model may vary between four to six, all of which are positioned along the front edge of the robot's underside. Made of clear plastic, these sensors measure approximately 3 to 4 inches in length, making them easily identifiable.Step 2: Wipe the sensors with a clean cloth
To effectively clean the sensors, use a soft, dry cloth made of microfiber or cotton to gently remove any dirt or debris. Take care not to apply excessive pressure on the sensors, as this may cause scratches or scuffs that could impact their performance.How to clean a Roomba bag
When it comes to Roombas with self-emptying capabilities, it is important to note that the Dirt Disposal bags cannot be washed. These bags are designed for single-use, so once the Clean Base displays a solid red LED light, simply dispose of the bag accordingly.
Step 1: Lift the lid at the top of the Clean Base
In the i, j, and s series, all the models equipped with self-emptying feature utilize a Clean Base, which conveniently houses the Dirt Disposal bag at its top. To access the bag, simply open the top of the Clean Base.Step 2: Pull the plastic card to lift the bag out
The Roomba Dirt Disposal bags are designed with a plastic card at the end, specifically designed to fit into the vacuum port located inside the Clean Base. By pulling up on the card, the bag is effortlessly removed and securely sealed to prevent any dirt or debris from escaping during the emptying process.Step 3: Throw away the bag
Disposing of the bag from the Roomba's base is as simple as tossing it in the trash. Regrettably, the bags cannot be reused.Step 4: Place a new bag in the base
To insert a new bag, smoothly glide the plastic card at the end into the guide rails situated inside the base. This ensures that all the debris is collected inside the bag rather than accumulating in the base. After securely placing the bag and closing the lid of the base, your Roomba is ready to resume vacuuming.Keep your Roomba clean and productive
 Cleaning and Maintaining Your Roomba for Optimal Performance
Let's face it — Roombas are pretty expensive investments. If you want to get the most out of your money, it's essential to ensure that your little robot friend can clean your home efficiently for years to come. Fortunately, cleaning your Roomba is a simple task that can significantly improve its performance and lifespan. By establishing a regular cleaning routine for the dustbin, filter, brushes, and other components, you can eliminate any worries about the cleanliness of your floors.


