
The Ultimate Guide to Securely Wiping Your Drive on Windows 10 and Windows 11
Efficiently wipe drives on Windows 10 or Windows 11 without relying on third-party software Explore three options: wiping entire drives, wiping free space, or securely wiping the Windows system drive Safeguard your data with these simple steps
Key Takeaways
Wiping a drive ensures that deleted files cannot be recovered, whether it is an internal drive or an external USB drive.
Traditional magnetic drives typically mark deleted files as "deleted," which allows for easy recovery. In contrast, modern solid-state drives are designed to delete files immediately. However, USB flash drives do not support this feature, thus necessitating the need for manual wiping.
There are three available options for wiping a drive: performing a full format for the entire drive, wiping only the free space using the cipher command, or utilizing the "Reset This PC" feature to wipe the Windows system drive.
Windows includes built-in tools that allow you to securely erase the contents of a drive by writing zeros. This prevents any possibility of recovering deleted files from the drive. Whether you need to wipe an internal drive or an external USB drive, here's a guide on how to do it.
This article on Cybersecurity Awareness Week is brought to you in partnership with Incogni.
Why Do You Need to Securely Wipe a Drive?
It's often possible to recover deleted files from a drive. Whether this is possible depends on a number of factors.
Deleted files on traditional magnetic drives are marked as deleted and can be easily recovered before being overwritten. On the other hand, modern solid-state drives utilize TRIM by default, ensuring that deleted files are immediately deleted for optimized speed. However, this distinction becomes more complex with external storage devices such as USB flash drives, which do not support TRIM and thus may allow for the recovery of deleted files.
To prevent data breaches, you can securely erase a drive. This process is straightforward: Windows will overwrite all sectors of the drive with zeroes or other random data, ensuring that any existing data is irrecoverably replaced. This step is particularly crucial when selling or disposing of a computer, drive, or USB stick that contains sensitive private information.
Furthermore, encryption significantly enhances security. Unless an attacker gains access to your encryption key, they would be unable to retrieve deleted files from the drive or even access files that have not yet been deleted.
Option 1: Wipe Any Entire Drive
To completely overwrite the data on a drive with zeros, simply carry out a complete formatting process. However, please be aware that this action will irreversibly delete all files stored on the drive. It is important to note that you cannot perform a full format on your Windows system drive while actively using Windows from it.
This method is perfect for internal drives without the operating system, USB flash drives, other external storage devices, and entire partitions requiring erasure.
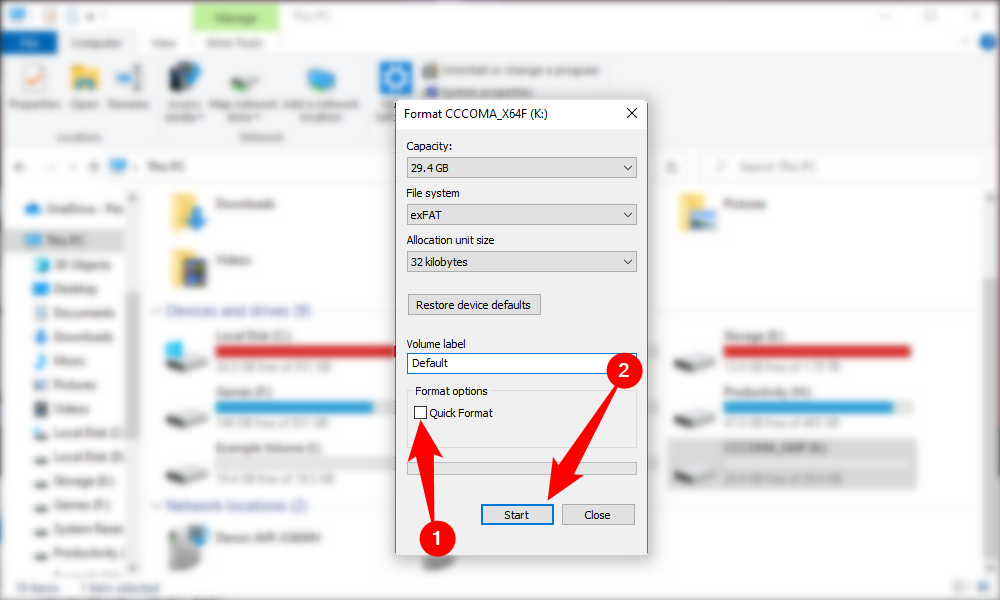
To begin, launch File Explorer and locate the drive you wish to wipe. Right-click on it and choose "Format."

To ensure a full format on Windows 10 or Windows 11, go to Format Options and uncheck "Quick Format". Microsoft's documentation states that since Windows Vista, the entire disk is overwritten with zeros during a full format.
You have the flexibility to modify any desired formatting preferences; however, make sure to uncheck the "Quick Format" option. If you're unsure about which options to select, you can leave them at their default settings.
Once you're prepared, click on "Start" to initiate the drive formatting. Please note that the duration of the process will vary depending on the disk's size and speed.
The format process will erase everything on the drive. Be sure you have a backup of any important files before continuing.
Option 2: Wipe Only Free Space
To prevent easy recovery of deleted files on a mechanical hard drive or external storage device, it is recommended to selectively overwrite the free space with zeros instead of wiping the entire drive.
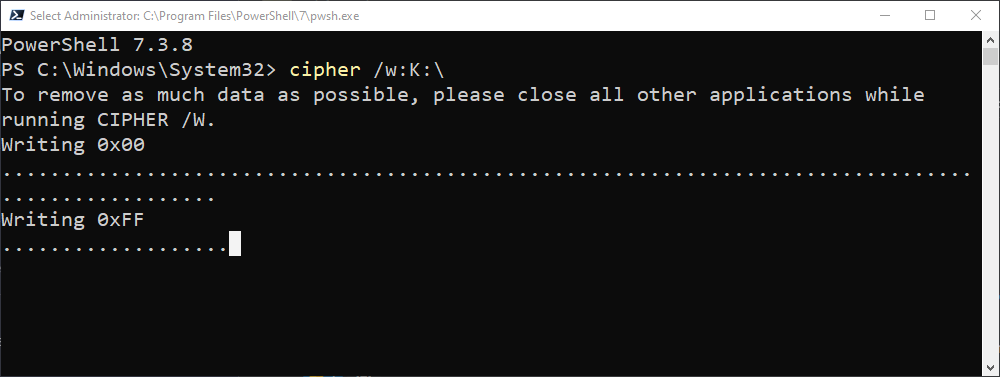
To wipe a drive's free space on Windows 10 or Windows 11, you can use the cipher command in the command line. This command offers an option to overwrite the free space with data. It performs three passes, first using zeros, then a different type of data, and finally random data. However, a single pass should be sufficient.
To begin, open a command-line environment with administrative privileges such as Command Prompt or Windows Terminal. On both Windows 10 and Windows 11, you can do this by right-clicking the Start button or pressing Windows+X and selecting either "Windows PowerShell (Admin)", "Command Prompt (Admin)", or "Windows Terminal (Admin)". You can choose any option from the menu, as they all serve the purpose.

Run the following command, replacing X with the drive letter of the drive you want to wipe free space for:
cipher /w:X:\
For example, if you want to wipe free space on your D: drive, you'd run the following:
The cipher command, executed with the /w parameter and pointing to the D drive, will display its progress in the command prompt. The duration of the process will vary depending on the speed of your drive and the available space to be overwritten.
Option 3: Wipe Your Windows System Drive
To wipe your entire Windows operating system drive, there is a straightforward method available. This feature is included in the Reset This PC option on both Windows 10 and Windows 11, although it is not activated by default.
During the process of restoring Windows to its factory default settings, you can choose to wipe your system drive. This is particularly useful in safeguarding your personal data when selling or passing on your PC to another individual.
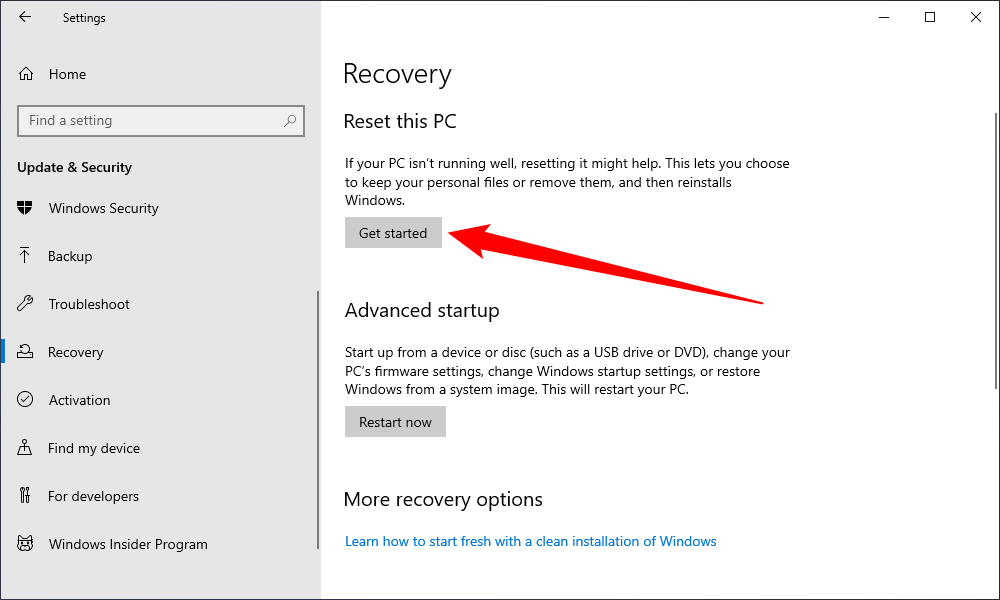
To perform this task on Windows 10, navigate to Settings > Update & Security > Recovery. Under Reset This PC, click "Get Started." (Alternatively, you can press Windows+i to promptly open the Settings app.)
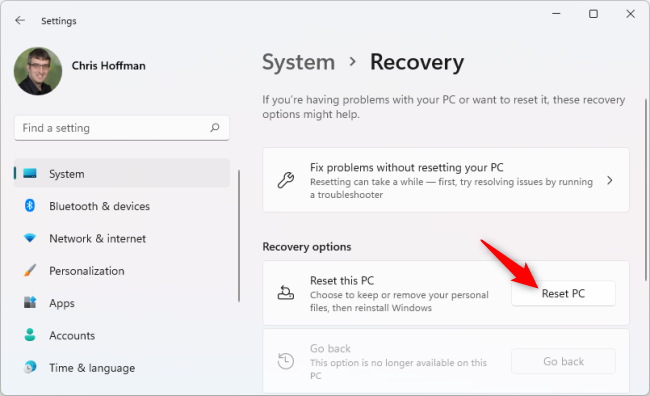
On Windows 11, head to Settings > System > Recovery. Click the "Reset PC" button under Recovery Options.
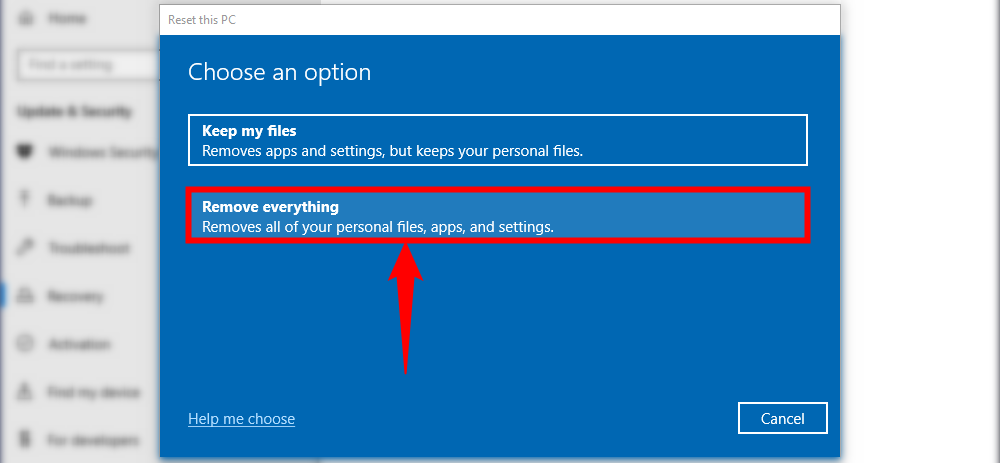
Select "Remove Everything" to have Windows remove all your files during the Reset process.
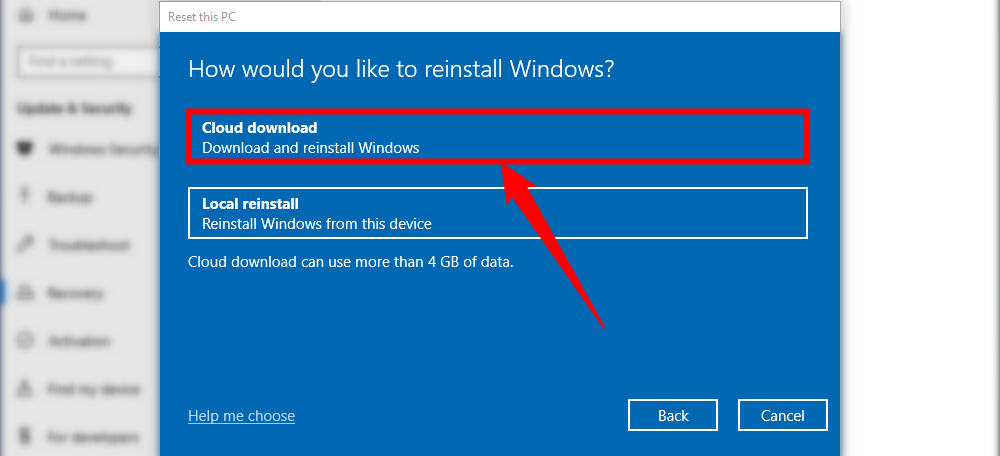
Choose either "Local Reinstall" or "Cloud Download" for this process. If you're unsure, it is advised to select "Local Reinstall" to avoid a large download.
"Cloud Download" is beneficial if the local Windows operating system files are corrupted and the Reset This PC process cannot be used. Surprisingly, Cloud Download can be faster than Local Reinstall because Windows only needs to download installation files instead of reconstructing them from the files on your computer's hard drive. This speed depends on the internet connection.
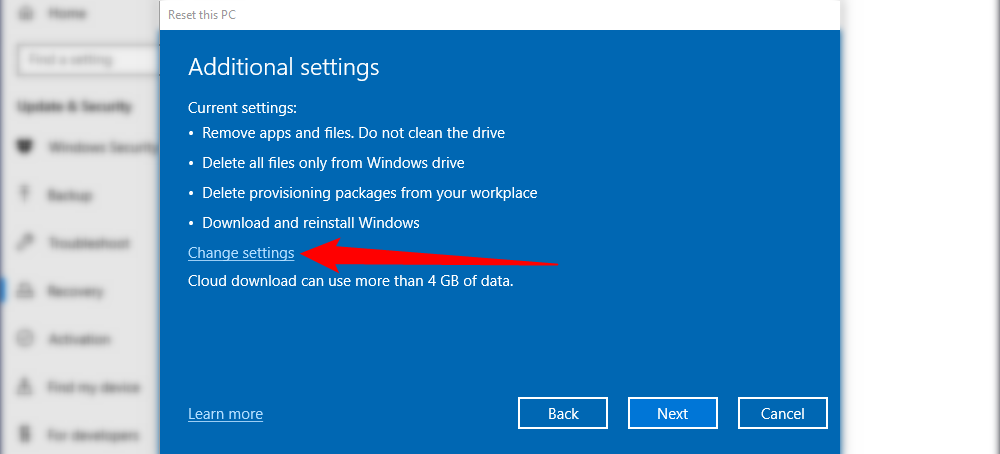
Under Additional Settings, select "Change Settings."
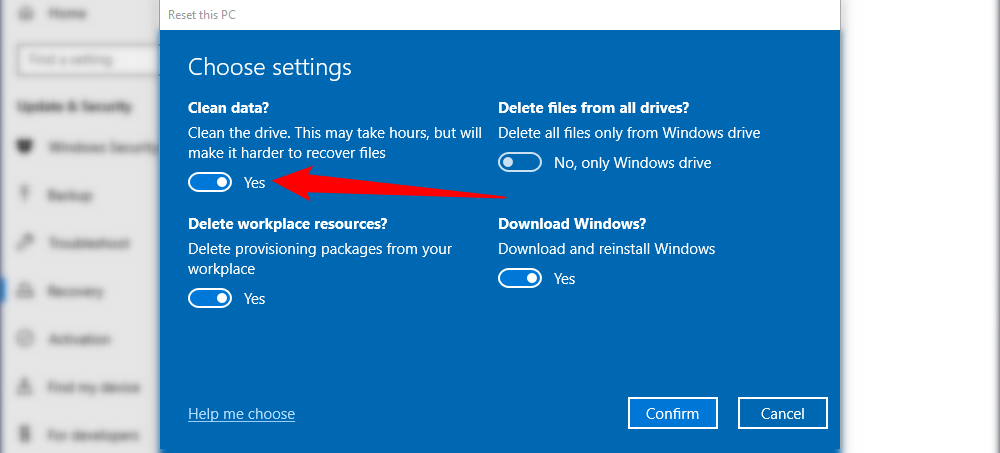
Set the switch under "Clean data?" to "Yes" in order to enable this option. Enabling this feature will initiate a process where Windows "cleans the drive," thereby significantly enhancing the level of difficulty (theoretically, practically impossible) in recovering your files.
Clicking "Confirm" will initiate the process of resetting your Windows 10 or Windows 11 PC and wiping your drive. Keep in mind that the duration of this process may vary depending on the speed and size of your computer's drive.
By following this process, all the data, programs, and configurations stored in your drive will be permanently removed. This will result in a clean installation of the Windows operating system, devoid of any of your personal files. Prior to proceeding, it is crucial to back up all important data.
In Windows, the process of wiping a drive is referred to as "cleaning the drive", which should not be confused with the conventional meaning of "cleaning" a drive. In Windows, cleaning a drive involves removing its partition information rather than completely wiping it.


