
The Ultimate Guide to Fortifying Your Linux Server with fail2ban: Unleashing Unbeatable Security
Secure your Linux server effortlessly with fail2ban, the ultimate solution to block malicious IP addresses with excessive connection failures Safeguard your machine automatically and effectively!
Key Takeaways
fail2ban is a self-regulating security utility for Linux that automatically blocks IP addresses with too many connection failures.
The integration with the Linux firewall (iptables) ensures that bans are enforced by adding rules to the firewall, without affecting its regular function.
To configure fail2ban, simply copy the default configuration file and create a new file named jail.local. In this file, you can make customizations that will remain in place even after upgrading fail2ban.
Learn how to enhance your Linux computer's security with fail2ban, the automatic IP address blocker that effectively defends against excessive connection failures. Discover the benefits of this self-regulating system in our comprehensive guide, presented by Incogni as part of the Cybersecurity Awareness Week.
What is fail2ban?
Fail2ban is a utility that will automatically block an IP address if it attempts and fails to connect to a server too many times.
When individuals try to connect to your server, whether it's an SSH server, a web or email server, or even a Minecraft server, they are generally asked to provide a username and password before gaining access. Regular users, who are entering or guessing their account details, have a physical limitation that prevents them from making more than one attempt every few seconds at best. However, if login credentials are being entered at a faster and more frequent rate, it indicates a potential problem - someone might be launching a brute-force attack using another computer in an attempt to breach your system.
To identify a brute-force attack, it is essential to monitor failed connection requests that do not successfully log into an account. Once an attacker has been recognized, they should be banned from making any further attempts.
The practical way to achieve this is through complete automation. By configuring fail2ban, the monitoring, banning, and unbanning processes can be effectively managed.
fail2ban seamlessly integrates with Linux firewall iptables, implementing bans on suspicious IP addresses by adding rules to the firewall. For the sake of simplicity, we are assuming the usage of iptables with no existing rules.
If you are worried about security, it is likely that you have set up a firewall with a comprehensive set of rules. fail2ban simply incorporates its own rules without affecting the functionality of your regular firewall.
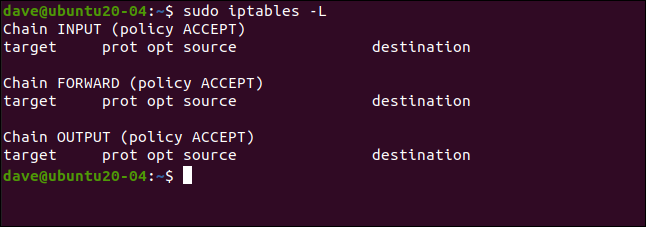
To view our empty ruleset, execute the following command:
sudo iptables -L
Installing fail2ban
Installing fail2ban is simple on all the distributions we used to research this article. On Ubuntu 20.04, the command is as follows:
sudo apt-get install fail2ban

On Fedora 32, type:
sudo dnf install fail2ban

On Manjaro 20.0.1, we used pacman:
sudo pacman -Sy fail2ban

Configuring fail2ban
The fail2ban installation includes a predefined configuration file known as jail.conf. However, it should be noted that any alterations made to this file will be lost during a fail2ban upgrade, as the file will be overwritten.
To copy the jail.conf file, create a new file named jail.local. By placing our configuration modifications in jail.local, they will remain intact during system upgrades. Both files, jail.conf and jail.local, are automatically read by fail2ban. Here are the instructions for copying the file:
sudo cp /etc/fail2ban/jail.conf /etc/fail2ban/jail.local

Now open the file in your favorite editor. We're going to use gedit:
sudo gedit /etc/fail2ban/jail.local
We will search for two sections in the file: [DEFAULT] and [sshd]. Please ensure that the correct sections are identified, as these labels may also appear in a section at the top that provides descriptions, which is not what we are looking for.
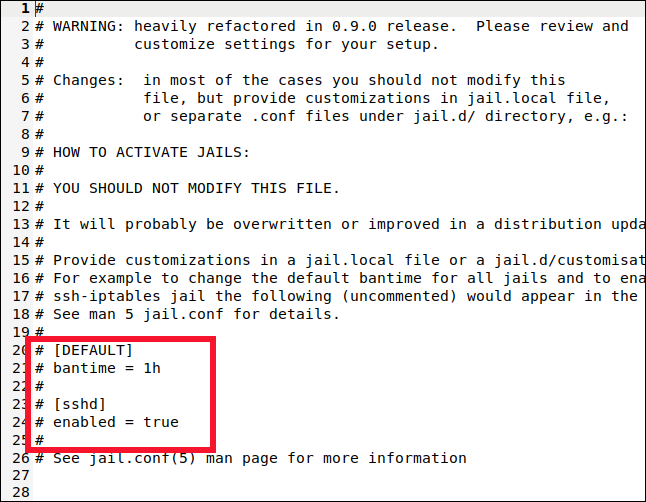
You'll find the [DEFAULT] section somewhere around line 40. It's a long section with a lot of comments and explanations.
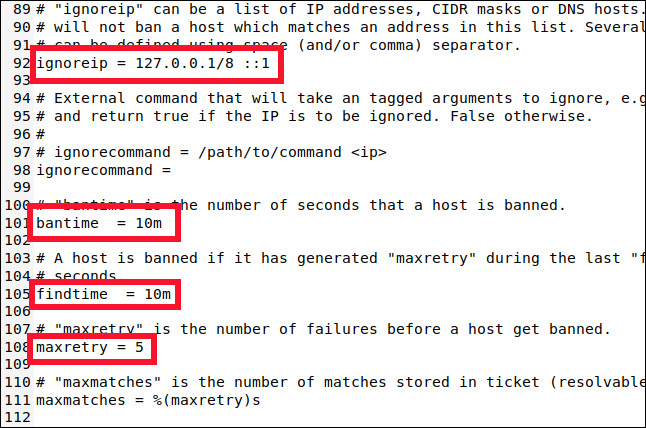
Scrolling down to approximately line 90 reveals four important settings that you should be aware of:
1. ignoreip: This setting constitutes a whitelist of IP addresses that will always be exempted from any banning actions. Essentially, these IP addresses possess an enduring "Get Out of Jail Free" privilege. By default, the list includes the localhost IP address (127.0.0.1) and its IPv6 equivalent (::1). If there are additional IP addresses that you are certain should never face any banning measures, you can append them to this list, ensuring that each entry is separated by a space.
bantime: The ban duration for an IP address (the "m" represents minutes). If a value is entered without an "m" or "h" (for hours), it will be treated as seconds. A value of -1 will result in a permanent ban for the IP address. Exercise caution to prevent locking yourself out permanently.
findtime: The time interval during which excessive failed connection attempts will lead to the banning of an IP address.
maxretry refers to the threshold for the number of failed attempts. When an IP address surpasses the maxretry limit by making multiple failed connection attempts within the findtime duration, they will be prohibited from accessing for the entire duration of the bantime. However, this restriction does not apply to IP addresses listed in the ignoreip list.
fail2ban captures IP addresses and restricts their access for a specified duration. It offers support for multiple jails, with each jail defining settings specific to a particular connection type. This flexibility enables the user to configure different settings for various connection types or selectively monitor a chosen set of connection types. Moving on, let's explore the configuration options for the SSH jail.
Configuring a Jail
In fail2ban's monitoring, jails provide the flexibility to modify connection types. If the predefined settings do not align with your desired configurations for the jail, you have the option to customize bantime, findtime, and maxretry values.
Scroll down to about line 280, and you'll see the [sshd] section.
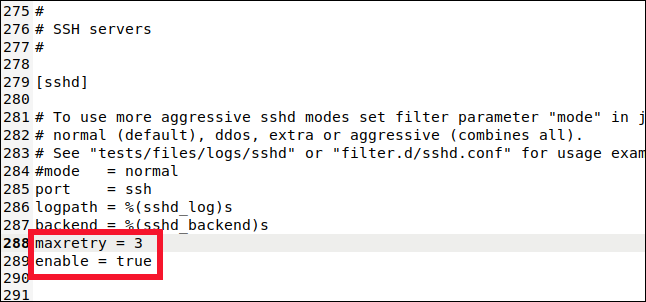
This is where you can set values for the SSH connection jail. To include this jail in the monitoring and banning, we have to type the following line:
enabled = true
We also type this line:
maxretry = 3
The default setting was set to five, but we opted for increased caution with SSH connections. Consequently, we decreased it to three and proceeded to save and close the file.
Moreover, we included this particular jail in fail2ban's monitoring and made modifications to one of the preset configurations. A jail can utilize a mix of default and jail-specific settings.
Enabling fail2ban
So far, we've installed fail2ban and configured it. Now, we have to enable it to run as an auto-start service. Then, we need to test it to make sure it works as expected.
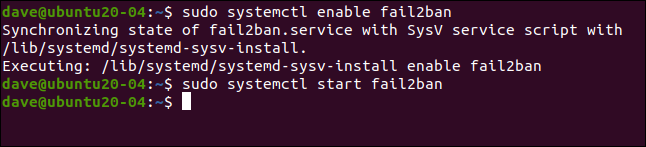
To enable fail2ban as a service, we use the systemctl command:
sudo systemctl enable fail2ban
We also use it to start the service:
sudo systemctl start fail2ban
We can check the status of the service using systemctl, too:
sudo systemctl status fail2ban.service
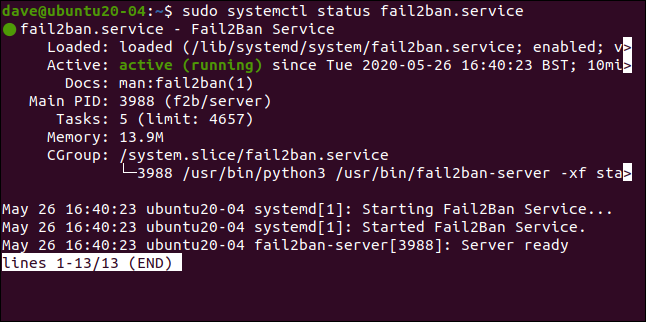
Everything looks good — we've got the green light, so all is well.
Let's see if fail2ban agrees:
sudo fail2ban-client status
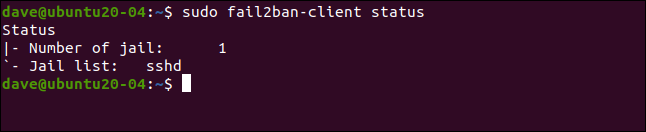
This reflects the jail setup we have implemented. A single jail called [sshd] has been enabled. By adding the jail's name to the command used earlier, we can obtain a more detailed status:
Execute the following command to check the status of the sshd jail:
sudo fail2ban-client status sshd
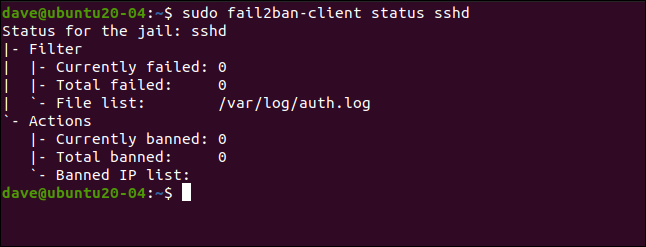
This lists the number of failures and banned IP addresses. Of course, all the statistics are zero at the moment.
Testing Our Jail
We will now attempt to establish an SSH connection with our test machine on a different computer. However, in order to test the security, we will intentionally enter the wrong password. Remember, you have three chances to enter the correct password for each connection attempt.
The maxretry value will be activated after three unsuccessful connection attempts, not three failed password attempts. Therefore, we need to enter an incorrect password three times in order to fail the first connection attempt.
Afterward, we will proceed with another connection attempt and enter the password incorrectly for three more times. The first incorrect password entry during the third connection request will activate fail2ban.
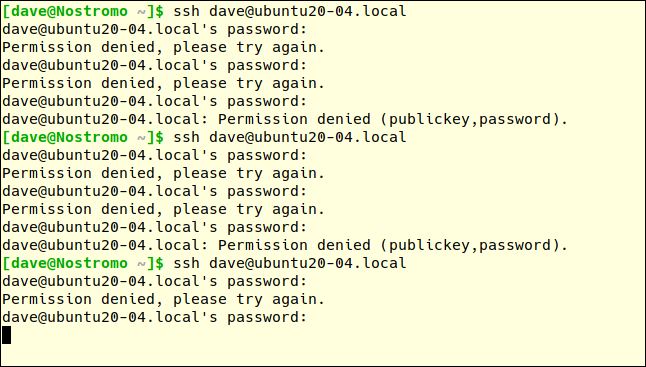
Following the initial incorrect password during the third attempt to connect, there is no response received from the remote machine. There is a lack of explanation; instead, we are met with silence.
You must press Ctrl+C to return to the command prompt. If we try once more, we'll get a different response:
ssh dave@ubuntu20-04.local

Previously, the error message was "Permission denied." This time, the connection is outright refused. We're persona non grata. We've been banned.
Let's look at the details of the [sshd] jail again:
sudo fail2ban-client status sshd
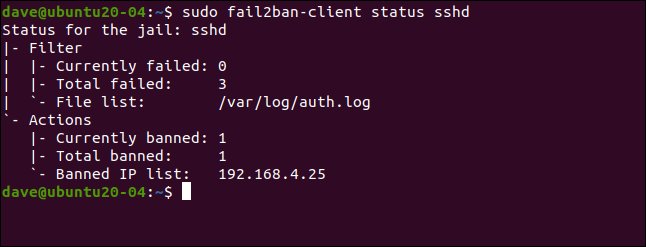
There were three failures, and one IP address (192.168.4.25) was banned.
As we mentioned previously, fail2ban enforces bans by adding rules to the firewall ruleset. Let's take another look at the ruleset (it was empty before):
sudo iptables -L
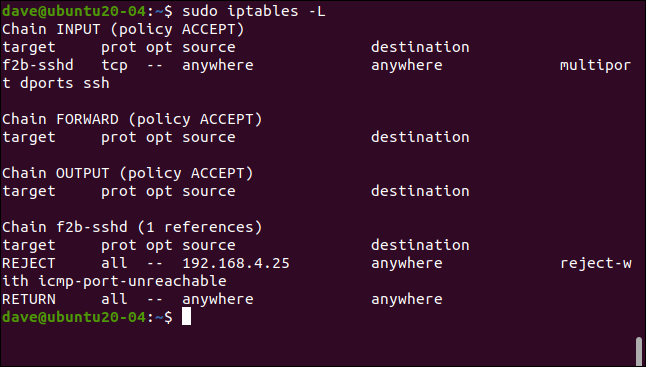
We have made a recent update to the INPUT policy by implementing a new rule. This rule directs SSH traffic to the f2b-sshd chain. As a result of this modification, any SSH connections originating from the IP address 192.168.4.25 will be rejected. It is important to note that we have not made any changes to the default bantime setting. Therefore, after a time period of 10 minutes, the aforementioned IP address will be automatically unbanned. This means that it will be able to establish fresh connection requests.
If you set a longer ban duration (like several hours), but want to allow an IP address to make another connection request sooner, you can parole it early.
We type the following to do this:
sudo fail2ban-client set sshd unbanip 192.168.5.25

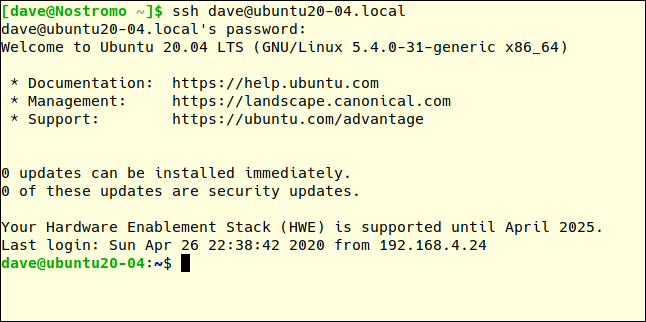
On our remote computer, if we make another SSH connection request and type the correct password, we'll be allowed to connect:
ssh dave@ubuntu20-04.local
Simple and Effective
Content must be written in English with placeholder
An elegant solution to a tricky problem is fail2ban, which requires minimal configuration and causes almost no operational overhead to you or your computer.


