
Step-by-Step Guide: Enabling Hardware-Accelerated GPU Scheduling in Windows 10 and 11
Enhance the performance of your apps and games effortlessly with Hardware-Accelerated GPU Scheduling in Windows 10 and 11 Discover how to enable this feature for smoother experiences No more lag or slowdowns!
Some Noticeable Information
To enable "Hardware-Accelerated GPU Scheduling" on Windows 10, go to Settings > System > Display > Graphics Settings. For Windows 11, access Settings > System > Display > Graphics > Change Default Graphics Settings and activate "Hardware-Accelerated GPU Scheduling."
What Is Hardware-Accelerated GPU Scheduling?
Enhancing Gaming and Video Performance with Hardware-Accelerated GPU Scheduling on Windows 10 and Windows 11
Typically, a computer's processor delegates visually and graphically demanding data to the GPU in order to ensure smooth operation of games, multimedia, and other applications. The CPU collects frame data, assigns commands, and prioritizes them sequentially to enable GPU rendering.
However, with the introduction of the Hardware-Accelerated GPU Scheduling feature, the GPU's scheduling processor and VRAM take over these tasks and execute them in groups, or batches, to render frames. This allows the GPU to alleviate some of the processor's workload and potentially decrease latency, resulting in improved performance for your PC.
Should You Enable Hardware-Accelerated GPU Scheduling?
Enabling GPU scheduling is highly recommended if you have a compatible graphics card (more information on compatibility below), as it can significantly enhance your computer's performance. Specifically, you can expect noticeable improvements when engaging in resource-intensive activities like video editing or gaming.
If any issues arise after enabling this feature, the only reason you should avoid using it is if you encounter any problems. In case your apps cease to function or if you experience graphics-related issues upon activation, it might be better to keep GPU scheduling disabled. The good news is that disabling this feature after testing it is a simple process, as we will elaborate.
What You'll Need to Make This Feature Work
Although introduced in the Windows 10 May 2020 Update, this feature remains disabled in both Windows 10 and 11. Additionally, in order to utilize this feature, your computer must have an NVIDIA graphics card (GTX 1000 or newer) or an AMD graphics card (5600 series or newer) with the most up-to-date graphics driver.
Regrettably, there is currently no specific combination of hardware (CPU and GPU) that is known to yield the optimal performance with this feature. Therefore, your experience with this feature may vary depending on the CPU, GPU, and graphics drivers installed on your PC.
Here's how you can enable it on your Windows 10 and 11 PC. It's a good idea to update the graphics drivers on your PC before you begin.
Turn On Hardware-Accelerated GPU Scheduling in Windows 10
Using Settings
Enabling Hardware-Accelerated GPU Scheduling on Windows 10
There are two methods to enable Hardware-Accelerated GPU Scheduling on your Windows 10 PC: through the Settings or using the Registry Editor. Both methods achieve the same outcome. Here are the steps for each method:
1. Using Settings:
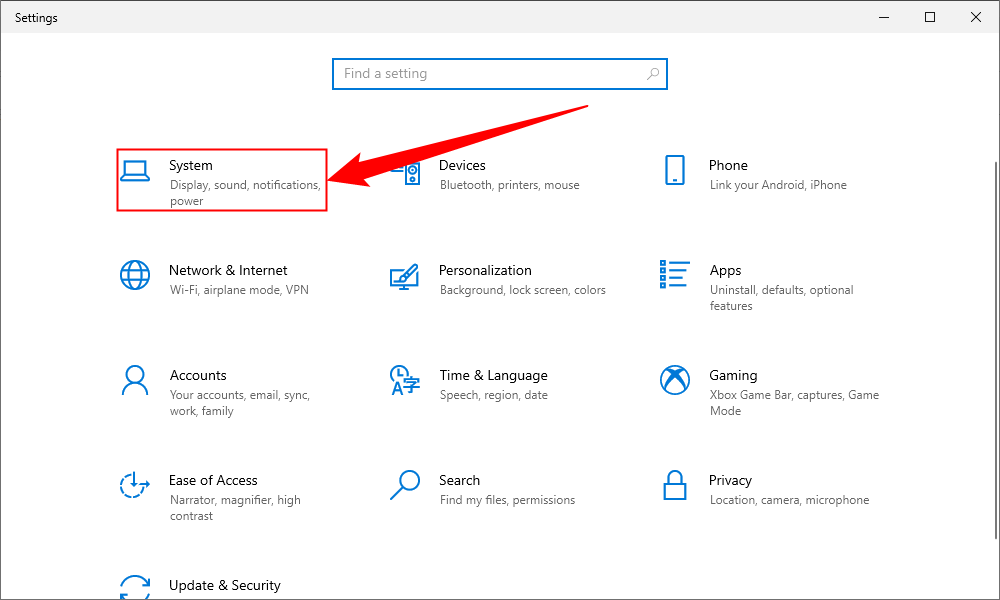
- Open the Start menu and click on "Settings."
- In the Settings window, select "System."
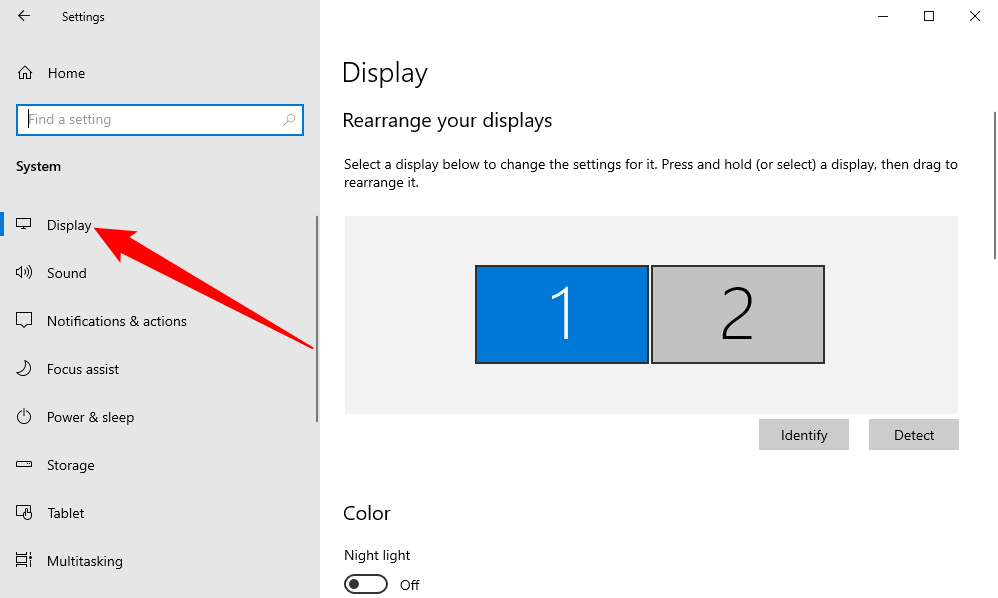
- From the left sidebar, choose "Display."
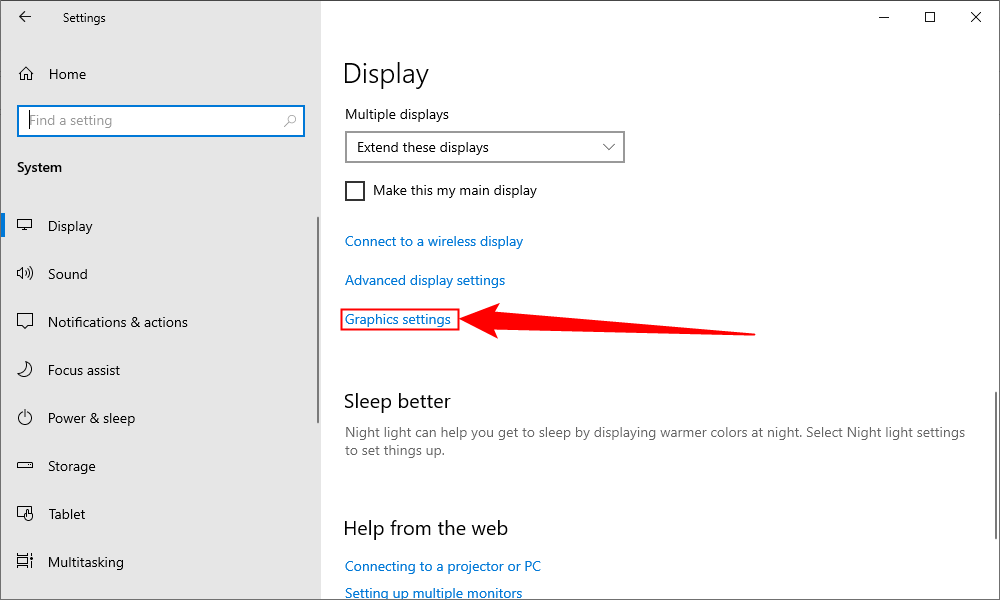
- Scroll down and click on "Graphics settings" located under the "Multiple displays" section.
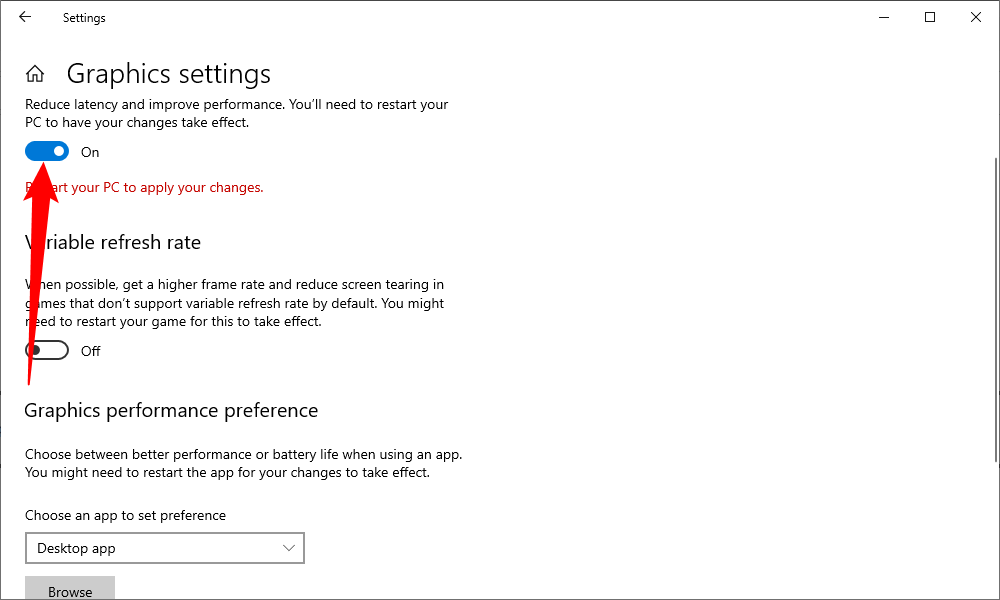
- Under the "Graphics settings" page, ensure that the "Hardware-Accelerated GPU Scheduling" toggle switch is turned on.
2. Using Registry Editor:
- Press the Windows key + R on your keyboard to open the Run dialog box.
- Type "regedit" and hit Enter. This will open the Registry Editor.
- In the Registry Editor, navigate to the following path:
HKEY_LOCAL_MACHINE\SYSTEM\CurrentControlSet\Control\GraphicsDrivers
- Right-click on an empty space in the right pane and choose "New" > "DWORD (32-bit) Value."
- Name the new value "HwSchMode" and press Enter.
- Double-click on the newly created "HwSchMode" value and set its value data to 2. Click OK.
- Restart your computer for the changes to take effect.
By following either of these methods, you can successfully enable Hardware-Accelerated GPU Scheduling on your Windows 10 PC.
Start by launching the Settings app on your PC. You can do this by pressing Windows+i.
In Settings, select "System."
In the sidebar on the left, click "Display."
On the right pane, at the bottom, choose "Graphics Settings."
On the following screen, toggle on the "Hardware-Accelerated GPU Scheduling" option.
To disable the feature in the future, simply toggle off the "Hardware-Accelerated GPU Scheduling" option again.
Close the Settings app and reboot your PC to bring your changes into effect.
Using the Registry Editor
To enable Hardware-Accelerated GPU Scheduling via the Registry Editor, first open the Run box by pressing Windows+R. In this box, type the following and press Enter:
regedit
Type the following in the path box at the top of the Registry Editor and press Enter:
Computer\HKEY_LOCAL_MACHINE\SYSTEM\CurrentControlSet\Control\GraphicsDrivers
In the pane on the right, double-click the option that says "HwSchMode."
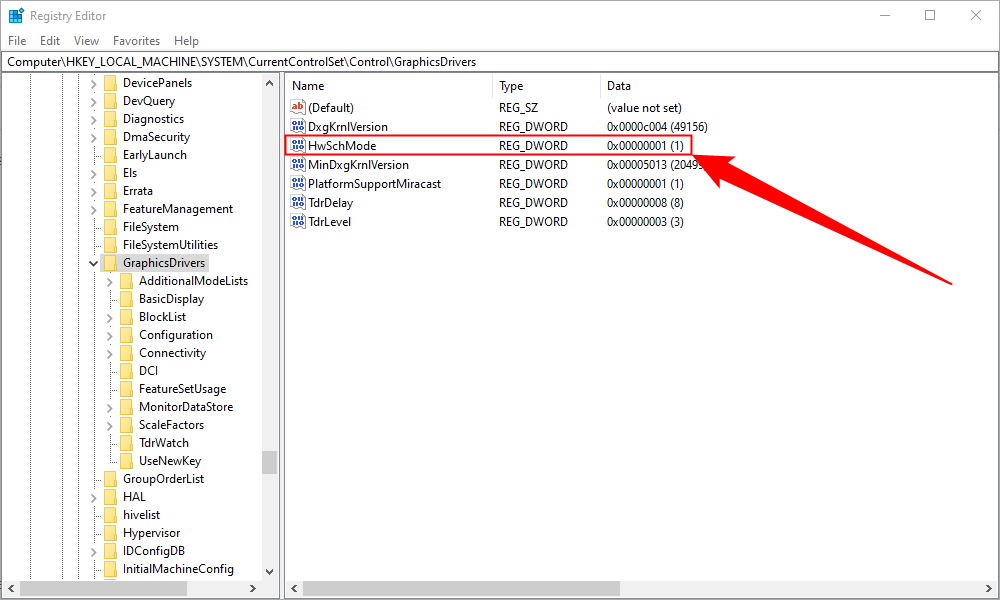
On the entry edit box, select the "Value Data" field and enter 2 . In the "Base" section, choose "Hexadecimal." Then, select "OK."

In the future, to disable the feature, enter 1 in the "Value Data" field, choose "Hexadecimal," and select "OK."
Close Registry Editor, restart your PC, and you have Hardware-Accelerated GPU Scheduling enabled on your computer. Enjoy!
Enable Hardware-Accelerated GPU Scheduling in Windows 11
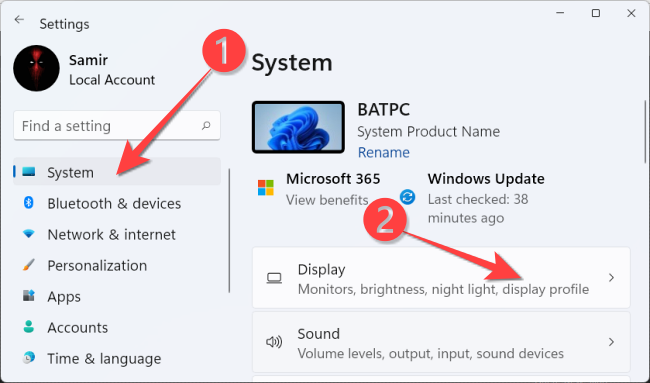
To activate the GPU scheduler in Windows 11, open the "Settings" app by pressing Windows+i. Then, navigate to the "Display" option in the "System" section.
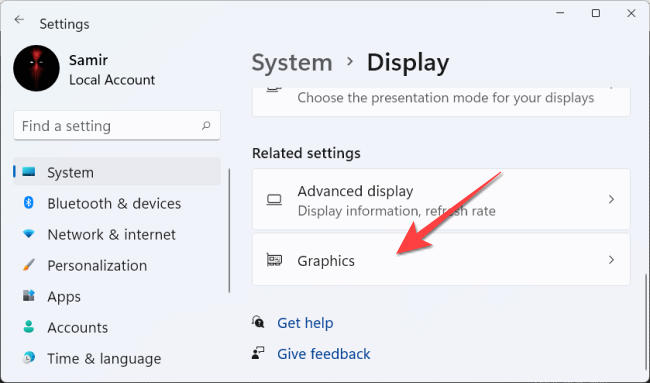
From the "Related Settings" section, select "Graphics."
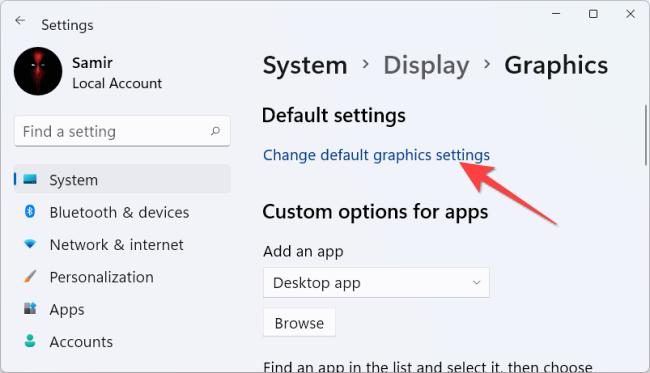
Choose "Change Default Graphics Settings."
Then, toggle on the switch under "Hardware-Accelerated GPU Scheduling" and select "Yes" from the User Access Control prompt that shows up.
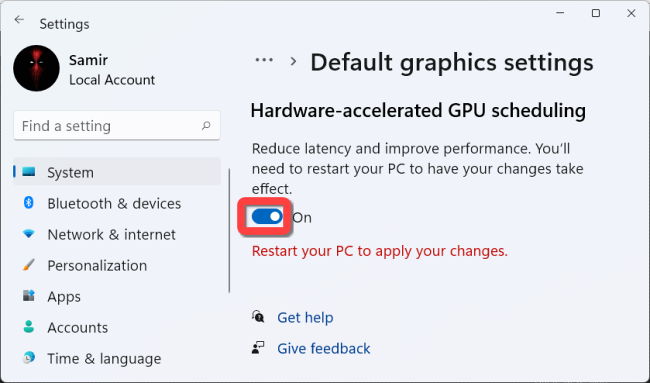
To disable GPU scheduling later, just turn off the "Hardware-Accelerated GPU Scheduling" option. Once done, exit the "Settings" app and reboot your computer for the changes to take effect.
Microsoft asserts that there may not be any immediate notable alterations. Nonetheless, in the event that this functionality impedes rather than enhances your computer's performance, you have the option to deactivate it. There you have it! You can determine whether it enhances your gaming and application experience on your Windows 11 computer.
Editor's P/S
As a Gen Z netizen, I am always on the lookout for ways to improve the performance of my PC, especially when it comes to gaming and video editing. I was excited to learn about the Hardware-Accelerated GPU Scheduling feature in Windows 10 and 11, which promises to enhance gaming and video performance by offloading some of the workload from the CPU to the GPU.
I followed the steps in the article to enable Hardware-Accelerated GPU Scheduling on my Windows 10 PC, and I immediately noticed a difference in performance. My games ran smoother, and video editing was much faster. I was also impressed by the fact that I didn't experience any compatibility issues with my NVIDIA graphics card.
Overall, I am very happy with the Hardware-Accelerated GPU Scheduling feature. It is a simple and effective way to improve the performance of your PC, and I highly recommend enabling it if you have a compatible graphics card.


