
Sending PowerShell Command Output to a File: A Simple Guide
Learn how to easily save the output of PowerShell commands in Windows 10 and 11 Discover how to create TXT or CSV files and view their contents within PowerShell Master the art of managing command outputs efficiently
Some Noticeable Information
In order to save the output of a PowerShell command to a TXT file, you can follow these steps: First, enter the desired command. After that, press the Spacebar key. Next, type the greater than symbol (>) and press the Spacebar again. Finally, specify the complete path to the TXT file where you want to store the output.
To create a CSV file using a PowerShell command, follow these steps:
1. Enter your command.
2. Press the Spacebar.
3. Type the | (pipe) symbol.
4. Press the Spacebar.
5. Type "Export-CSV".
6. Press the Spacebar.
7. Specify the full file path for the CSV file.
8. Press the Spacebar.
9. Type "-NoTypeInformation".
10. Press Enter.
If you want to save the result of your PowerShell command in a TXT or CSV file on your Windows 11 or Windows 10 PC, it's a simple process. Let us guide you through it.
Send a PowerShell Command's Output to a Text File
To save the output of your PowerShell command to a text (TXT) file, follow these steps:
1. Open a PowerShell window.
2. Type the desired command.
3. After entering the command, press the Spacebar.
4. Type the > (greater than) symbol.
5. Press the Spacebar again.
6. Enter the complete path to the text file where you want to save the output.
7. Press Enter to execute the command and save the output to the specified text file.
To save the output of the "systeminfo" command to a file called "SystemInfo.txt" on your desktop, use the following command:
systeminfo > C:\Users\mahes\Desktop\SystemInfo.txt
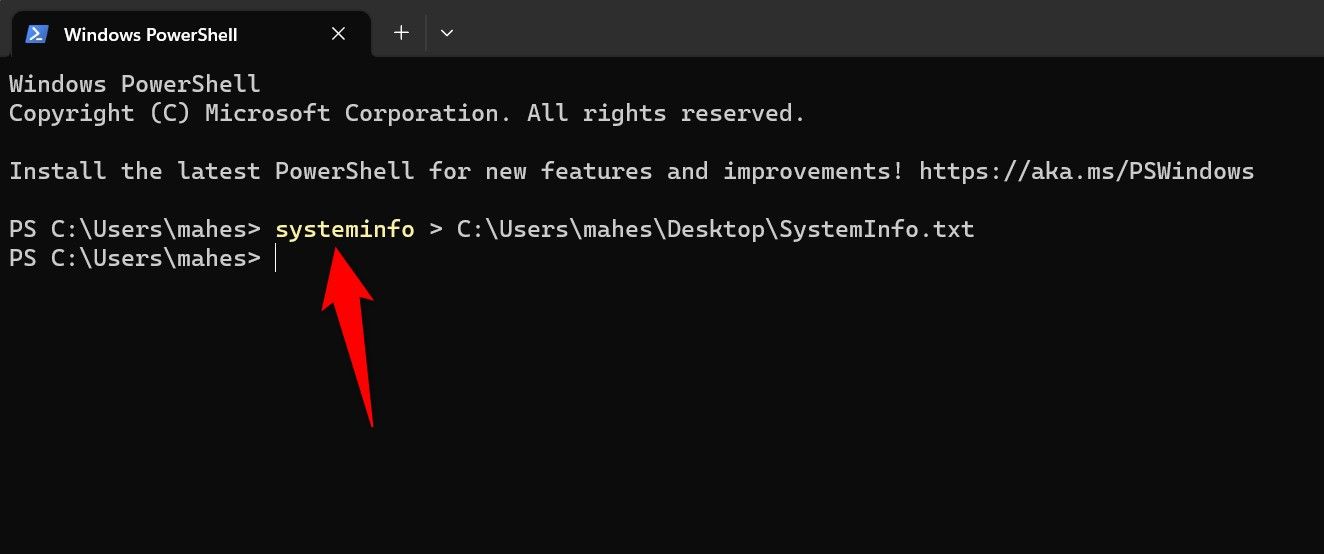
Upon pressing Enter, PowerShell will generate the specified file and append the output of your command to it. Once completed, navigate to the designated path to locate your newly created file.
Send a PowerShell Command's Output to a CSV File
If you want to create a CSV file containing the output of your specified PowerShell command, use the tool’s "Export-CSV" cmdlet.
To accomplish this, open PowerShell and input your desired command. Afterward, press the Spacebar, then add the | (pipe) sign, press the Spacebar again, and input "Export-CSV". Following that, press the Spacebar, input the complete file path where you wish to create the CSV file, press the Spacebar again, and type "-NoTypeInformation". Finally, press Enter.
For instance, if you would like to store the item list of your current directory in a file named "List.csv" on your desktop, utilize a command resembling the following. It is important to note that the "NoTypeInformation" parameter is included to exclude the #TYPE information header from the resulting CSV file.
Get-ChildItem | Export-CSV C:\Users\mahes\Desktop\List.csv -NoTypeInformation
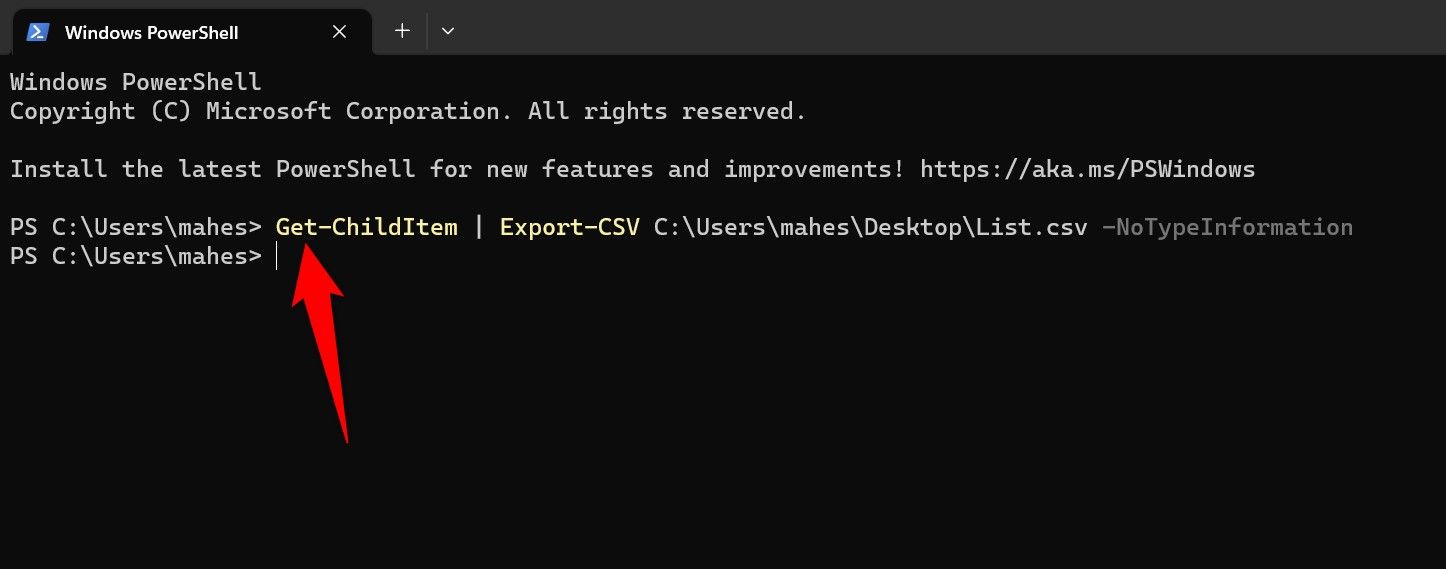
When you’ve finished running the command, you’ll have a file called "List.csv" on your desktop containing the list of the items in your current directory.
View Your Text or CSV File’s Contents in PowerShell
To view the contents of your recently created text or CSV file directly in PowerShell without the need to switch to another application, follow these steps:
1. Open a PowerShell window.
2. Type the following command, but make sure to replace "PATH" with the complete file path of your text or CSV file.
3. Press Enter.
Type PATH
For example, if you want to read the contents of a file named "SystemInfo.txt" placed on your desktop, you’d use the following command:
Type C:\Users\mahes\Desktop\SystemInfo.txt

PowerShell will promptly load the contents of your file in the open window, enabling you to peruse the file content.
That concludes all the necessary information on how to save your PowerShell command results in text or CSV files. Enjoy!
Editor's P/S
As a PowerShell enthusiast, I found this article to be quite informative and useful. The guide provides clear and concise instructions on how to save the output of PowerShell commands to TXT or CSV files. The steps are well-organized and easy to follow, making it accessible to both novice and experienced users.
Moreover, the inclusion of specific examples, such as the "systeminfo" and "Get-ChildItem" commands, helps to illustrate the concepts and reinforce understanding. Overall, I believe this article serves as a valuable resource for anyone looking to enhance their PowerShell skills and effectively manage command outputs.


