Mastering File Compression and Extraction in Linux: Essential Terminal Tips
Learn how to efficiently manage ZIP files in the Linux terminal with this comprehensive guide Master the zip and unzip commands, create password-protected archives, extract files to a specific directory, exclude and overwrite files, explore file details, and utilize additional helpful utilities
Key Takeaways
ZIP files are widely used on Windows, macOS, and Linux systems, making them the most common form of compressed archive.
To zip files (or folders) on Linux, run: zip zipname files_to_be_zipped
To extract files from a ZIP, run: unzip zipname
ZIP files are widely utilized as universal archives in Windows, macOS, and Linux environments. With a few commonly used Linux terminal commands, you have the capability to create a zip archive or extract files from an existing one.
The ZIP Compressed Archive File Format
The ZIP format is widely dominant in the Windows realm, making it the most commonly used compressed archive format globally. While Linux commonly uses .tar.gz and tar.bz2 files, Windows users typically prefer the ZIP format when sending archives. If you need to archive files and share them with a Windows user, using the ZIP format will provide the easiest and most compatible solution for everyone involved.
zip, unzip, and Other Utilities
You may be familiar with the fact that Linux and Unix-like operating systems, such as macOS, offer built-in tools for creating ZIP files and extracting files from them. These tools are called zip and unzip. However, there is a range of other useful utilities within this family, including zipcloak, zipdetails, zipsplit, and zipinfo.
To ensure the presence of these utilities in the standard installation of various Linux distributions, we conducted a check. All the utilities were found in Ubuntu versions 23.04, 19.04, 18.10, and 18.04, as well as in Manjaro 18.04. However, on Fedora 29, only zip and unzip were included, while the rest of the utilities were absent. The same situation was observed with CentOS.
To install the missing elements on Fedora 29, execute the following command:
sudo dnf install perl-IO-Compress

To install the missing elements on CentOS 7, use the following command:
sudo yum install perl-IO-Compress

In case any of the zip utilities are not available in a Linux distribution not mentioned earlier, it is necessary to utilize the package management tool specific to that Linux distribution for the installation of the required package.
How to Create a ZIP File with the zip Command
To generate a ZIP file, provide zip with the name of the archive file and specify the files to be included. The ".zip" extension is not necessary for the archive name, although it is harmless to include it.
To create a file called source_code.zip containing all the C source code files and header files in the current directory, you would use this command:
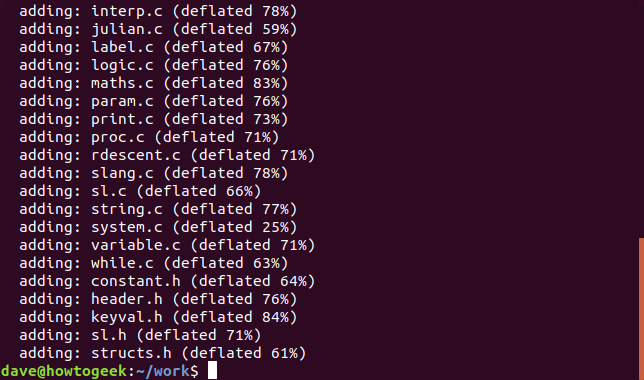
zip source_code *.c *.h

Each file is listed as it's added. The name of the file and the amount of compression that was achieved on that file is shown.
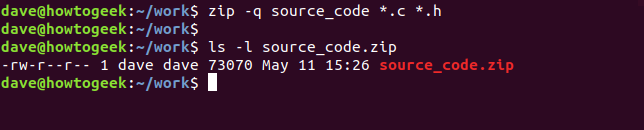
If you look at the new ZIP archive, you can see that the ".zip" file extension has been added automatically by zip.
ls -l source_code.zip

If you do not want to see the output from zip as the ZIP file is created, use the -q (quiet) option.
zip -q source_code *.c *.h
Including Directories in ZIP Files
To add sub-directories to the ZIP file, utilize the -r (recursive) option and specify the sub-directory's name in the command line. To generate a ZIP file with both the previous content and the archive sub-directory, execute the following command:
zip -r -q source_code archive/ *.c *.h

In order to show consideration for the individual who will be extracting the files from the ZIP file you are about to create, it is recommended to package the files inside a directory within the ZIP file. This ensures that when the recipient extracts the ZIP file, all the files will be neatly organized within a designated directory on their computer.
Archive the work directory and all sub-directories by executing the following command. Please ensure that the command is issued from the parent directory of the work folder.
Use the command: zip -r -q source_code work/

Setting the Level of Compression
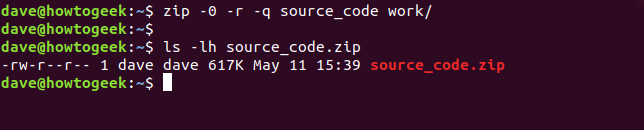
To specify the level of compression applied to files added to the ZIP archive, use the range of 0 to 9. A compression level of 0 indicates no compression, while higher levels increase compression but also increase the time required to create the ZIP file. For small ZIP files, the difference in time is generally not significant. In fact, the default compression level (6) is likely sufficient for small ZIP files. To set a specific compression level, include the desired number as an option preceded by a "-" on the command line.
zip -0 -r -q source_code work/
The default compression level is 6. There is no need to provide the -6 option, but it will do no harm if you do.
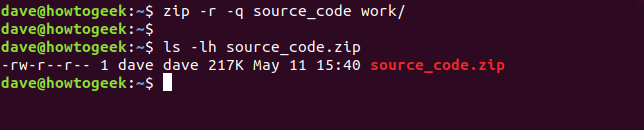
zip -r -q source_code work/
The maximum compression level is level 9.
zip -9 -r -q source_code work/

Archiving files and directories here, the distinction in compression levels between no compression (level 0) and the default compression (level 6) is 400K. The disparity between the default compression and the maximum compression (level 9) is just 4K. Although seemingly negligible, for archives comprising hundreds or even thousands of files, the slight increase in compression per file would accumulate into significant space savings.
Adding Passwords to ZIP Files
Adding passwords to ZIP files is easy. Use the -e (encrypt) option and you'll be prompted to enter your password and to re-enter it for verification.
zip -e -r -q source_code work/
How to Unzip a ZIP File With the unzip Command
To extract the files from a ZIP file, use the unzip command, and provide the name of the ZIP file. Note that you do need to provide the ".zip" extension.
unzip source_code.zip
As the files are extracted they are listed to the terminal window.
ZIP files do not include information about file ownership. When files are extracted from the ZIP file, the owner of all these files is set to the user who performed the extraction.
Similarly to the ZIP utility, the unzip command also provides a -q (quiet) option. This option suppresses the display of the file listing while extracting the files.
unzip -q source_code.zip
Extracting Files to a Target Directory
To have the files extracted in a specific directory, use the -d (directory) option, and provide the path to the directory you wish the archive to be extracted into.
unzip -q source_code.zip -d ./development
Extract Password Protected ZIP Files
If a ZIP file has been created with a password, unzip will ask you for the password. If you do not provide the correct password, unzip will not extract the files.
unzip -q source_code.zip
If the privacy and security of your password are not a concern to you, and you want it to be easily accessible in your command history, you have the option to provide the password on the command line using the -P (password) option. Please note that the capital letter "P" must be used.
To extract the contents of the "source_code.zip" file, you can use the following command:
unzip -P fifty.treacle.cutlass -q source_code.zip
Excluding Files
To exclude specific files or file groups from extraction, utilize the -x (exclude) option. In the given scenario, the objective is to extract all files except for those that conclude with the ".h" extension.
Command: unzip -q source_code.zip -x "*.h"
Overwriting Files
If you have accidentally deleted some files that were extracted from an archive, the best solution is to extract the files again. However, when extracting the ZIP file in the same directory as before, the unzip process will request confirmation on whether to overwrite the existing files. You will need to choose one of the following options.
Apart from the r (rename) response, these responses are case sensitive.
y: Yes, overwrite this file
n: No, don't overwrite this file
A: All, overwrite all of the files
N: None, overwrite none of the files
r: Rename, extract this file but give it a new name. You will be prompted for a new name.
To force unzip to overwrite any existing files use the -o (overwrite) option.
unzip -o -q source_code.zip
To efficiently replace the missing files, only extract the files from the archive that are not present in the target directory using the unzip command with the -n (never overwrite) option.
Command: unzip -n source_code.zip
Looking Inside a ZIP File
To preview the contents of a ZIP file before extracting it, utilize the -l (list archive) option in conjunction with the unzip command. Pipe the output through less for easier readability.
Example:
unzip -l source_code.zip | less
The output shows the directories and files within the ZIP file, their length and the time and date they were added to the archive. Press "q" to quit from less.
There are other ways to peek inside a ZIP file which give different types of information, as we shall see.
Add a Password With the zipcloak Command
In case you have created a ZIP file without adding a password, there is a solution. By utilizing the zipcloak command, you can easily add a password to the ZIP file. Simply provide the name of the ZIP file in the command line. A prompt will appear, requesting you to input a password. Additionally, it is essential to verify the password by entering it a second time.
zipcloak source_code.zip
View File Details With the zipdetails Command
The zipdetails command provides a wealth of information about the ZIP file. To manage the extensive output generated by this command, it is recommended to utilize the less command through piping.
zipdetails source_code.zip | less
Note that the content will contain filenames even if the ZIP file is password protected. This kind of information is stored as meta-data within the ZIP file, separate from the encrypted data.
Search Inside the File With the zipgrep Command
With the zipgrep command, you can efficiently search for specific text within files in a ZIP file. In this particular example, we aim to identify the files within the ZIP file that contain the text "keyval.h".
zipgrep keyval.h source_code.zip
We can observe that the files slang.c and getval.c comprise the string "keyval.h". Additionally, it is evident that the ZIP file consists of two duplicates of each of these files located in various directories.
View Information With the zipinfo Command
The zipinfo command gives you yet another way to look inside a ZIP file. As before, we pipe the output through less.
zipinfo source_code.zip | less
From left to right the output shows:
The file permissions
The version of the tool used to create the ZIP file
The original file size
A file descriptor (described below)
The method of compression (deflation, in this case)
The data and time stamp
The file name and directory path.
The file descriptor consists of two characters. The initial character will be either "t" or "b" to denote a text or binary file. If it is a capitalized letter, the file is encrypted. The second character can be any of the four options. This character indicates the type of meta-data included for the file: none, extended local header, extra field, or both.
-: If neither exists, the character will be a hyphen
l: if there is an extended local header but no extra field
x: if there is no extended local header but there is an extra field
X: if there is an extended local header and there is an extra field
Split the File With the zipsplit Command
To send a ZIP file to someone else, you can utilize the zipsplit command to divide the file into smaller ZIP files if there are size limitations or transmission issues. By using the -n (size) option, you can specify the maximum size for each new ZIP file. In this instance, we are dividing the source_code.zip file into smaller ZIP files, ensuring that none of them exceed 100 KB (102400 bytes).
zipsplit -n 102400 source_code.zip
The chosen size must be equal to or larger than the size of any file within the ZIP file.
By utilizing these commands, you have the ability to generate ZIP files, extract received ZIP files, and carry out a range of additional tasks on them, all within the Linux terminal environment.