
Effortless Tips for Maximizing Boot Partition Space on Ubuntu
Learn how to effectively free up space in the boot partition on Ubuntu Resolve the boot space full error by efficiently checking usage and employing simple methods to clean the boot partitions Take control of your Linux system's boot partition management for optimal performance
Key Takeaways
To optimize the boot partition and create more space, utilize two commands: "sudo apt autoremove" or "dpkg --purge" with a specified package name. By executing these commands, obsolete kernels will be deleted, resulting in freed up space within the boot partition.
To manage and remove old kernels effectively, consider utilizing a graphical application such as Synaptic. With this tool, you can efficiently mark multiple kernel packages for removal, thereby creating additional free space. Moreover, if you need to expand the available space further, you can achieve this by permanently resizing the boot partition via GParted.
What Is Boot Partition on Linux? (And Why You Should Clean It)
Efficiently Clean Up the Boot Partition on an Ubuntu Linux SystemCleaning up the boot partition on an Ubuntu Linux system generally involves the elimination of obsolete or unused kernel files. As you continually update your Linux kernel over time, it leads to the accumulation of outdated kernel versions, which occupy valuable storage space. To effectively reclaim boot space, you have two options: simply remove the outdated kernels or resize the boot partition as a whole.
The boot partition in Linux houses the necessary files for initiating the operating system, including the kernel, initrd, and bootloader. Typically located at /boot/, the boot partition facilitates the integration of multiple operating systems on a single machine, permitting each system to possess its individual bootloader.
Regularly cleaning the boot partition is advisable to eliminate outdated and unused kernels. These obsolete kernels occupy significant space and can impede system updates, potentially hindering the boot process. In addition, certain old kernels might harbor bugs or vulnerabilities that pose a security risk to your Linux system.
To remove outdated kernels, you have the option of utilizing tools such as apt autoremove or manually deleting the files located in /boot/. However, exercise caution and ensure not to delete the current kernel or any files essential for the bootloader to function properly. Failure to do so may result in your system being unable to boot.
It is important to note that resizing the boot partition on Linux carries inherent risks, including potential data loss, system corruption, or failure to boot. It is strongly advised to back up your data and verify the health of your disk before proceeding with any modifications to the boot partition.
Check Boot Partition Usage
Before clearing space, it is essential to assess the usage of the boot partition. This evaluation will provide you with an understanding of the extent to which your system is lacking boot partition space. Additionally, it will aid in identifying the specific amount of space required for the boot partition.
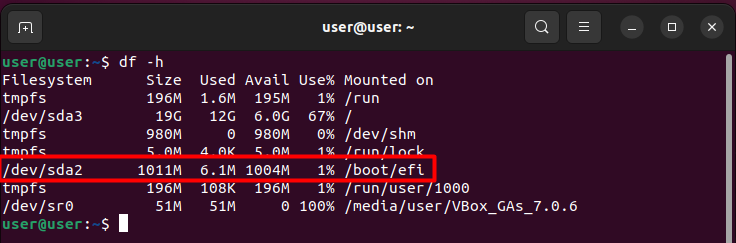
To check the boot partition usage you can run the df -h command. The -h option here displays the information in a more readable format—in gigabytes and megabytes:
df -h
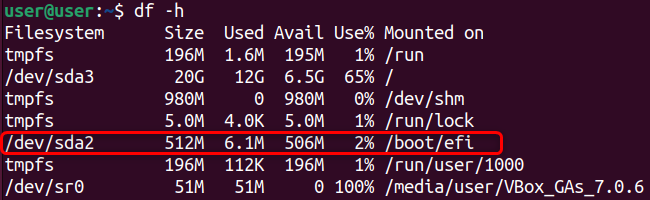
The output of this command will display the boot partition total size, used space, available space, and percentage usage.
Removing Old Kernels Using the Linux Terminal
Over time, as you regularly update your Ubuntu Linux system, it is common for old kernel files to accumulate. These older kernel versions might take up crucial disk space in the boot partition.
To free up space in the boot partition and make room for other files or new kernels, simply delete the old and unused kernel files. For a hassle-free process, utilize the apt autoremove command in the terminal. This command not only deletes the unused kernels but also removes their associated dependencies. Execute the following command:
sudo apt autoremove

The list of packages to be removed will be shown when executing this command. To proceed, press Y.
In order for the autoremove method to function properly, there needs to be available space in the /boot partition. If the /boot partition is full, you will need to manually remove outdated kernels beforehand.
Before you proceed with manually deleting old kernels, make sure to check the name and version of the currently running kernel. This step is crucial to avoid accidentally removing the active kernel, which is essential for maintaining system stability.
To determine the currently running kernel version, you can utilize the uname command. This command will display the kernel version that your system is currently using, which should be retained and not deleted.
uname -r

After knowing the current kernel you can use the ls command to list all the contents of the /boot directory in a detailed format:
ls -l /boot
This command displays the Linux kernel files, including vmlinuz (kernel images), initrd.img (initial ramdisk images), and configuration files. Unused kernels labeled as "old" or with a version number different from your current kernel can be deleted.

To list all installed packages with "linux-image" in their package names, use the following dpkg command. This command specifically focuses on packages pertaining to the Linux kernel, encompassing various kernel versions and associated modules.
Command: dpkg -l | grep linux-image
This will show you something like this:
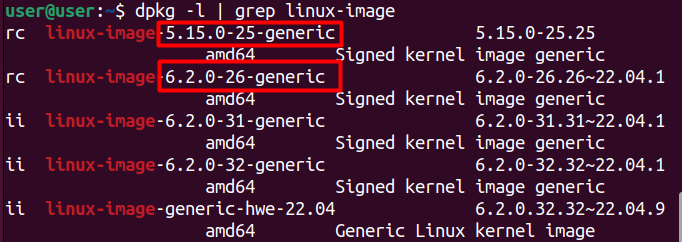
The system has multiple Linux kernel images installed. The ones labeled as "ii" are installed, while those labeled as "rc" have been removed but still have residual configuration files. The older kernel versions are 5.15.0-25-generic and 6.2.0-26-generic. The most recent version is 6.2.0-32-generic, followed by 6.2.0-31-generic.
It is worth noting that the ls -l/boot command does not display the 5.15.0-25-generic and 6.2.0-26-generic kernels as they have already been deleted and identified as "rc" by the dpkg command.
To ensure system stability and prevent data loss, it is advisable to retain one or two previous kernels as backup. These backups serve as a failsafe in case the latest kernel fails and eliminate the need for operating system reinstallation.
As the current kernel is 6.2.0-32-generic, it is important not to delete it. To remove any older, unused kernels, utilize a command following this format:
The package containing the old kernel version can be removed by using the following command:
sudo apt remove linux-image-
Specify the desired kernel to be removed.
To delete the linux-image-5.15.0-25-generic kernel you can use the following command:
sudo apt remove linux-image-5.15.0-25-generic

This will also remove any related packages, such as linux-modules or linux-headers. Confirm the action by pressing Y.
Similarly, you can also remove the other older kernel using:
sudo apt remove linux-image-6.2.0-26-generic

The dpkg -l list still shows the old kernel packages even after using the apt remove command. This is because the apt remove command is designed to be cautious and avoid removing packages that other packages may still need. Therefore, if it detects that a package is already in a "removed" state, it may not attempt to remove it again.

This is why, in the above case, running apt remove didn't remove the package from the dpkg -l list—as it was already marked as "rc".
To completely uninstall a package and its associated configuration files from your system, utilize the dpkg purge command. This command, dpkg --purge, does not evaluate dependencies; it solely removes the specified package. Execute the following command to remove the package "linux-image-5.15.0-25-generic":
sudo dpkg --purge linux-image-5.15.0-25-generic
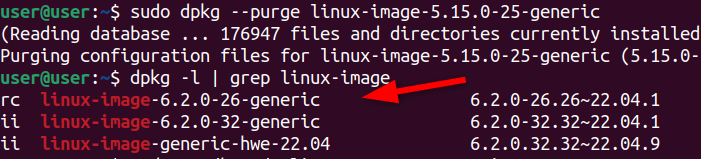
Executing this command will effectively eliminate the presence of the package linux-image-5.15.0-25-generic, resulting in the removal of the linux-image package itself and all related dependencies. Consequently, the package will no longer be visible in the dpkg -l list.
Similarly, you can also completely remove the 6.2.0-26-generic kernel package using the below command:
sudo dpkg --purge linux-image-6.2.0-26-generic
Now the 6.2.0-26 package is also removed from the dpkg -l list.

You can also use the rm command to remove the old kernels from the boot partition.
sudo rm /boot/vmlinuz-6.2.0-26-generic
To remove multiple files with the same naming pattern, you can use the below command:
sudo rm /boot/*-6.2.0-{26}-*
The command will delete all files in the boot partition that match the pattern -6.2.0-{26} and you can delete multiple patterns by separating them with commas in a brace expansion.
sudo rm /boot/*-6.2.0-{26,31}-*
The above command deletes the files in the /boot directory with names that match the pattern -6.2.0-{26} or -6.2.0-{31}.
Now update the GRUB bootloader configuration to avoid displaying the older kernels:
sudo update-grub

Execute the autoremove command to eliminate any remaining packages that are no longer necessary. This command also ensures the removal of outdated initramfs and header files linked with the deleted kernels.
sudo apt autoremove
Removing Old Unused Kernel Files Using Synaptic
Eliminating outdated kernels through a terminal can present challenges and potential hazards. It demands the execution of intricate commands and precision in identifying the precise names of kernel packages. However, you can effortlessly uninstall obsolete kernels by utilizing a package manager tool with a graphical user interface known as Synaptic.
To improve system performance and save disk space, you can use Synaptic to selectively remove older, unused kernels. It is recommended to keep the current kernel and the previous one as a backup for your system.
To install Synaptic, follow these steps:
1. Open the terminal.
2. Enter the following command to install Synaptic:
sudo apt install synaptic

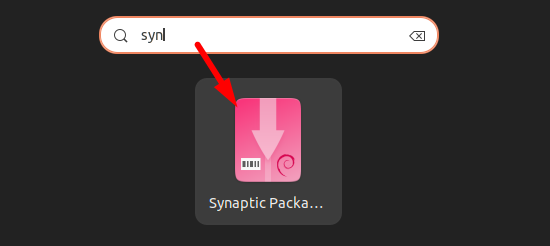
Launch Synaptic from the application menu or by typing sudo synaptic in a terminal window.
In the Synaptic window, click on the "Sections" button. Now select "Kernel and Modules". This will display all the installed kernel versions on your system.
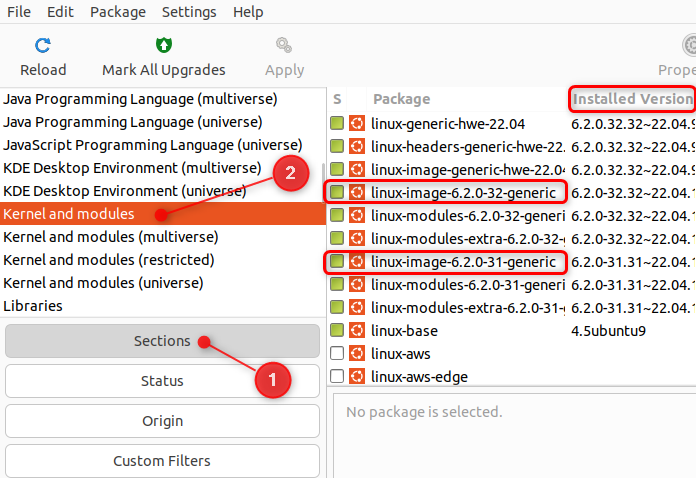
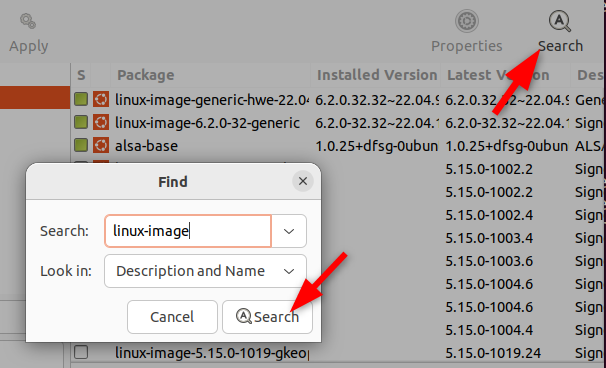
You can also use the "Search" option to find older kernels. Type linux-image and click "Search". This will display all the installed kernel packages on your system partitions.
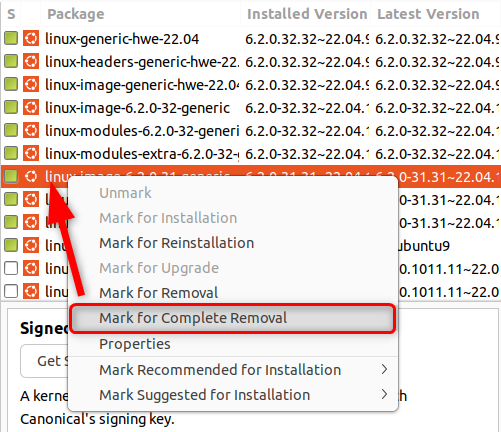
To remove any old kernel package (excluding the current and previous versions), simply right-click on it and select "Mark for Complete Removal". You can find the current kernel version by running the command "uname -r" in a terminal window.
Now, click on "Apply" to start deleting the selected kernel version.
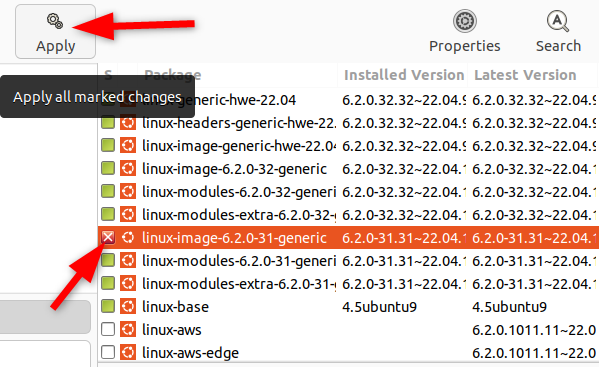
You will see a summary of the actions about to be taken. Confirm the removal of the selected packages by clicking the "Apply" button.
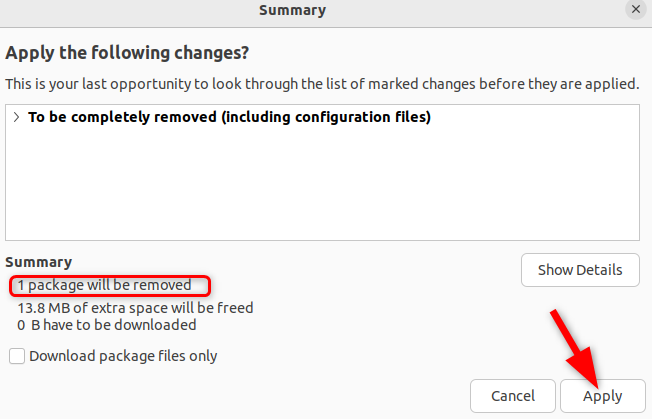
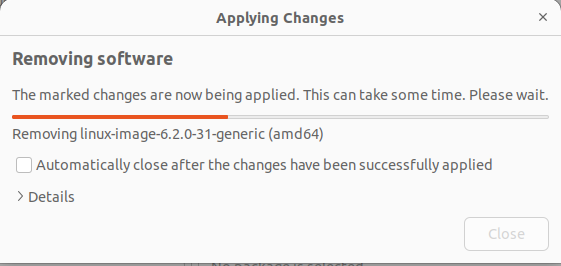
The selected kernel package files and their associated dependencies will be deleted. It will free up some disk space on the boot partition.
Resizing the Boot Partition on Ubuntu to Free Up Space
Both previously mentioned methods rely on eliminating unused kernels or packages. However, merely removing old kernels is not a lasting solution. It is important to note that your Ubuntu system's boot partition may still become full due to the installation of additional packages. Consequently, if you remain unsatisfied with the amount of space you have freed up, consider resizing the boot partition to prevent encountering errors related to a full directory.
To resize the boot partition on Ubuntu, utilize the GParted tool. GParted is a user-friendly partition editor that enables effortless resizing, moving, copying, and manipulation of partitions on your hard drive.
Before initiating the resizing process for your boot partition, it is crucial to create a backup of your important data. This task involves a considerable level of risk as it entails modifying the boundaries of the boot partition, which may potentially result in booting difficulties.
Begin the process by downloading the necessary GParted ISO file to create a bootable USB drive. GParted is a convenient partition management tool that functions as a portable version of the Ubuntu system.
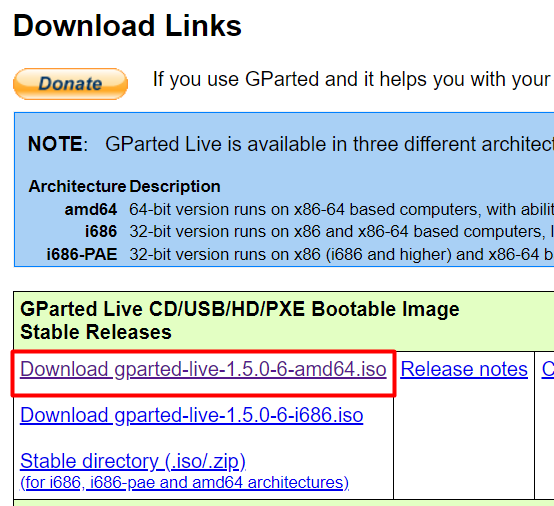
Once you have downloaded the GParted ISO file, you can utilize Rufus or a similar tool to create a bootable USB drive. This tool allows you to transfer the ISO file onto the USB drive, thereby enabling it to boot up and be utilized effortlessly.
Related: A Hassle-free Guide to Creating a Bootable Linux USB Flash Drive
Open your Ubuntu system and run the command df -h to determine the current size of the boot partition.
Launching GParted on a PC
Changing Boot Order to Use GPartedIn order to utilize GParted, it is necessary to modify the boot order within your system's BIOS settings. This entails instructing your system to boot from the USB drive or CD/DVD containing GParted, rather than your internal hard drive.
To access the BIOS mode on your system, simply restart it and press the designated key. The specific key required may vary depending on the system model and manufacturer, but common options include F1, F2, F10, F12, DEL, or ESC. For further guidance, consult your system manual or on-screen instructions. Additionally, if you want to boot your computer from a disc or USB drive, refer to our related article.
Access the BIOS or UEFI settings and navigate to the "Boot" or "Boot Order" menu. Adjust the boot order by placing the USB drive containing GParted at the top or designating it as the primary boot device. Alternatively, you may press the "Enter" key to initiate GParted directly from the USB drive.
Once you have successfully modified the boot order and saved the alterations, you must proceed to exit the BIOS mode and initiate a system restart. This will enable your system to boot from the USB drive or CD/DVD housing GParted.
Launching GParted as a Virtual Machine
To effectively use Ubuntu as a virtual machine (VM), it is necessary to create a bootable GParted VM. When configuring the GParted virtual machine, avoid creating a virtual hard disk as GParted functions as a live Linux distribution that operates entirely in RAM, eliminating the need for a virtual hard disk.
To ensure proper booting, adjust the GParted virtual machine settings to prioritize the optical drive as the primary boot device over the hard disk.
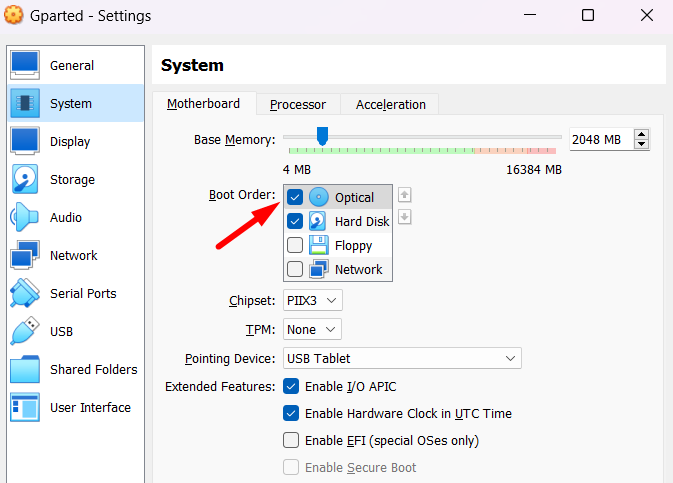
To prioritize the optical disk option, configure the virtual optical drive as the primary boot device. This guarantees that the GParted VM will recognize the GParted ISO or Live CD as the main boot source upon startup.
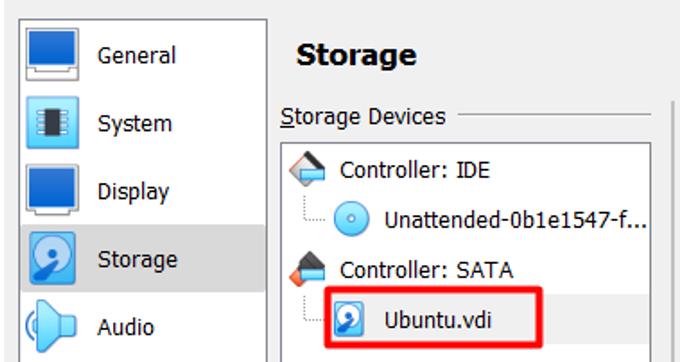
To utilize GParted, please follow these steps after configuring the GParted VM: Attach the virtual hard disk (VDI) that holds your Ubuntu installation to GParted. This particular VDI file corresponds to the storage of your Ubuntu virtual machine. By choosing the Ubuntu VDI within the SATA controller settings of the GParted VM, the Ubuntu virtual disk becomes accessible for editing in GParted. Locate the Ubuntu VDI at the designated location below:
C:\Users\[Username]\VirtualBox VMs\Ubuntu
Using GParted
After you boot the GParted from the USB drive, you will see the GNOME Partition Editor Window. By default, the GParted Live option is selected. Press Enter to launch GParted.
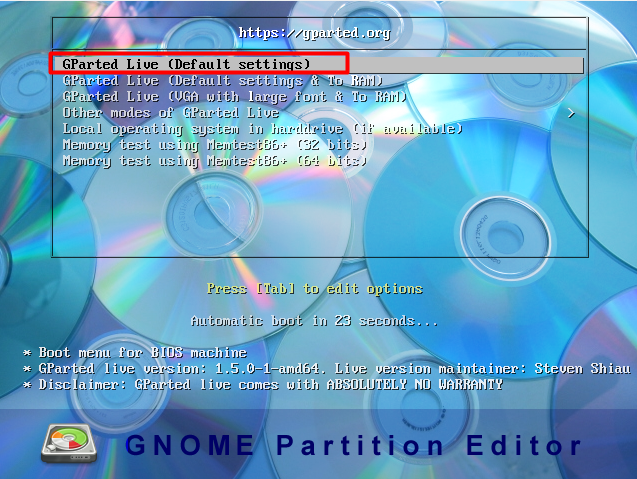
Press the enter key to continue with default settings and follow any on-screen instructions.
The GParted window will open showing all partitions on your system.

Prior to proceeding, ensure that you identify a non-system partition (/dev/sda3) and unmount it. This action will detach the partition from the file system, allowing safe modifications. If you come across a Gray "Mount" option, it indicates that the partition is already unmounted.
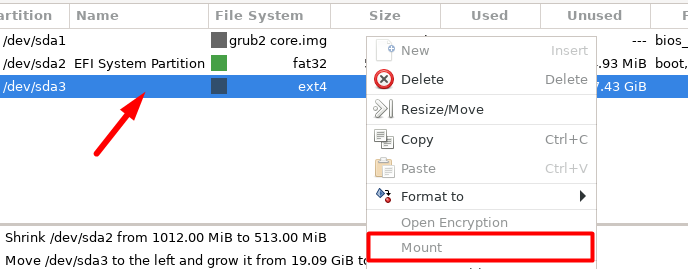
To optimize the disk usage, start by reducing the size of the non-system partition, creating unallocated space. Then, utilize this space to expand the boot partition. Simply right-click on the non-system or root partition and choose "Resize/Move".
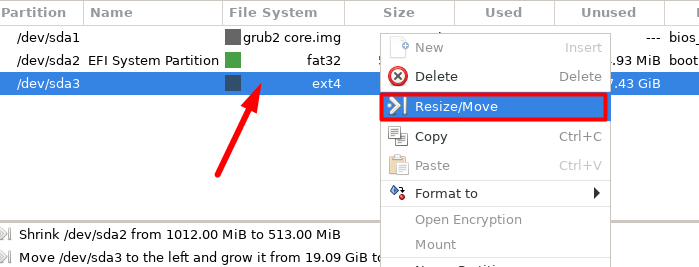
To increase the size of a boot partition, unallocated space must be available right next to the boot partition.
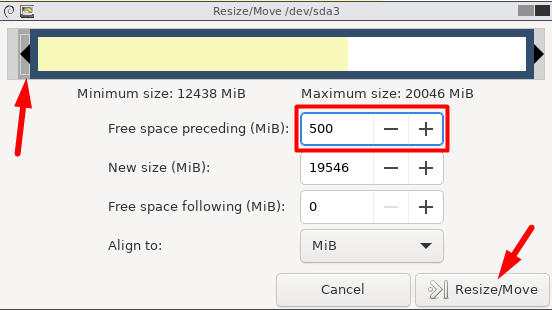
A dialog box will pop up, allowing you to drag the left edge of the partition to reduce its size and generate unallocated space alongside the boot partition. You can alternatively input the desired size in the "New Size" field. To implement the modifications, click on "Resize/Move".
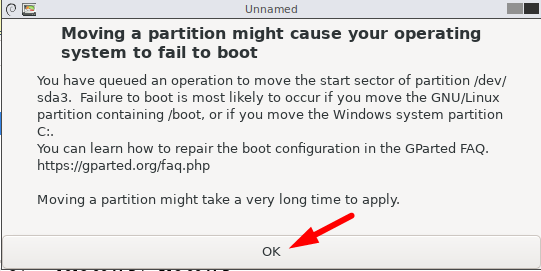
A warning message will prompt, showing that your system might fail to boot after moving the partition. Hit "OK" to continue.
A new unallocated partition will be created right next to the boot partition.

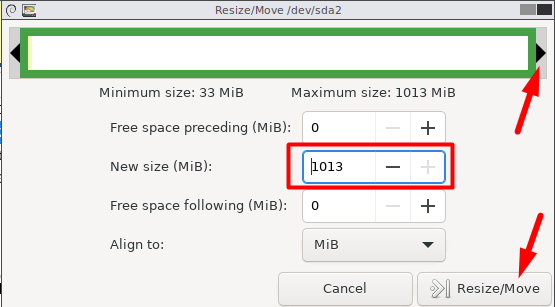
Next, you have the option to resize the boot partition by allocating the unallocated space. Simply right-click on the boot partition and choose the "Resize/Move" option. In the dialog box, drag the right edge of the partition to extend it and fill the unallocated space. Finally, click "Resize/Move" to apply the changes.
Save your change by clicking the green checkmark icon and selecting "Apply" from the new menu.
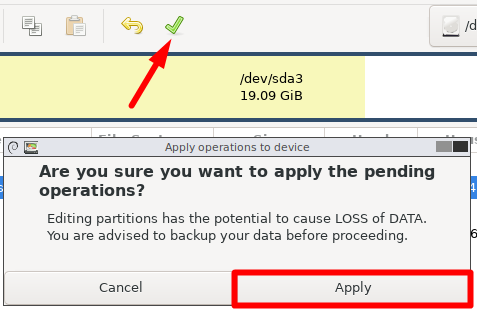
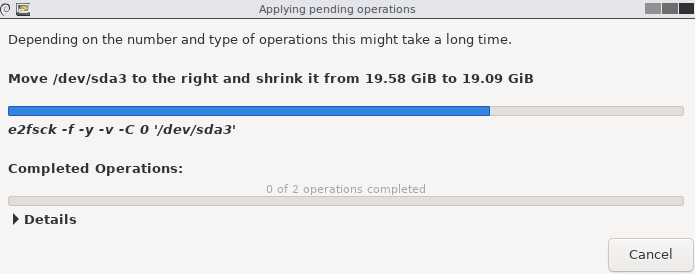
Now wait for the operation to complete. GParted will shrink the dev/sda3 partition by 500 MiB and allocate this to the boot partition.
When the boot partition is resized, a completed operation message will appear.
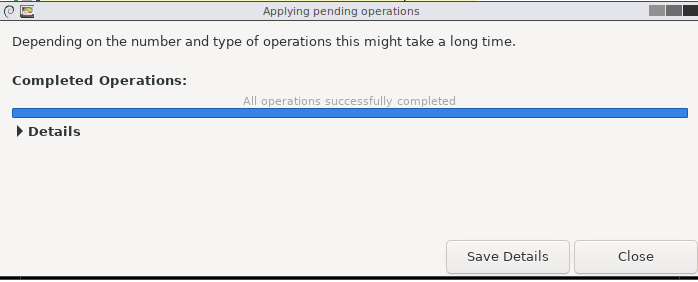
You can verify the new boot partition size from GParted.

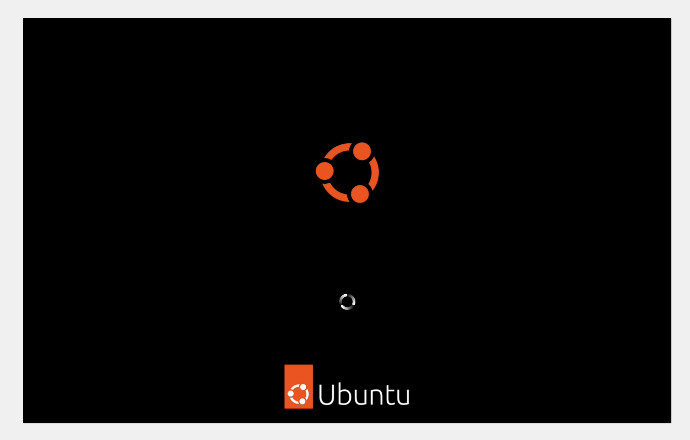
Reboot your Ubuntu system. Make sure you select the default Ubuntu system as your boot option. For virtual machines, boot from the default Ubuntu virtual machine.
After rebooting, run the command df -h to confirm the new size of the boot partition. In our example, the boot partition has been expanded from 500 MiB to 1011 MiB.
Actively Manage Linux Partitions
Linux partitions serve as designated areas on a disk where the Linux operating system stores essential files and data. To prevent encountering the bothersome "disk full error" on your system, it is advisable to proactively manage your Linux partitions. Active partition management involves ensuring your system is consistently updated, regularly eliminating outdated kernels, and diligently monitoring disk space utilization.
Similar to the GParted tool, the fdisk command offers the ability to actively manage Linux partitions. With fdisk, you gain precise control over disk partitions, allowing you to observe existing partitions, create new ones, and specify their file system types. Additionally, you can modify partition attributes and efficiently handle the disk drive layout.


